WITH THE NEW PATHING, THIS GUIDE IS NOW OBSOLETE
AN UPDATED GUIDE FOR THE NEW PATHING CAN BE FOUND HERE.
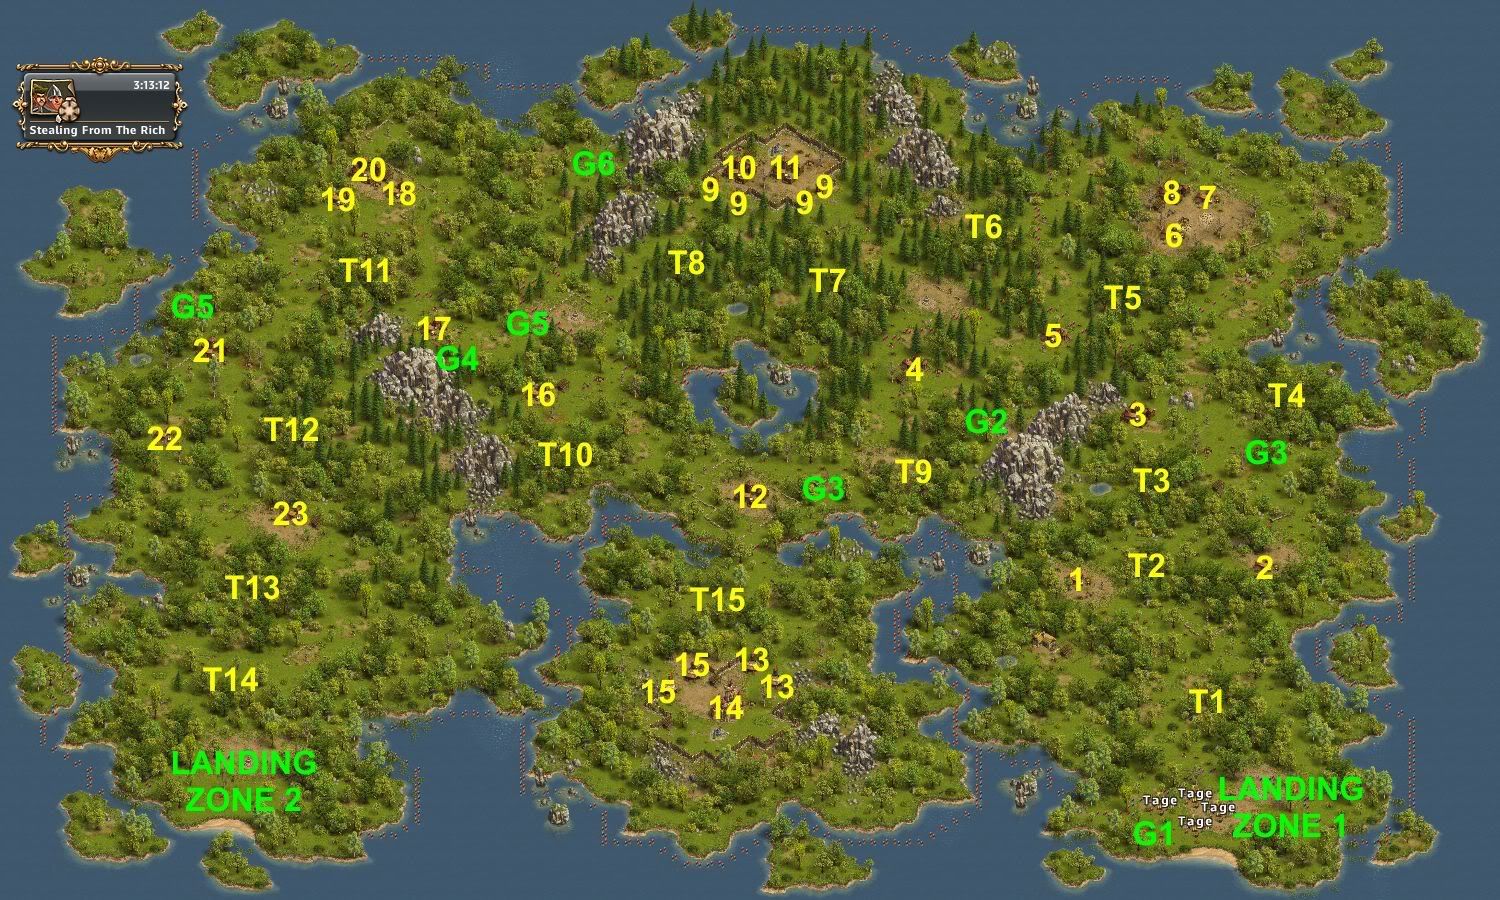
Stealing from the Rich
Veteran General and Round Blocks
Adventure Info:
Player Level: 26+
Difficulty: 4/10
Number of Players: 2
Duration: 4 days
Where to get?: Adventure seek with Explorer or Trader (Shop) for 195 gems


Only one version is presented below, and it is based on a single player doing everything in this 2-player adventure.
You need at least 3 generals:- Two NORMAL generals.
- One VETERAN general.
You need to send troops 5-6 times.
This guide includes two round blocks of method 2.
Units needed and lost:- Units needed, average: 652R 168S 230C (1050 units)
- Units needed, maximum: 720R 168S 230C (1118 units)
- Units lost, minimum: 448R
- Units lost, average: 637R
- Units lost, maximum: 720R
Game flow, garrison settings and losses (minimum - average - maximum):
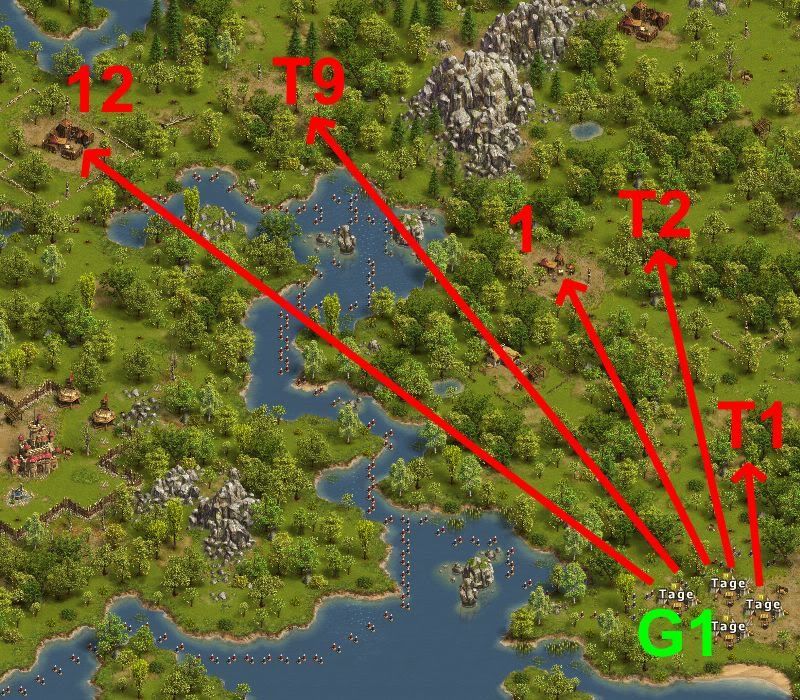
 Garrison Position G1
If you have more than 3 generals, a few have probably arrived in landing zone 2.
In that case, move all those generals to landing zone 1 (garrison position G1).
Trap T1) 40 Wolves
ANY general: [1R 39S (1R)]
Trap T2) 100 Wolves
ANY general: [5R 99S (5R)]
Camp 1) 30 Recruit Deserters, 40 Bowman Deserters
ANY general: [1S 199C (-)]
Trap T9) 40 Wolves
ANY general: [1R 39S (1R)]
Camp 12) 20 Elite Soldier Deserters, 20 Crossbowman Deserters, 20 Cannoneer Deserters, 1 Sir Robin
VETERAN general: [82R 168S (46R - 74R - 82R)]
Garrison Position G2
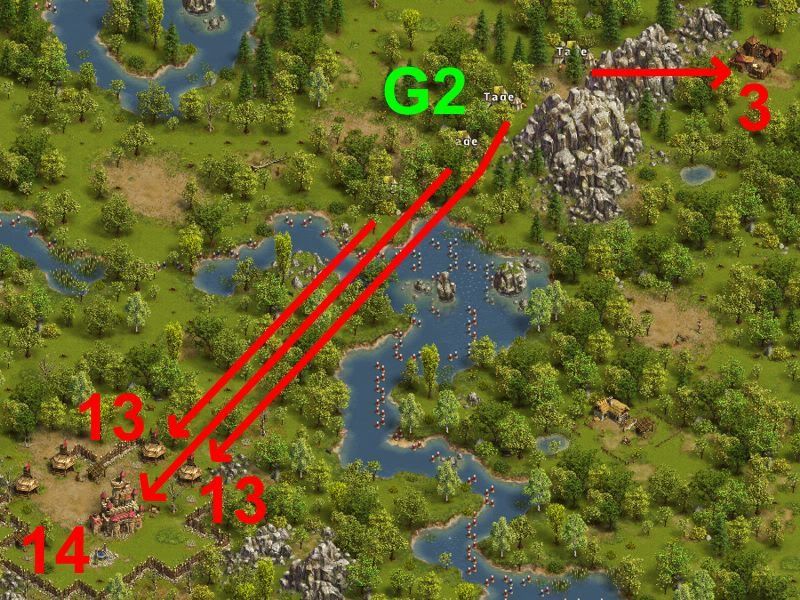
Move at least one veteran general to garrison position G2.
Do not move your generals any further to the west (left) than shown on the image above.
Otherwise they might be intercepted by trap T15.
Tower 13) 15 Longbowman Deserters
ANY general: [100C (-)]
Tower 13) 15 Longbowman Deserters
ANY general: [100C (-)]
Before attacking camp 14, make sure the towers (13) have been destroyed first.
Otherwise, if the right-most tower is still standing, the general going to camp 14 will be intercepted by tower 15.
Camp 14) 50 Soldier Deserters, 50 Cavalry Deserters, 50 Longbowman Deserters, 1 Big Bertha
VETERAN general: [140R 110S (100R - 124R - 140R)]
Camp 3) 65 Recruit Deserters, 85 Bowman Deserters
VETERAN general: [19R 1S 230C (14R - 17R - 19R)]
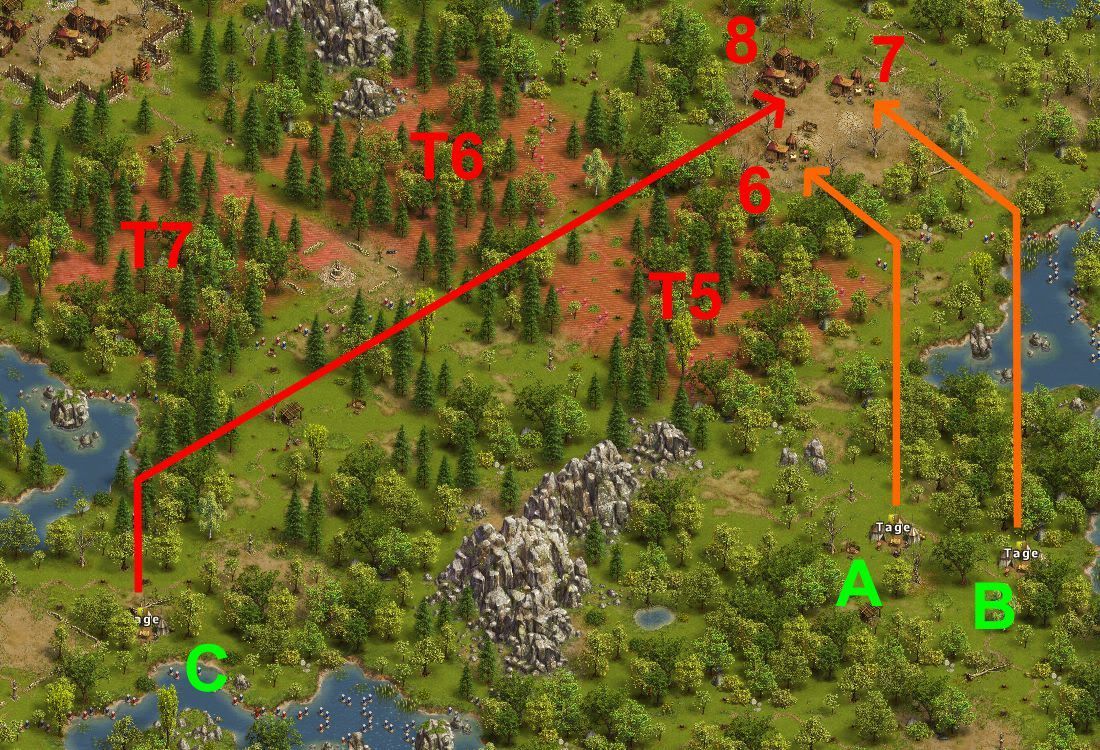
Garrison Position G3
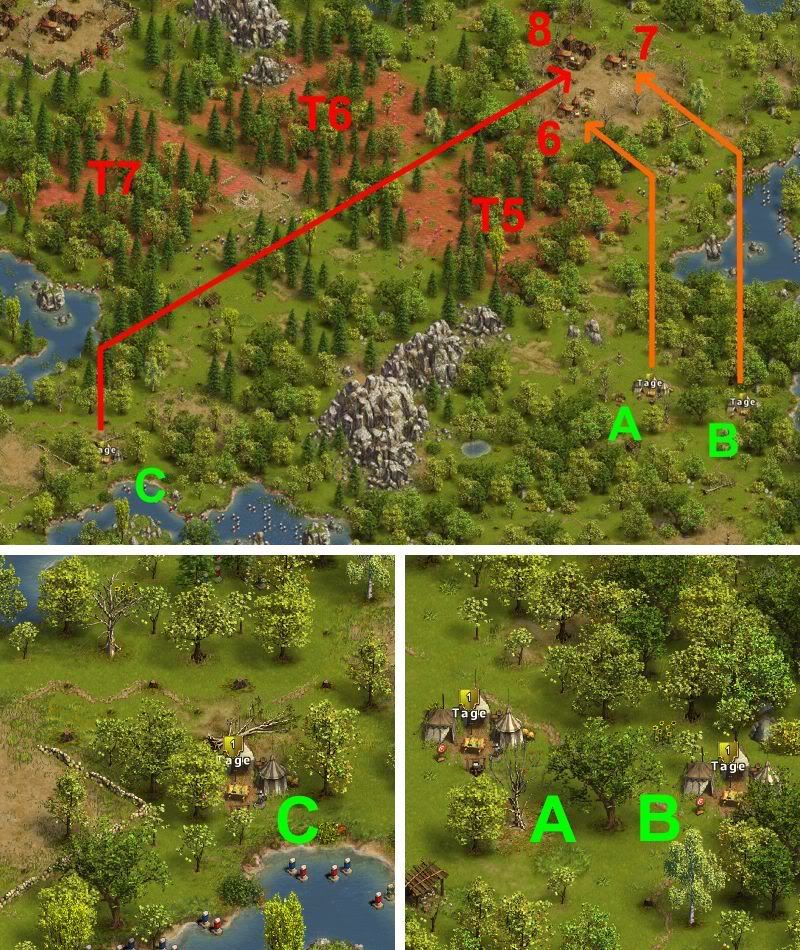
Move one veteran general and two normal generals to garrison position G3:- Position A: Normal general
- Position B: Normal general
- Position C: Veteran general
Send all three generals after each other in this order (as soon as you can):
From A to Camp 6) 60 Militia Deserters, 20 Longbowman Deserters
BLOCKING NORMAL general: [136C (-)] {5 - 7.5 - 10 rounds of fighting}
From B to Camp 7) 40 Militia Deserters, 40 Longbowman Deserters
BLOCKING NORMAL general: [4R 94C (-)] {5 - 7.4 - 9 rounds of fighting}
From C to Camp 8) 40 Militia Deserters, 40 Cavalry Deserters, 1 Sir Robin
VETERAN general: [86R 164S (48R - 75R - 86R)] {3 rounds of fighting}
Garrison Position G4
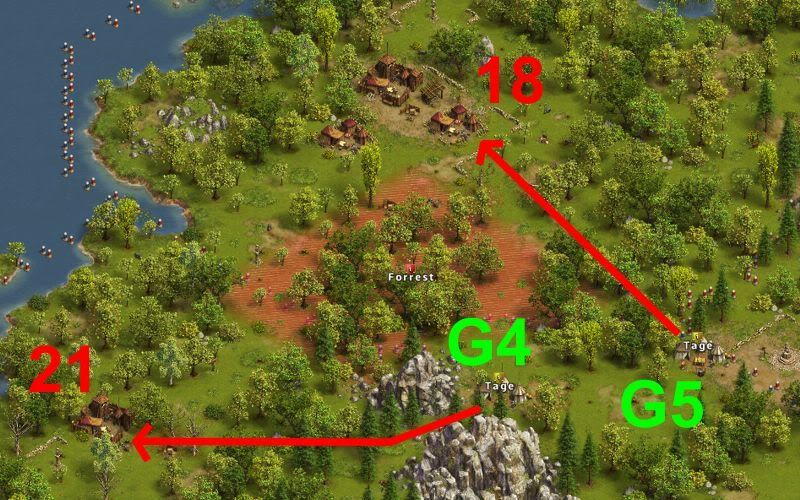
Move your veteran general to garrison position G4.
Camp 21) 85 Recruit Deserters, 65 Bowman Deserters
VETERAN general: [27R 1S 222C (21R - 25R - 27R)]
Move your veteran general to garrison position G5.
Camp 18) 20 Militia Deserters, 60 Longbowman Deserters
VETERAN general: [1S 230C (-)]
Garrison Position G5
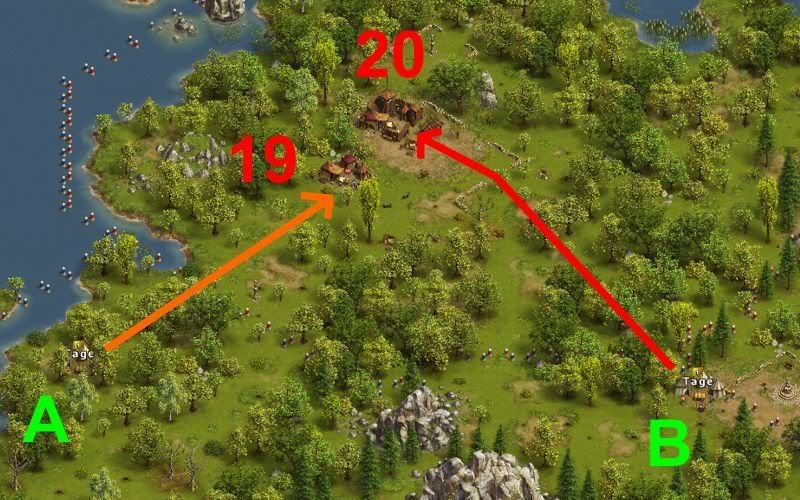
Move one normal general to the western garrison position G5, so that you now have:- Position A: Normal general
- Position B: Veteran general
Send both generals after each other in this order (as soon as you can, but no more than 10 seconds between them):
From A to Camp 19) 40 Militia Deserters, 40 Longbowman Deserters
BLOCKING NORMAL general: [4R 94C (-)] {5 - 7.4 - 9 rounds of fighting}
From B to Camp 20) 40 Militia Deserters, 40 Longbowman Deserters, 1 Sir Robin
VETERAN general: [110R 140S (68R - 96R - 110R)] {3 rounds of fighting}
Garrison Position G6
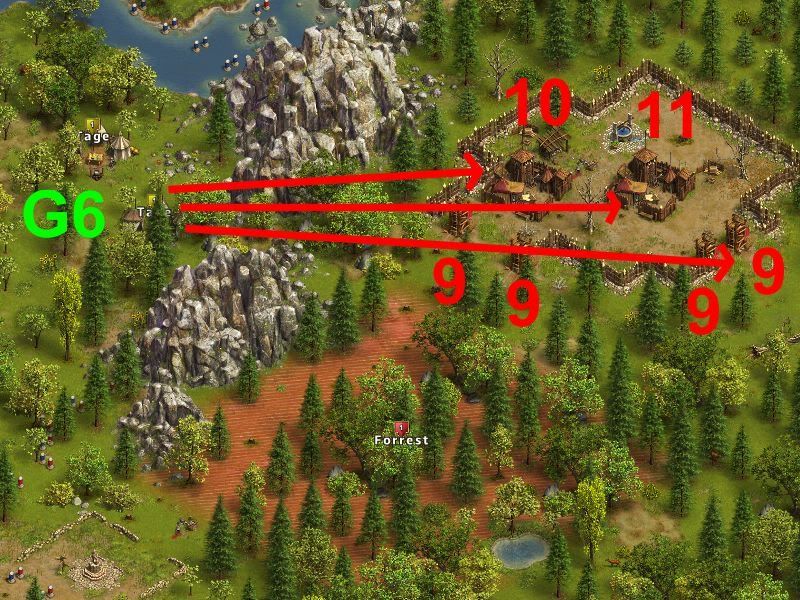
Move at least your veteran general to garrison position G6.
Do not attack from anywhere further south than the two garrisons shown in the image above.
In that case your general would be intercepted by 160 wolves hiding in the forest (trap T8).
To kill the towers (camps 9), send your general to the last one and he will be intercepted and kill all four of them.
The last (eastern-most) tower 9 can be left to a lootspot buyer.
In that case, do make sure the lootspot buyer gets to destroy that tower completely, before you yourself destroy the final camp 11.
Otherwise, the sold lootspot will be lost.
Also, make sure the lootspot buyer is moving his general to G6, and nowhere further south than the garrisons shown above.
Wolf traps T6, T7 and T8 are still blocking the entrance from all other directions.
Tower 9) 30 Longbowman Deserters
ANY general: [100C (-)]
Tower 9) 30 Longbowman Deserters
ANY general: [100C (-)]
Tower 9) 30 Longbowman Deserters
ANY general: [100C (-)]
Tower 9) 30 Longbowman Deserters
ANY general: [100C (-)]
Camp 10) 30 Soldier Deserters, 30 Cavalry Deserters, 40 Longbowman Deserters, 1 Sir Robin
VETERAN general: [109R 141S (64R - 95R - 109R)]
Camp 11) 50 Soldier Deserters, 50 Longbowman Deserters, 1 Sir Robin
VETERAN general: [140R 110S (80R - 124R - 140R)]
All garrison setups where recruits and soldiers are included have a very small chance of one or a few soldiers being killed.
I prefer having it so tight, that in most cases that one soldier survives and actually saves one recruit by taking the last hits in the battle.
That being said, be prepared to lose the odd soldier(s) after playing the same adventure hundreds of times...


Originally Posted by MOD_Wetterd


 Posting Permissions


 Reply With Quote