The Invasion of the Nords
I do apologize in advance; the ideal guide in my opinion is very much like Tage's. What I do here is just try to mimic his style and what not; but lacking patience, this is going to be somewhat simplistic.
Naturally, quite a few things will look surprisingly similar to the EXiNX Guide from Killste's Awesome Adventure Guides.
My first objective was to restrict losses to recruits and bowmen only. Unfortunately, due to the unpredictable behaviour of the interception queue I was unable to get the two wave assault on the final camp work. I hope they'll make the aforementioned mechanics consistent; then I'll happily update this guide.
For those who prefer one-wave attacks, militia-based troops are given.
Notation:
R - Recruit, E - Elite, C - Cavalry, B - Bowman, A - Crossbowman, [B]G[/G] - General.
JoW - JomViking, HK - HouseCarl, Kar - Karl, Th - Thrall, WK - Valkyrie, Ber - Berzerk, WO - Grey Wolf.
Major and veteran, two-wave version:
Troops required: 532R 58M 237E 333C 431B 211A.
Max* troops lost: 532R 58M 431B.
Major and veteran, one-wave version:
Troops required: 366R 261M 237E 333C 211A.
Max* troops lost: 366R 261M.
Two veterans, two-wave version:
Troops requires: 552R 54M 10S 237E 308C 660B 185A.
Max* troops lost: 552R 54M 10S 660B.
Two veterans, one-wave version:
Troops requires: 192R 394M 10S 237E 308C 185A.
Max* troops lost: 192R 394M 10S.
* Empirical, based on 100000 simulations.
And now the guide itself.

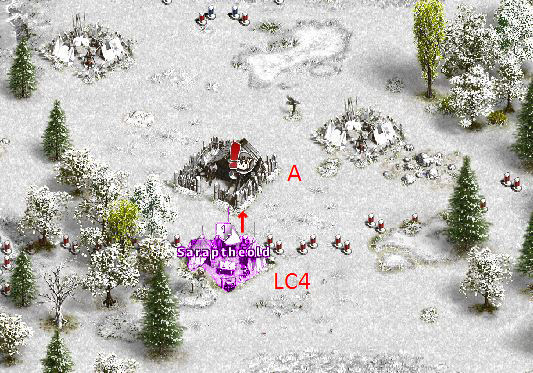
~~~ Landing Zone 2 ~~~

Attack L2 in two waves.
If you have a Veteran general:
From A to Camp L2) 140JoW 60Kar
Any general: [145B 1G (145B 1G)]
From B to Camp L2) 108JoW 60Kar
Veteran general: [92R 1E 157A 1G (92R)]
If you have a Major general:
From A to Camp L2) 140JoW 60Kar
Any general: [103B 1G (103B 1G)]
From B to Camp L2) 117JoW 60Kar
Major general: [92R 1E 177A 1G (92R)]
If you want to make it in one wave:
From A to Camp L2) 140JoW 60Kar
Veteran general: [30R 112M 1E 107A 1G (30R 112M)]
Major general: [86R 49M 1E 134A 1G (86R 49M)]
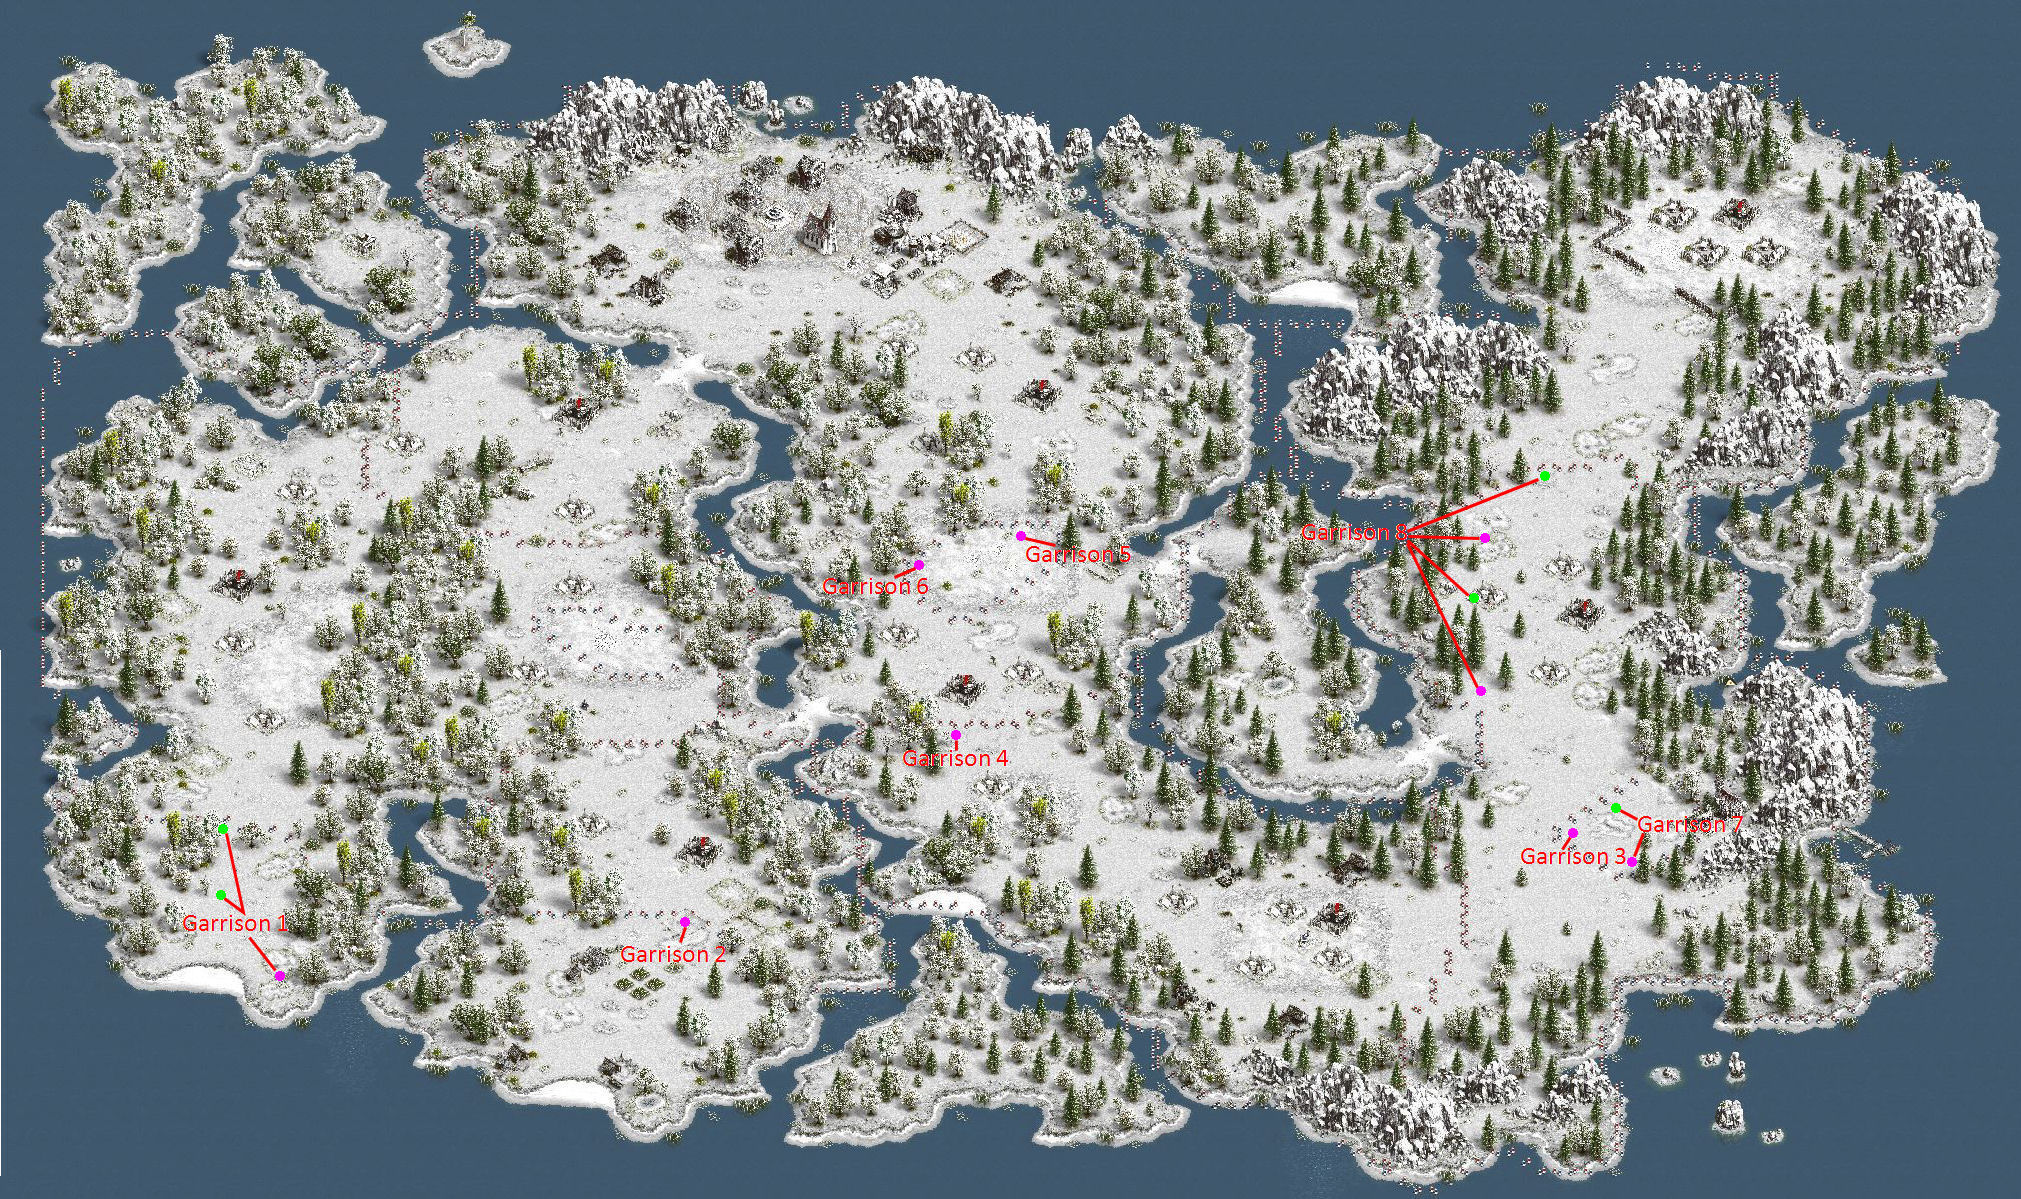
~~~ Garrison position G1 ~~~
From these positions, send your generals right after each other:

From A to Trap T1) 200WO
BLOCKING Normal general: [32E 1G (-)]
From B to Camp 1) 150Kar 50WK
BLOCKING Normal general: [82E 118C 1G (-)]
From C to Camp 2) 80Kar 120WK
BLOCKING Normal general: [122E 1G (-)]
From D to Camp L1) 40Kar 160WK
Veteran general: [14R 1E 190C 45A 1G (14R)]
Major general: [1E 215C 54A 1G (-)]
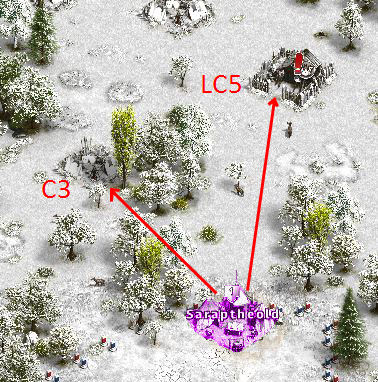
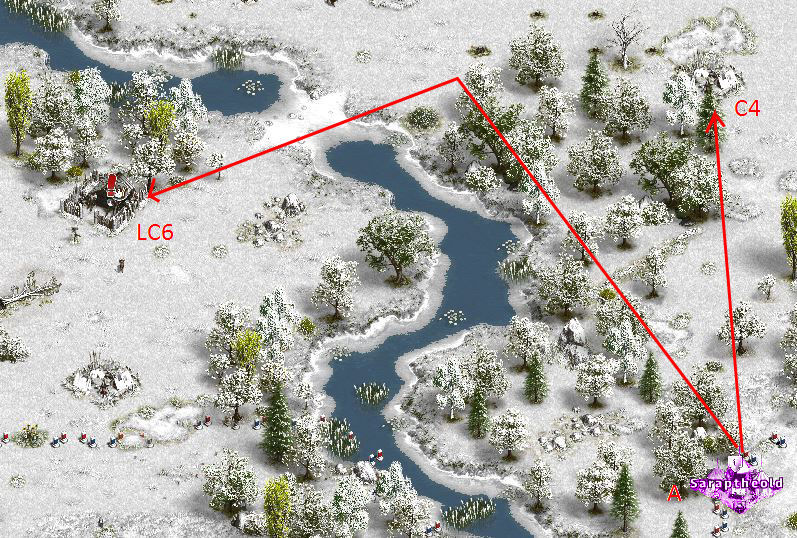
~~~ Garrison position G2 ~~~

Each of these two leader camp is killed in two waves, independently; for leader camp L4 use either position B, or any of the positions in Landing 2. The sector has three leaders, so in order to be able to do block on the third one we need to eliminate these two first.
Note: L4 can also be targeted directly from position D in the previous block (G1).
Attack L5 in two waves.
If you have a Veteran general:
From A to Camp L5) 60JoW 80HK 60Kar
Any general: [145B 1G (145B 1G)]
From A to Camp L5) 28JoW 80HK 60Kar
Veteran general: [91R 1E 158A 1G (91R)]
If you have a Major general:
From A to Camp L5) 60JoW 80HK 60Kar
Any general: [108B 1G (108B 1G)]
From A to Camp L5) 36JoW 80HK 60Kar
Major general: [92R 1E 177A 1G (92R)]
If you want to make it in one wave:
From A to Camp L5) 60JoW 80HK 60Kar
Veteran general: [5R 64M 1E 180A 1G (5R 64M)]
Major general: [36R 36M 1E 197A 1G (36R 36M)]
Attack L4 in two waves.
If you have a Veteran general:
From B to Camp L4) 40JoW 120HK 40WK
Any general: [152B 1G (152B 1G)]
From B to Camp L4) 6JoW 120HK 40WK
Veteran general: [71R 1E 46C 132A 1G (71R)]
If you have a Major general:
From B to Camp L4) 40JoW 120HK 40WK
Any general: [99B 1G (99B 1G)]
From B to Camp L4) 18JoW 120HK 40WK
Major general: [71R 1E 42C 156A 1G (71R)]
If you want to make it in one wave:
From B to Camp L4) 40JoW 120HK 40WK
Veteran general: [57M 1E 28C 164A 1G (57M)]
Major general: [22R 34M 1E 29C 184A 1G (22R 34M)]
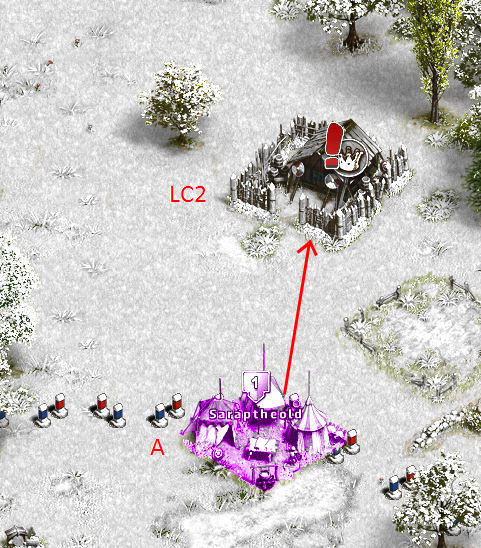
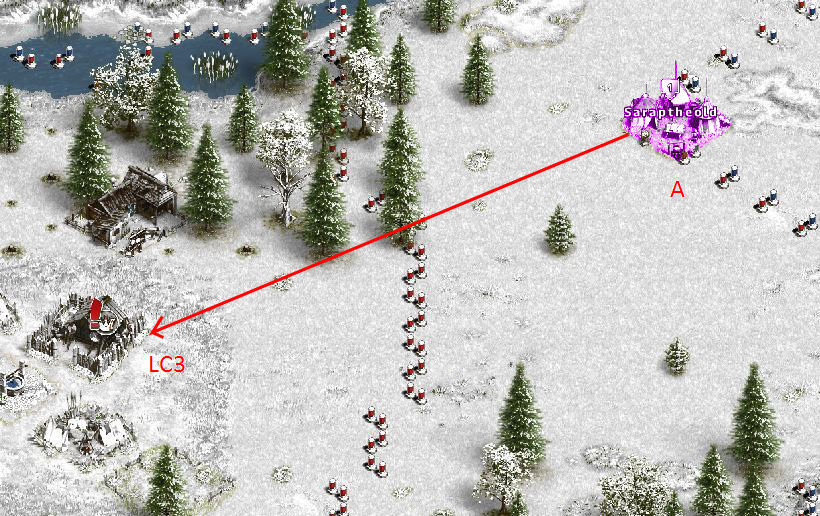
~~~ Garrison position G3 ~~~
From these positions, send your generals right after each other (position C is for non-Major version):

Note: the zones are bugged -- you can get intercepted even on your own territory! The provided positioning accounts for that bug.
From A to Camp 3) 80HK 80Th 50WK
BLOCKING Normal general: [161E 1G (-)]
From B to Camp L3) 85HK 80WK 35Ber
Major general: [75R 1E 72C 122A 1G (75R)]
Veteran general: [73R 10M 1E 60C 106A 1G (73R 10M)]
If you do not have a Major general or do not want to lose militia, send two waves:
From B to Camp L3) 85HK 80WK 35Ber
Any general: [19B 1G (19B 1G)]
From C to Camp L3) 81HK 80WK 35Ber
Veteran general: [85R 1E 61C 103A 1G (85R)]
~~~ Garrison Position G4 ~~~
Move your generals to these positions:

If you plan to use one-wave attacks (losing militia), you can ignore positions C and D; then A is a normal general, and B is your best general.
Otherwise A is a normal general, B and C -- any generals, D -- your best general.

Attack L6 in two waves.
If you have a Veteran general:
From C to Camp L6) 40JoW 80HK 60WK 20Ber
Any general: [86B 1G (86B 1G)]
From D to Camp L6) 21JoW 80HK 60WK 20Ber
Veteran general: [76R 1E 52C 121A 1G (76R)]
If you have a Major general:
From C to Camp L6) 40JoW 80HK 60WK 20Ber
Any general: [8B 1G (8B 1G)]
From D to Camp L6) 38JoW 80HK 60WK 20Ber
Major general: [91R 1E 40C 138A 1G (91R)]
If you want to make it in one wave:
From B to Camp L6) 40JoW 80HK 60WK 20Ber
Veteran general: [33R 41M 1E 42C 133A 1G (33R 41MR)]
Major general: [78R 10M 1E 42C 139A 1G (78R 10M)]

From these positions, send your generals right after each other:
From A to Camp 4) 120HK 80Kar
BLOCKING Normal general: [193E 1G (-)]
From B to Camp L7) 70JoW 50HK 50Kar 30Ber
Any general: [113B 1G (113B 1G)]
From D to Camp L7) 45JoW 50HK 50Kar 30Ber
Veteran general: [98R 1E 151A 1G (98R)]
Major general: [86R 1E 183A 1G (86R)]
If you want to make it in one wave:
From A to Camp 4) 120HK 80Kar
BLOCKING Normal general: [193E 1G (-)]
From B to Camp L7) 70JoW 50HK 50Kar 30Ber
Veteran general: [12R 56M 1E 181A 1G (12R 56M)]
Major general: [69R 36M 1E 164A 1G (69R 36M)]
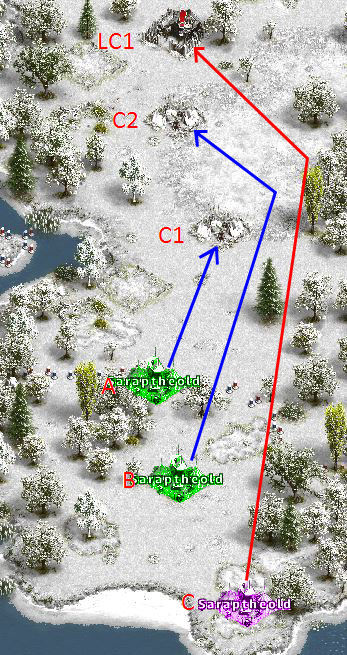
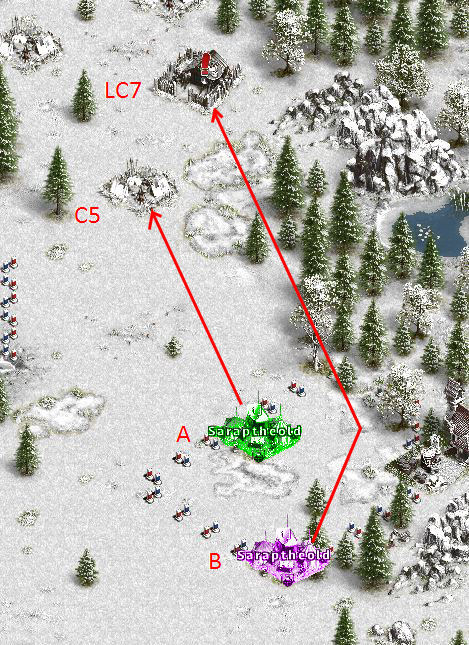
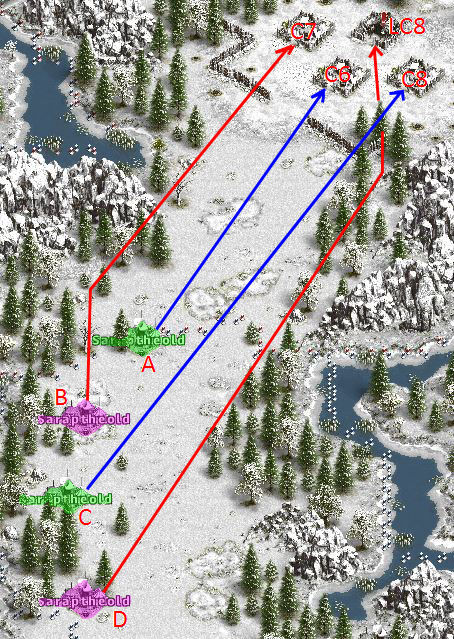
~~~ Garrison Position G5 ~~~
Move your generals to these positions:

Ignore position D until developers fix the erratic behaviour of queue unqinding for intercepted generals.

From these positions, send your generals right after each other. We want C to be intercepted by camp 6!
From A to Camp 5) 200HK
BLOCKING Normal general: [200E 1G (-)]
From B to Camp 6) 200WK
Battle hardened general: [97R 1E 102C 1G (97R)]
Battle hardened general: [38M 1E 161C 1G (38M)]
Veteran general: [25R 1E 224C 1G (25R)]
From C to Camp L8) 60JoW 80HK 60Ber (will be intercepted by camp 6, but it's intentional)
Veteran general: [54M 10S 1E 185A 1G (54M 10S)]
Major general: [58M 1E 211A 1G (58M)]
The timing is as follows:
1) When general A reaches camp #5, general B is at the border of 5's influence zone. It takes 10 flags to reach camp #6 from that position -- the marching will take approximately 34 seconds.
2) The fighting at camp #6 takes 40 seconds (with a fast general).
3) From camp #6 it takes 7 flags to reach camp L8 -- the marching will take approximately 24 seconds.
4) Finally, it takes at most 50 seconds with a veteran (or forty, if you have a major general) to defeat camp L8.
Overall, from the moment the block on camp #5 starts till the moment when camp L8 is defeated it takes approximately 150 seconds.
The block on camp #5 lasts at least 200 seconds with (empirical) probability 99.99% (or 180 seconds with empirical probability < 0.01%).
It becomes risky if you have a normal general for Valkyries (camp #6), and that is why I do not give this option at all.
That's it for now. Details on blocks, time margins and what not are coming later.
Please let me know if I didn't make something clear, or said something foolish, or if you want to get more information of any kind.
Cheers!


not following the idea
Originally Posted by Stylopora

")


did you know you can skip camp 1,3,7,9 just walk by them (lol

 Posting Permissions
 Reply With Quote