The Black Knights adventure is hard to find and expensive to buy, but play it if you get the chance.
Losses are lower than with Victor the Vicious, but both the loot and the XP are better.
There are already several BK guides availble, so I cannot claim this is all mine.
Most notable, the first double block is almost the same as Tibster's version in flaxarn's guide.
I also couldn't avoid noticing that Martonus recently posted a BK guide for cannoneers where camps 5 and 14 are blocked in front of the castles. I was already working on those blocks, but can thus not claim it was my idea...
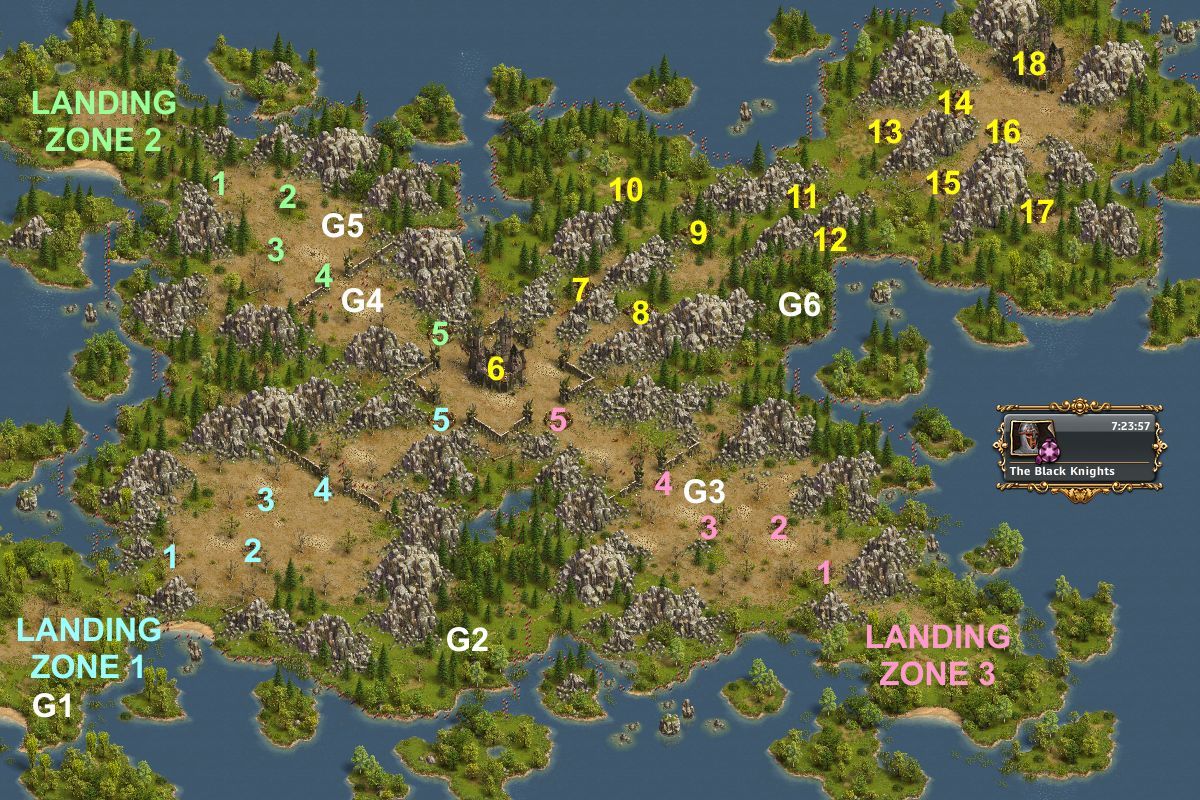
The Black Knights
Veteran or Battle Hardened General and Round Blocks
Average Losses (veteran with crossbows): 1183R
Average Losses (veteran with cannons): 881R
Adventure Info:
Player Level: 42+
Difficulty: 9/10
Number of Players: 3
Duration: 8 days
Where to get?: Adventure seek with Explorer or Trader (Shop) for 300 map fragments or 495 gems

This guide contains several versions, and they are all based on one player doing everything in this 3-player adventure.
You're free to invite friends right from the start, and choose different solutions on different camps, depending on what troops you all possess.
If you play it alone, you need to send troops 7-8 times.
A suggestion for the lootspots is presented further down.
Eight versions are listed here with the following needed generals and needed/lost troops:
One
BATTLE HARDENED general with Longbows
One
ANY general (battle hardened better than normal)
Two
NORMAL generals using two round blocks
- Units needed, average: 1297R 176M 154S 203C 59LB (1889 units)
- Units needed, maximum: 1355R 189M 154S 203C 59LB (1960 units)
- Units lost, minimum: 1152R 187M
- Units lost, average: 1275R 210M
- Units lost, maximum: 1355R 231M 12S 15C
One
BATTLE HARDENED general with Crossbows and Soldiers
One
ANY general (battle hardened better than normal)
Two
NORMAL generals using two round blocks
- Units needed, average: 1227R 176M 154S 199C 63XB (1819 units)
- Units needed, maximum: 1300R 193M 154S 199C 63XB (1909 units)
- Units lost, minimum: 1082R 159M
- Units lost, average: 1205R 176M
- Units lost, maximum: 1300R 193M 12S 5C
One
BATTLE HARDENED general with Crossbows and Elite Soldiers
One
ANY general (battle hardened better than normal)
Two
NORMAL generals using two round blocks
- Units needed, average: 1225R 176M 42S 110E 221C 63XB (1837 units)
- Units needed, maximum: 1299R 193M 42S 110E 221C 63XB (1928 units)
- Units lost, minimum: 1087R 159M
- Units lost, average: 1203R 176M
- Units lost, maximum: 1299R 193M 10S 5C
One
BATTLE HARDENED general with Cannoneers
Two
NORMAL generals using three round blocks
- Units needed, average: 866R 202M 43S 110E 237C 105K (1563 units)
- Units needed, maximum: 916R 221M 43S 110E 237C 105K (1632 units)
- Units lost, minimum: 779R 164M
- Units lost, average: 862R 194M
- Units lost, maximum: 916R 221M 18S 4C
One
VETERAN general with Longbows
One
ANY general (battle hardened better than normal)
Two
NORMAL generals using two round blocks
- Units needed, average: 1252R 19M 154S 199C 114LB (1738 units)
- Units needed, maximum: 1314R 19M 154S 199C 114LB (1800 units)
- Units lost, minimum: 1095R
- Units lost, average: 1241R 1S
- Units lost, maximum: 1314R 22S 1C
One
VETERAN general with Crossbows and Soldiers
One
ANY general (battle hardened better than normal)
Two
NORMAL generals using two round blocks
- Units needed, average: 1198R 19M 154S 208C 117XB (1696 units)
- Units needed, maximum: 1257R 32M 154S 208C 117XB (1768 units)
- Units lost, minimum: 1042R
- Units lost, average: 1187R 1S
- Units lost, maximum: 1257R 22S 8C
One
VETERAN general with Crossbows and Elite Soldiers
One
ANY general (battle hardened better than normal)
Two
NORMAL generals using two round blocks
- Units needed, average: 1196R 42S 130E 230C 117XB (1715 units)
- Units needed, maximum: 1267R 81M 43S 130E 230C 117XB (1868 units)
- Units lost, minimum: 1042R
- Units lost, average: 1183R
- Units lost, maximum: 1267R 11S 4E 8C
One
VETERAN general with Cannoneers
Two
NORMAL generals using four round blocks
- Units needed, average: 889R 10M 43S 130E 190C 117XB 127K (1506 units)
- Units needed, maximum: 960R 10M 46S 130E 190C 117XB 127K (1580 units)
- Units lost, minimum: 777R
- Units lost, average: 881R
- Units lost, maximum: 960R 5M 8S 8C
This guide includes four round blocks of
method 2. Two of them are optional, and only if you have cannoneers.
Game flow, garrison settings and losses (minimum - average - maximum):
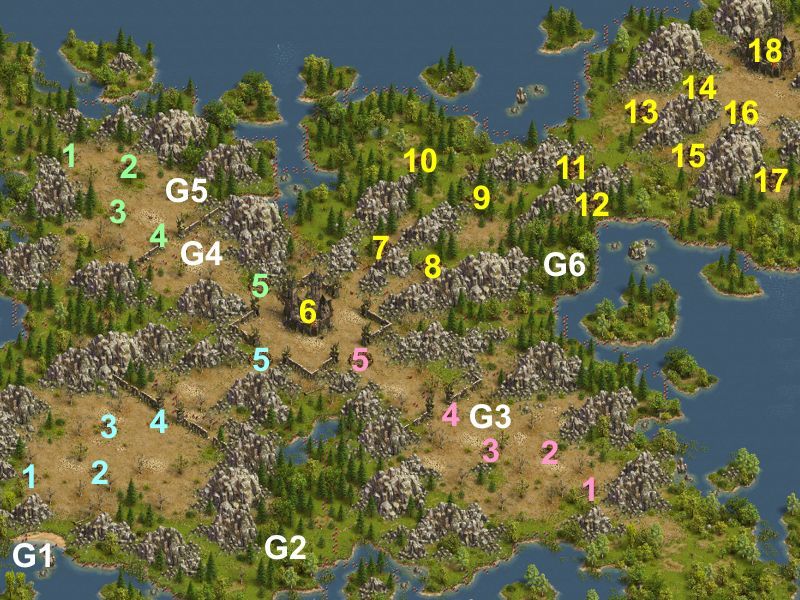
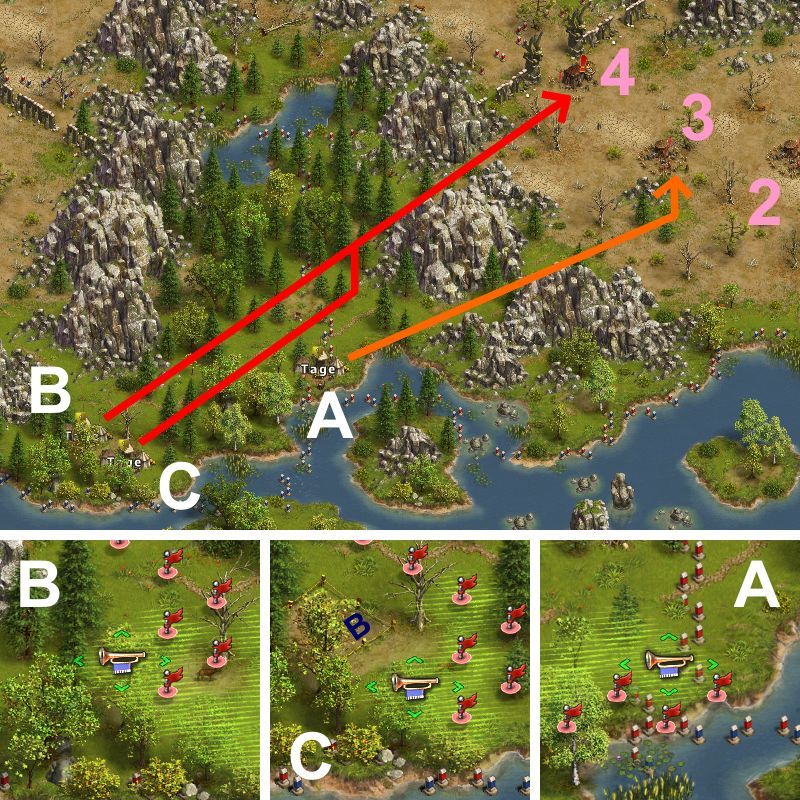
 Garrison Position G1 (BLOCK)
Rearrange your generals in the landing zone accoring to garrison position G1:
Garrison Position G1 (BLOCK)
Rearrange your generals in the landing zone accoring to garrison position G1:- Position A: NORMAL general
- Position B: NORMAL general
- Position C: BATTLE HARDENED general or ANY general
- Position D: VETERAN general or BATTLE HARDENED general
Send your two blocking normal generals right after each other:
From A to
Camp 2) 100 Soldier Deserters, 100 Bowman Deserters
BLOCKING NORMAL general:
[61S 128C (-)] {
180 - 300 seconds of fighting, <0.1% chance of 160 seconds}
BLOCKING NORMAL general:
[1R 47E 150C (-)] {
180 - 300 seconds of fighting}
Note that general B must be sent to camp
4, and will be intercepted by camp
3:
From B to
Camp 4) 100 Militia Deserters, 100 Cavalry Deserters (Camp
3)
BLOCKING NORMAL general:
[11R 19M 91S (-)] {
180 - 340 seconds of fighting, 0.1% chance of 160 seconds}
BLOCKING NORMAL general:
[41S 62E (-)] {
200 - 380 seconds of fighting, 0.2% chance of 180 seconds}
Now, wait till general B has reached the indicated spot next to garrison A, before sending off general C.
If you have a veteran general with cannoneers, camp
4 may be killed in one wave:
From C to
Camp 4) 60 Elite Soldier Deserters, 60 Cavalry Deserters, 60 Longbowman Deserters, 10 Cannoneer Deserters
VETERAN general:
[120R 2S 1E 127K (99R - 110R - 120R 2S)] {30-40 seconds of fighting}
MASTER of Martial Arts:
[109R 1E 110K (85R - 98R - 108R)] {30 seconds of fighting}
If you do not have enough cannoneers, camp
4 must be killed in two waves.
Send general D right after general C.
If you have a
BATTLE HARDENED general with Longbows:
From C to
Camp 4) 60 Elite Soldier Deserters, 60 Cavalry Deserters, 60 Longbowman Deserters, 10 Cannoneer Deserters
BATTLE HARDENED general or
ANY general:
[96R (96R)] {10 or 20 seconds of fighting}
From D to
Camp 4) 53-55 Elite Soldier Deserters, 60 Longbowman Deserters, 10 Cannoneer Deserters
BATTLE HARDENED general:
[74R 2S 75C 49LB (55R - 65R - 74R 1S)] {40 seconds of fighting}
In all other cases:
From C to
Camp 4) 60 Elite Soldier Deserters, 60 Cavalry Deserters, 60 Longbowman Deserters, 10 Cannoneer Deserters
BATTLE HARDENED general or
ANY general:
[72R (72R)] {10 or 20 seconds of fighting}
From D to
Camp 4) 59-60 Elite Soldier Deserters, 60 Longbowman Deserters, 10 Cannoneer Deserters
BATTLE HARDENED general:
[80R 2S 71C 47XB (57R - 70R - 80R 1S)] {40 seconds of fighting}
BATTLE HARDENED general:
[62R 2S 87C 49K (43R - 54R - 63R 2S)] {40 seconds of fighting}
VETERAN general:
[63R 2S 71C 114LB (37R - 51R - 63 1S)] {30-40 seconds of fighting}
VETERAN general:
[51R 2S 80C 117XB (37R - 46R - 51R 1S)] {30 seconds of fighting}
The marching time for general C, from the moment general A starts his battle, till the moment general C starts his battle, is about 70 seconds plus the time it takes to send off generals B and C, some 5 seconds each. The maximum time needed to kill camp 4, from the moment the block on camp 2 starts to fight, is thus 70+10+20+40 = 140 seconds. The first block always lasts at least 160 seconds.
NB!
From here on, there is a much safer way to go, by moving north rather than south.
Please check borome's post here till I get a chance to play this again and update my guide.
Garrison Position G2 (BLOCK)
Move your generals to garrison position G2:- Position A: NORMAL general
- Position B: BATTLE HARDENED general or ANY general
- Position C: VETERAN general or BATTLE HARDENED general
Send all generals right after each other:
From A to
Camp 3) 100 Militia Deserters, 100 Cavalry Deserters
BLOCKING NORMAL general:
[11R 19M 91S (-)] {
180 - 340 seconds of fighting, 0.1% chance of 160 seconds}
BLOCKING NORMAL general:
[41S 62E (-)] {
200 - 380 seconds of fighting, 0.2% chance of 180 seconds}
If you have a veteran general with cannoneers, camp
4 may be killed in one wave:
From B to
Camp 4) 60 Elite Soldier Deserters, 60 Cavalry Deserters, 60 Longbowman Deserters, 10 Cannoneer Deserters
VETERAN general:
[120R 2S 1E 127K (99R - 110R - 120R 2S)] {30-40 seconds of fighting}
MASTER of Martial Arts:
[109R 1E 110K (85R - 98R - 108R)] {30 seconds of fighting}
If you do not have enough cannoneers, camp
4 must be killed in two waves.
Send general C right after general B.
If you have a
BATTLE HARDENED general with Longbows:
From B to
Camp 4) 60 Elite Soldier Deserters, 60 Cavalry Deserters, 60 Longbowman Deserters, 10 Cannoneer Deserters
BATTLE HARDENED general or
ANY general:
[96R (96R)] {10 or 20 seconds of fighting}
From C to
Camp 4) 53-55 Elite Soldier Deserters, 60 Longbowman Deserters, 10 Cannoneer Deserters
BATTLE HARDENED general:
[74R 2S 75C 49LB (55R - 65R - 74R 1S)] {40 seconds of fighting}
In all other cases:
From B to
Camp 4) 60 Elite Soldier Deserters, 60 Cavalry Deserters, 60 Longbowman Deserters, 10 Cannoneer Deserters
BATTLE HARDENED general or
ANY general:
[72R (72R)] {10 or 20 seconds of fighting}
From C to
Camp 4) 59-60 Elite Soldier Deserters, 60 Longbowman Deserters, 10 Cannoneer Deserters
BATTLE HARDENED general:
[80R 2S 71C 47XB (57R - 70R - 80R 1S)] {40 seconds of fighting}
BATTLE HARDENED general:
[62R 2S 87C 49K (43R - 54R - 63R 2S)] {40 seconds of fighting}
VETERAN general:
[63R 2S 71C 114LB (37R - 51R - 63 1S)] {30-40 seconds of fighting}
VETERAN general:
[51R 2S 80C 117XB (37R - 46R - 51R 1S)] {30 seconds of fighting}
Garrison Position G3 (OPTIONAL BLOCK)
Move your generals to garrison position G3:- Position A: NORMAL general
- Position B: VETERAN general or BATTLE HARDENED general
- Position C: VETERAN general (only for the brave hearted)
For most players, this block should not even be considered.
However, if you have enough cannoneers, do try the block.
Also, if you're brave and consider a risk of losing 6M 1S 190C acceptable, check the block (I am myself venturing doing it).
Otherwise, do move downwards a bit.
For the block, send the generals right after each other:
From A to
Camp 5) 60 Elite Soldier Deserters, 60 Crossbowman Deserters
BLOCKING NORMAL general:
[1R 6M 1S 190C (-)] {
200 - 300 seconds of fighting, 0.1% chance of 180 seconds}
From B to
Camp 6) 50 Cavalry Deserters, 50 Elite Soldier Deserters, 50 Crossbowman Deserters, 1 Sir Robin
BATTLE HARDENED general:
[5R 90M 105K (5R 63M - 5R 80M - 5R 90M)] {70-90 seconds of fighting}
VETERAN general:
[130R 4M 116K (100R - 123R - 130R 3M)] {70-90 seconds of fighting}
MASTER of Martial Arts:
[115R 1E 104K (78R - 104R - 115R)] {70 seconds of fighting}
The remaining marching time for general B, when general A starts his blocking attack, is just under 45 seconds.
Thus the battle for the castle needs 115-135 seconds, and the block lasts at least 180 seconds.
Now, if you do not have cannoneers, but if you consider yourself brave, you might want to try this block with recruits and soldiers too.
Without cannoneers, the fight for the castle may last up to 45+10+180 = 235 seconds, but in most cases the battle will last a maximum of 45+10+140 = 195 seconds (or 205 seconds with a normal general B).
Thus, 200 seconds is only barely enough for the block...
With a slightly modified block there is a 94% chance that the block will indeed last 220 seconds or longer. It's all up to you...
Further discussion about this block and whether it is worth trying, can be found
here.
 From A
 to
Camp 5) 60 Elite Soldier Deserters, 60 Crossbowman Deserters
BLOCKING NORMAL general:
[1R 7M 190C (-)] {
220 - 300 seconds of fighting, 5.7% chance of 200 seconds or less}
From B to
Camp 6) 50 Cavalry Deserters, 50 Elite Soldier Deserters, 50 Crossbowman Deserters, 1 Sir Robin
BATTLE HARDENED general or
ANY general:
[94R (94R)] {10 or 20 seconds of fighting}
From C to
Camp 6) 42-46 Elite Soldier Deserters, 50 Crossbowman Deserters, 1 Sir Robin
VETERAN general:
[125R 25M 100S (93R - 125R 8M - 125R 24M)] {130-160 seconds of fighting}
VETERAN general:
[150R 1S 99E (100R - 138R - 150R 1S 3E)] {130-140 seconds of fighting, small chance of up to 180 seconds}
VETERAN general:
[36R 74M 1S 139E (36R 34M - 36R 61M - 36R 72M)] {120-130 seconds of fighting}
Without blocking, attack camp
5 first:
From B to
Camp 5) 60 Elite Soldier Deserters, 60 Crossbowman Deserters
ANY general:
[63R 3S 74C 60LB (48R - 58R - 63R 2S)]
ANY general:
[63R 2S 74C 61XB (44R - 54R - 63R 1S)]
ANY general:
[51R 2S 102C 45K (36R - 45R - 51R 1S)]
VETERAN general:
[50R 2S 103C 95LB (35R - 45R - 50R 1S)]
VETERAN general:
[49R 2S 125C 74XB (35R - 44R - 49R 1S)]
If you do have cannoneers, kill camp 6 in one wave:
From B to
Camp 6) 50 Cavalry Deserters, 50 Elite Soldier Deserters, 50 Crossbowman Deserters, 1 Sir Robin
ANY general:
[5R 90M 105K (5R 63M - 5R 80M - 5R 90M)]
VETERAN general:
[130R 4M 116K (100R - 123R - 130R 3M)]
MASTER of Martial Arts:
[115R 1E 104K (78R - 104R - 115R)]
Otherwise, two waves are needed to kill camp 6.
If you do not have a veteran general:
From A to
Camp 6) 50 Cavalry Deserters, 50 Elite Soldier Deserters, 50 Crossbowman Deserters, 1 Sir Robin
ANY general:
[175R (175R)]
From B to
Camp 6) 7-20 Elite Soldier Deserters, 50 Crossbowman Deserters, 1 Sir Robin
ANY general:
[142R 58S (69R - 118R - 142R)]
ANY general:
[141R 1S 58E (69R - 115R - 141R)]
If you do have a veteran general:
From A to
Camp 6) 50 Cavalry Deserters, 50 Elite Soldier Deserters, 50 Crossbowman Deserters, 1 Sir Robin
ANY general:
[94R (94R)]
From B to
Camp 6) 42-46 Elite Soldier Deserters, 50 Crossbowman Deserters, 1 Sir Robin
VETERAN general:
[140R 110S (100R - 140R 1S - 140R 10S)]
VETERAN general:
[150R 100E (100R - 138R - 150R 4E)]
Garrison Position G4
From this point on, you may start inviting two friends or lootspot buyers (see further down for the recommended lootspot kill).
Move your best general to garrison position G4:
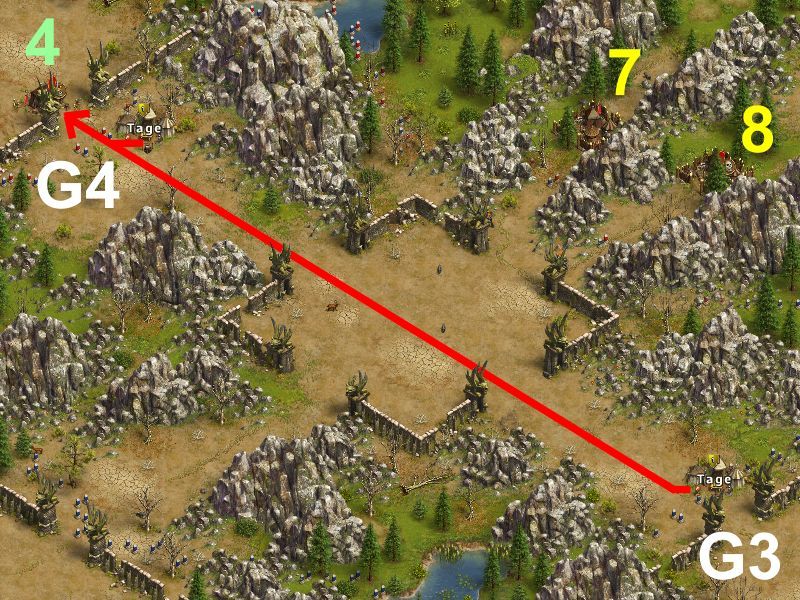
If you have a veteran general with cannoneers, camp
4 may be killed in one wave:
From G3 to
Camp 4) 60 Elite Soldier Deserters, 60 Cavalry Deserters, 60 Longbowman Deserters, 10 Cannoneer Deserters
VETERAN general:
[120R 2S 1E 127K (99R - 110R - 120R 2S)]
MASTER of Martial Arts:
[109R 1E 110K (85R - 98R - 108R)] {30 seconds of fighting}
If you do not have enough cannoneers, camp
4 must be killed in two waves.
Send the first general from G3 (or wherever you have a spare one) while your best general marches up to G4.
If you have a
BATTLE HARDENED general with Longbows:
From G3 to
Camp 4) 60 Elite Soldier Deserters, 60 Cavalry Deserters, 60 Longbowman Deserters, 10 Cannoneer Deserters
ANY general:
[96R (96R)]
From G4 to
Camp 4) 53-55 Elite Soldier Deserters, 60 Longbowman Deserters, 10 Cannoneer Deserters
BATTLE HARDENED general:
[74R 2S 75C 49LB (55R - 65R - 74R 1S)]
In all other cases:
From G3 to
Camp 4) 60 Elite Soldier Deserters, 60 Cavalry Deserters, 60 Longbowman Deserters, 10 Cannoneer Deserters
ANY general:
[72R (72R)]
From G4 to
Camp 4) 59-60 Elite Soldier Deserters, 60 Longbowman Deserters, 10 Cannoneer Deserters
BATTLE HARDENED general:
[80R 2S 71C 47XB (57R - 70R - 80R 1S)]
BATTLE HARDENED general:
[62R 2S 87C 49K (43R - 54R - 63R 2S)]
VETERAN general:
[63R 2S 71C 114LB (37R - 51R - 63 1S)]
VETERAN general:
[51R 2S 80C 117XB (37R - 46R - 51R 1S)]
Garrison Position G5
Move your best general to garrison position G5:

Camp 10 is a little special, due to the cannoneer deserters in it.
First of all, if you have a veteran general, there is no advantage in using cannoners yourself.
Since cannoneers have last strike, it is more advantageous to use crossbowmen killing as many as possible before they get a chance to hit.
Also, since cannoneer deserters would be the units remaining by the end of the round,
it doesn't really pay to have militia or soldiers protecting your cavalry.
Each cannoneer deserter kills one militia just as easily as it kills one cavalry.
Even 70% of your soldiers (or elite soldiers) would be killed by one cannoneer deserter each.
Thus, I'm only using recruits, cavalry and range units in this attack.
Even if the maximum number of lost cavalry may seem high, the chance for even one cavalry dying is still quite small.
From G5 to
Camp 10) 60 Elite Soldier Deserters, 60 Crossbowman Deserters, 20 Cannoneer Deserters
ANY general:
[110R 39C 51LB (93R - 105R - 110R 15C)]
ANY general:
[110R 50C 40XB (86R - 98R - 110R 5C)]
ANY general:
[105R 55C 40K (69R - 86R - 105R 4C)]
VETERAN general:
[78R 75C 97LB (57R - 67R - 78R 1C)]
VETERAN general:
[63R 72C 115XB (38R - 50R - 63R 8C)]
MASTER of Martial Arts:
[52R 1E 30C 137XB (38R - 50R - 52R)]
Garrison Position G6
Move your best general to garrison position G6:
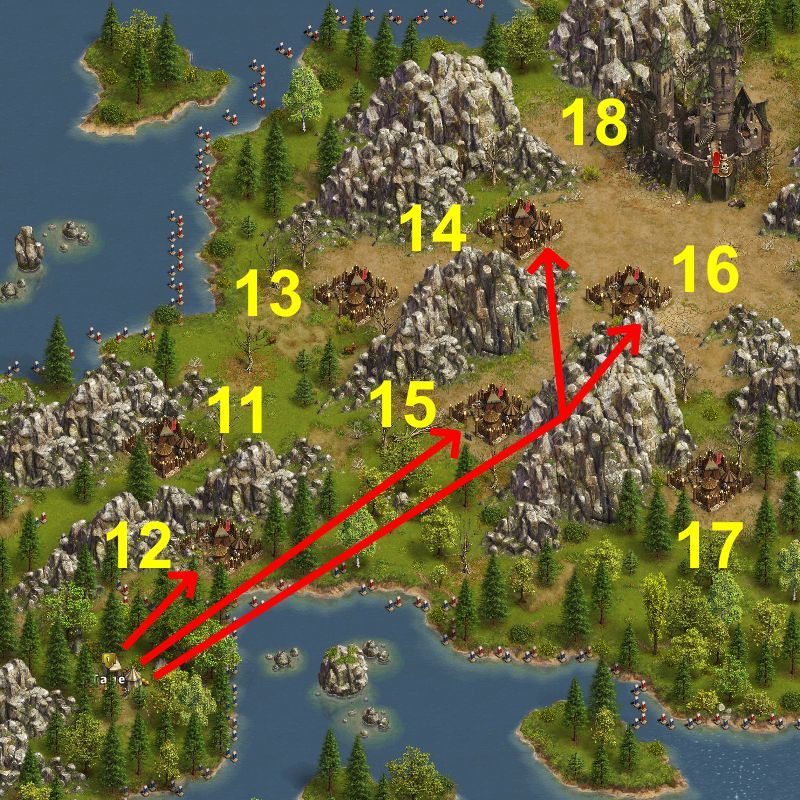 Camp 12)
 80 Soldier Deserters, 80 Crossbowman Deserters
ANY general:
[57M 3S 99C 41LB (47M - 52M - 57M 2S)]
ANY general:
[49M 3S 95C 53XB (37M - 43M - 49M 2S)]
ANY general:
[99R 8S 79C 14K (80R - 95R - 99R 7S)]
VETERAN general:
[74R 4S 98C 74LB (58R - 68R - 74R 3S)]
VETERAN general:
[65R 2S 122C 61XB (49R - 58R - 65R 1S)]
VETERAN general:
[64R 2S 132C 52K (48R - 57R - 64R 1S)]
MASTER of Martial Arts:
[62R 1E 100C 57K (47R - 56R - 62R)]
Camp 15) 100 Cavalry Deserters, 100 Crossbowman Deserters
ANY general:
[1: 119R (119R), 2: 138C (-)]
VETERAN general:
[121R 129S (116R - 119R - 121R)]
VETERAN general:
[120R 130E (116R - 119R - 120R)]
MASTER of Martial Arts:
[120R 120E (117R - 119R - 120R)]
Camp 16) 100 Soldier Deserters, 75 Crossbowman Deserters
ANY general:
[92M 3S 87C 18LB (73M - 83M - 92M 2S)]
ANY general:
[71M 3S 89C 37XB (59M - 65M - 71M 2S)]
ANY general:
[65M 6S 89C 40K (57M - 63M - 65M 5S)]
VETERAN general:
[111R 3S 93C 43LB (89R - 101R - 111R 2S)]
VETERAN general:
[90R 5S 89C 66XB (68R - 82R - 90R 4S)]
VETERAN general:
[90R 2S 89C 69K (66R - 77R - 90R 1S)]
VETERAN general:
47M 2S 1E 121C 79K (40M - 46M - 47M 2S)]
MASTER of Martial Arts:
[80R 1E 65C 74K (60R - 75R - 80R)]
Camp 14 can be blocked if you have a veteran general with cannoneers (se below).
Otherwise, kill camp 14 as well now:
Camp 14) 100 Elite Soldier Deserters, 50 Longbowman Deserters
ANY general:
[82M 3S 59C 56LB (67M - 75M - 82M 2S)]
ANY general:
[73M 3S 61C 63XB (63M - 68M - 73M 2S)]
ANY general:
[58M 1S 60C 81K (44M - 51M - 58M)]
VETERAN general:
[122R 3S 60C 65LB (94R - 109R - 122R 2S)]
VETERAN general:
[112R 3S 60C 75XB (90R - 103R - 112R 2S)]
VETERAN general:
[81R 3S 78C 88K (65R - 76R - 81R 2S)]
MASTER of Martial Arts:
[81R 1E 45C 93K (66R - 76R - 81R)]
Lootspot
If you haven't invited any friends for the lootspots yet, do it now.
Each lootspot buyer should bring a general with 1R.
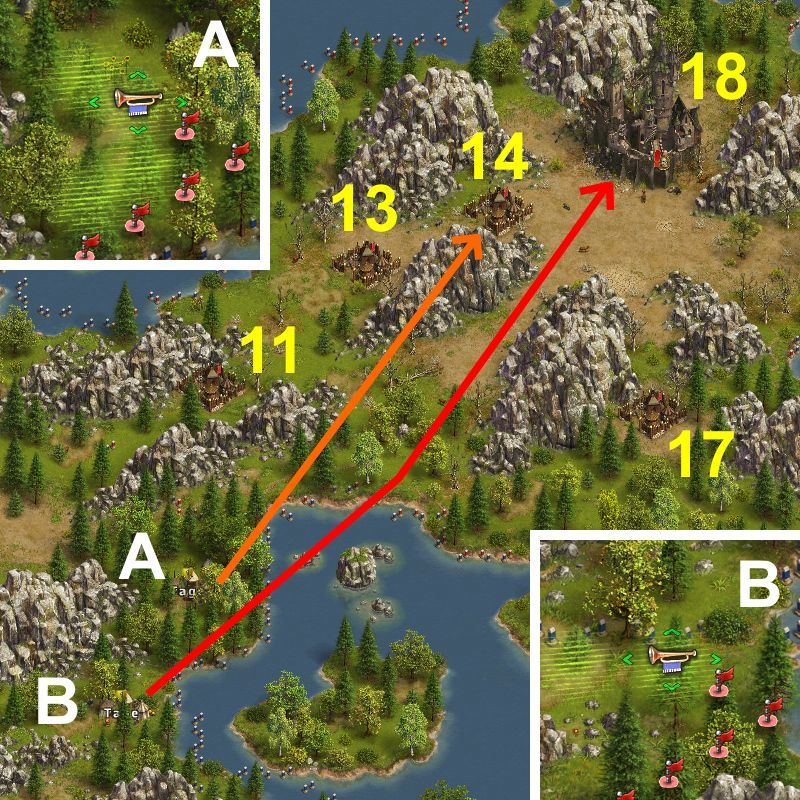
If you are going to block camp 14, then let your lootspot buyers attack camp 17.
Otherwise, for best result, your lootspot buyer should help you killing the troops in the last castle, camp 18.
Each 1R attack on that castle will kill one Elite Soldier Deserter. And each such kill will reduce your losses in the last attack by 3-6 recruits.
Also, if you at this stage have normal generals recovering and waking up from their hibernation,
use each of them to attack the castle with 1R, to further reduce your overall losses.
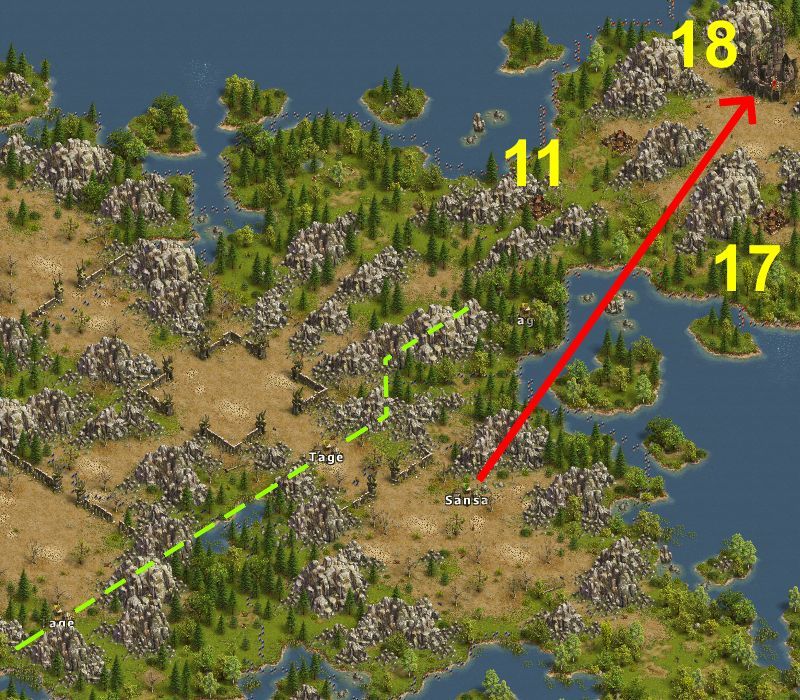
Note also that, in order to avoid being intercepted by camp 11,
the 1R attacks on the castle must originate from somewhere south of the green line in the map above.
Garrison Position G6 (OPTIONAL BLOCK)
If you have a veteran general with cannoneers, arrange your generals within garrison position G6:- Position A: NORMAL general
- Position B: VETERAN general
Send both generals right after each other:
From A to
Camp 14) 100 Elite Soldier Deserters, 50 Longbowman Deserters
BLOCKING NORMAL general:
[5R 3M 38S 20E 133C (-)] {
200 - 320 seconds of fighting, 0.6% chance of 180 seconds}
From B to
Camp 18) 50 Elite Soldier Deserters, 50 Crossbowman Deserters, 25 Cannoneer Deserters, 1 Big Bertha
VETERAN general:
[133R 2M 115K (112R - 125R - 133R 2M)] {150 seconds of fighting}
MASTER of Martial Arts:
[88R 1E 131K (62R - 79R - 88R)] {120-150 seconds of fighting}
The remaining marching time for general B, when general A starts his blocking attack, is about 40 seconds.
Thus the battle for the castle needs some 190 seconds, and the block lasts at least 200 seconds 99.4% of the times.
If you have already killed camp 14 above, the last attack(s) on camp 18 depend on how many 1R attacks you've sent at it first.
Camp 18) 50 Elite Soldier Deserters, 50 Crossbowman Deserters, 25 Cannoneer Deserters, 1 Big Bertha
ANY general:
[1: 120R, 2: 121R 79S (198R - 220R - 241R 2S)]
ANY general:
[1: 120R, 2: 121R 79E (198R - 219R - 241R)]
ANY general:
[1: 59R, 2: 132R 9M 59K (169R - 187R - 191R 8M)]
VETERAN general:
[1: 18R, 2: 148R 102S (133R - 153R - 166R 1S)]
VETERAN general:
[1: 18R, 2: 148R 102E (133R - 151R - 166R)]
Camp 18) 49 Elite Soldier Deserters, 50 Crossbowman Deserters, 25 Cannoneer Deserters, 1 Big Bertha
ANY general:
[1: 117R, 2: 121R 79S (195R - 217R - 238R 2S)]
ANY general:
[1: 117R, 2: 121R 79E (195R - 216R - 238R)]
ANY general:
[1: 55R, 2: 132R 9M 59K (165R - 183R - 187R 8M)]
VETERAN general:
[1: 13R, 2: 148R 102S (128R - 148R - 161R 1S)]
VETERAN general:
[1: 13R, 2: 148R 102E (128R - 146R - 161R)]
Camp 18) 48 Elite Soldier Deserters, 50 Crossbowman Deserters, 25 Cannoneer Deserters, 1 Big Bertha
ANY general:
[1: 114R, 2: 121R 79S (192R - 214R - 235R 2S)]
ANY general:
[1: 114R, 2: 121R 79E (192R - 213R - 235R)]
ANY general:
[1: 50R, 2: 132R 9M 59K (160R - 178R - 182R 8M)]
VETERAN general:
[1: 7R, 2: 148R 102S (125R - 144R - 155R 1S)]
VETERAN general:
[1: 7R, 2: 148R 102E (125R - 142R - 155R)]
Camp 18) 47 Elite Soldier Deserters, 50 Crossbowman Deserters, 25 Cannoneer Deserters, 1 Big Bertha
ANY general:
[1: 109R, 2: 121R 79S (187R - 209R - 230R 2S)]
ANY general:
[1: 109R, 2: 121R 79E (187R - 208R - 230R)]
ANY general:
[1: 44R, 2: 132R 9M 59K (154R - 172R - 176R 8M)]
VETERAN general:
[1: 1R, 2: 148R 102S (120R - 138R - 149R 2S)]
VETERAN general:
[1: 1R, 2: 148R 102E (120R - 136R - 149R)]
Camp 18) 46 Elite Soldier Deserters, 50 Crossbowman Deserters, 25 Cannoneer Deserters, 1 Big Bertha
ANY general:
[1: 104R, 2: 121R 79S (182R - 204R - 225R 2S)]
ANY general:
[1: 104R, 2: 121R 79E (182R - 203R - 225R)]
ANY general:
[1: 39R, 2: 132R 9M 59K (149R - 167R - 171R 8M)]
VETERAN general:
[148R 102S (119R - 137R - 148R 2S)]
VETERAN general:
[148R 102E (119R - 135R - 148R)]
Camp 18) 45 Elite Soldier Deserters, 50 Crossbowman Deserters, 25 Cannoneer Deserters, 1 Big Bertha
ANY general:
[1: 99R, 2: 121R 79S (177R - 199R - 220R 2S)]
ANY general:
[1: 99R, 2: 121R 79E (177R - 198R - 220R)]
ANY general:
[1: 34R, 2: 132R 9M 59K (144R - 162R - 166R 8M)]
VETERAN general:
[146R 104S (117R - 133R - 146R 1S)]
VETERAN general:
[146R 104E (117R - 131R - 146R)]
Camp 18) 44 Elite Soldier Deserters, 50 Crossbowman Deserters, 25 Cannoneer Deserters, 1 Big Bertha
ANY general:
[1: 94R, 2: 121R 79S (172R - 194R - 215R 2S)]
ANY general:
[1: 94R, 2: 121R 79E (172R - 193R - 215R)]
ANY general:
[1: 29R, 2: 132R 9M 59K (139R - 157R - 161R 8M)]
VETERAN general:
[142R 108S (114R - 129R - 142R 1S)]
VETERAN general:
[140R 110E (108R - 128R - 140R)]
Camp 18) 43 Elite Soldier Deserters, 50 Crossbowman Deserters, 25 Cannoneer Deserters, 1 Big Bertha
ANY general:
[1: 88R, 2: 121R 79S (166R - 188R - 209R 2S)]
ANY general:
[1: 88R, 2: 121R 79E (166R - 187R - 209R)]
ANY general:
[1: 23R, 2: 132R 9M 59K (133R - 151R - 155R 8M)]
VETERAN general:
[135R 115S (107R - 126R - 135R 1S)]
VETERAN general:
[135R 115E (106R - 123R - 135R)]
Camp 18) 42 Elite Soldier Deserters, 50 Crossbowman Deserters, 25 Cannoneer Deserters, 1 Big Bertha
ANY general:
[1: 83R, 2: 121R 79S (161R - 183R - 204R 2S)]
ANY general:
[1: 83R, 2: 121R 79E (161R - 182R - 204R)]
ANY general:
[1: 18R, 2: 132R 9M 59K (128R - 146R - 150R 8M)]
VETERAN general:
[132R 118S (104R - 122R - 132R 1S)]
VETERAN general:
[132R 118E (102R - 119R - 132R)]
Camp 18) 41 Elite Soldier Deserters, 50 Crossbowman Deserters, 25 Cannoneer Deserters, 1 Big Bertha
ANY general:
[1: 78R, 2: 121R 79S (156R - 178R - 199R 2S)]
ANY general:
[1: 78R, 2: 121R 79E (156R - 177R - 199R)]
ANY general:
[1: 13R, 2: 132R 9M 59K (123R - 141R - 145R 8M)]
VETERAN general:
[129R 121S (101R - 117R - 129R 1S)]
VETERAN general:
[129R 121E (100R - 116R - 129R)]
Camp 18) 40 Elite Soldier Deserters, 50 Crossbowman Deserters, 25 Cannoneer Deserters, 1 Big Bertha
ANY general:
[1: 73R, 2: 121R 79S (151R - 173R - 194R 2S)]
ANY general:
[1: 73R, 2: 121R 79E (151R - 172R - 194R)]
ANY general:
[1: 7R, 2: 132R 9M 59K (117R - 135R - 139R 8M)]
VETERAN general:
[126R 124S (99R - 114R - 126R 1S)]
VETERAN general:
[124R 126E (96R - 113R - 124R)]
Camp 18) 39 Elite Soldier Deserters, 50 Crossbowman Deserters, 25 Cannoneer Deserters, 1 Big Bertha
ANY general:
[1: 68R, 2: 121R 79S (146R - 168R - 189R 2S)]
ANY general:
[1: 68R, 2: 121R 79E (146R - 167R - 189R)]
ANY general:
[1: 1R, 2: 132R 9M 59K (111R - 129R - 133R 8M)]
VETERAN general:
[120R 130S (93R - 111R - 120R 1S)]
VETERAN general:
[120R 130E (92R - 110R - 120R)]
All garrison setups have been simulated at least 5000 times, using
this simulator.
Even if I do the utmost to ensure that no errors occur anywhere, I am only human, and errors might always appear.
Thus, I do recommend that you double-check all setups in the simulator, especially before trying an attack the first time in a newly published setup.
All garrison setups where recruits and soldiers are included have a very small chance of one or a few soldiers being killed.
I prefer having it so tight, that in most cases that one soldier survives and actually might save one recruit by taking the last hits in the battle.
That being said, be prepared to lose the odd soldier(s) after playing the same adventure hundreds or thousands of times...
On the other hand, all garrison setups have also been made so that the risk of losing longbows or crossbows is next to negligible.
Due to this, some setups have more recruits/soldiers than what can be seen in other guides.
In some cases this will increase the maximum losses (of recruits), but save the rare occasion of losing crossbows.
All round blocks have been optimised using Andelar's TSO battle simulator V1.0.1 and double-checked using
this simulator.
The duration of the blocks and attacks are based on
this post.


Originally Posted by PrincessAlly
 Surprise Attack


 Reply With Quote