VeeJay, what adventure?

VeeJay, what adventure?
Hi Killste,
Just done Outlaws using Bobs guide along with Lisztes' Blocking tactics (Hasmirs blog page 14), and while it's tight it works well. New pathing means camp 24 is skipped but you have to fight camp 12 (UllrichB's numbers), I used 150R 100S and lost 92R. If we could have some of Tage's magic on this it would eliminate the Xs on the map and maybe save some recs with a block on 12.
Unfortunately camp 12 has too weak units for a block that would last long enough.Originally Posted by Majikrider

Whether you use elite soldiers or cavalry, you would only get 4 rounds (plus the victory countdown) of battle for the long march up to block camps 13 and 14 and kill camp 15.
Hi Killste for horseback its better to use
130 B 70 lb losses 130 B for the camp of the bulls
what map number for horseback?
Traitors
All kinds of Generals and Optional Round Blocks
Average losses (veteran with crossbows): 521R
Average losses (veteran with cannoneers): 303R
Average losses (MoMA + veteran with cannoneers): 205R
Adventure Info:
Player Level: 26+
Difficulty: 4/10
Number of Players: 1
Duration: 3 days
Where to get?: Adventure seek with Explorer or Trader (shop) for 165 gems
For more information about the loot, please refer to Triple-J's Loot Overview
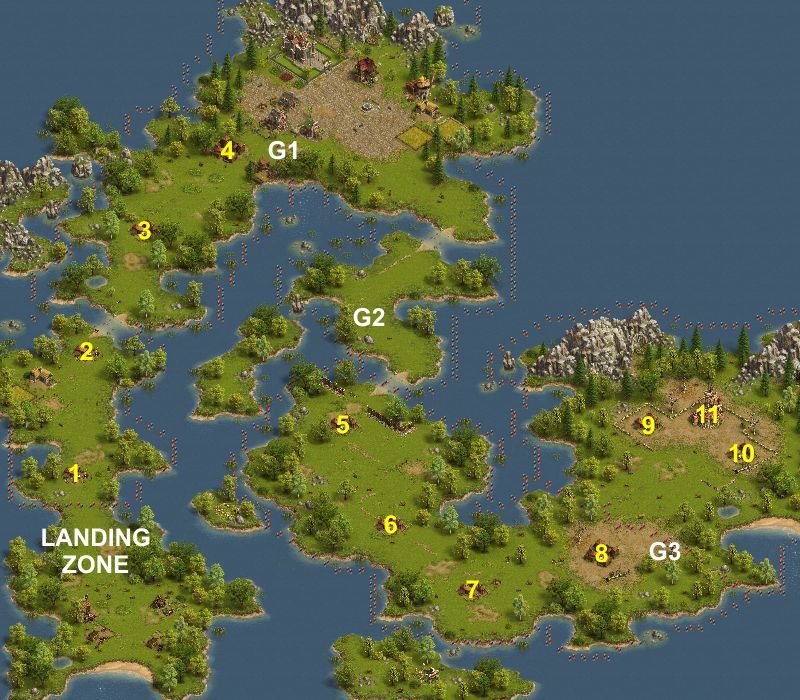
QUICK LINKS: ... G1 ... G2 ... G3
You need at least 2 generals, preferably 4. At least one general must be normal.
If you want to do the double block on camps 6 and 7, you will need at least two normal generals.
You need to send troops 5-6 times if you have a veteran general, otherwise 7-8 times.
This guide includes blocks of both method 1 and method 2.
Nine versions are presented below:
One NORMAL general with Longbows
One NORMAL general using three 1R blocks
- Units needed, average: 1037R 118S 199C 69LB (1423 units)
- Units needed, maximum: 1088R 125S 199C 69LB (1481 units)
- Units lost, minimum: 929R
- Units lost, average: 1009R
- Units lost, maximum: 1088R 7S
One NORMAL general with Crossbows
One NORMAL general using three 1R blocks
- Units needed, average: 1030R 118S 199C 42XB (1389 units)
- Units needed, maximum: 1088R 125S 199C 42XB (1454 units)
- Units lost, minimum: 922R
- Units lost, average: 1002R
- Units lost, maximum: 1079R 7S
One BATTLE HARDENED general with Longbows
Two NORMAL generals using one round block and three 1R blocks
- Units needed, average: 721R 126S 282C 69LB (1198 units)
- Units needed, maximum: 751R 128S 282C 69LB (1230 units)
- Units lost, minimum: 630R
- Units lost, average: 693R
- Units lost, maximum: 751R 7S
One BATTLE HARDENED general with Crossbows
Two NORMAL generals using one round block and three 1R blocks
- Units needed, average: 703R 124S 305C 42XB (1174 units)
- Units needed, maximum: 737R 124S 305C 42XB (1208 units)
- Units lost, minimum: 611R
- Units lost, average: 675R
- Units lost, maximum: 737R 5S
Two BATTLE HARDENED generals with Cannoneers
Two NORMAL generals using two round blocks
- Units needed, average: 385R 22M 125S 89E 307C 86K (1014 units)
- Units needed, maximum: 405R 22M 125S 89E 307C 86K (1034 units)
- Units lost, minimum: 334R
- Units lost, average: 385R 8M
- Units lost, maximum: 405R 22M 2S
One VETERAN general with Longbows
Two NORMAL generals using one round block and two 1R blocks
- Units needed, average: 565R 122S 335C 62LB (1084 units)
- Units needed, maximum: 584R 124S 335C 62LB (1105 units)
- Units lost, minimum: 452R
- Units lost, average: 544R
- Units lost, maximum: 584R 8S
One VETERAN general with Crossbows
Two NORMAL generals using one round block and two 1R blocks
- Units needed, average: 542R 122S 332C 64XB (1060 units)
- Units needed, maximum: 569R 124S 332C 64XB (1089 units)
- Units lost, minimum: 438R
- Units lost, average: 521R
- Units lost, maximum: 569R 5S
One VETERAN general with Cannoneers
One BATTLE HARDENED general
Two NORMAL generals using two round blocks
- Units needed, average: 313R 8M 125S 89E 373C 102K (1010 units)
- Units needed, maximum: 324R 8M 128S 89E 373C 102K (1024 units)
- Units lost, minimum: 254R
- Units lost, average: 303R
- Units lost, maximum: 324R 8M 3S
One MAJOR general
One BATTLE HARDENED general
Two NORMAL generals using two round blocks
- Units needed, average: 311R 3M 125S 89E 399C 124K (1051 units)
- Units needed, maximum: 325R 3M 128S 89E 399C 124K (1068 units)
- Units lost, minimum: 249R
- Units lost, average: 298R
- Units lost, maximum: 325R 3M 1S
Game flow, garrison settings and losses (minimum - average - maximum):
Garrison Position G1
Move your best general to garrison position G1:
Camp 4) 40 Soldier Deserters, 60 Longbowman Deserters
ANY general: [27R 2S 148C 23LB (19R - 24R - 27R 1S)]
ANY general: [27R 2S 161C 10XB (17R - 24R - 27R 1S)]
ANY general: [27R 1E 163C 9K (17R - 23R - 27R)]
VETERAN general: [20R 2S 228C (13R - 18R - 20R 1S)]
VETERAN general: [20R 1S 1E 228C (13R - 18R - 20R 1S)]
MAJOR general: [20R 1E 249C (12R - 17R - 20R)]
MASTER of Martial Arts: [20R 1S 199C (12R - 17R - 20R 1S)]
MASTER of Martial Arts: [20R 1E 199C (12R - 17R - 20R)]
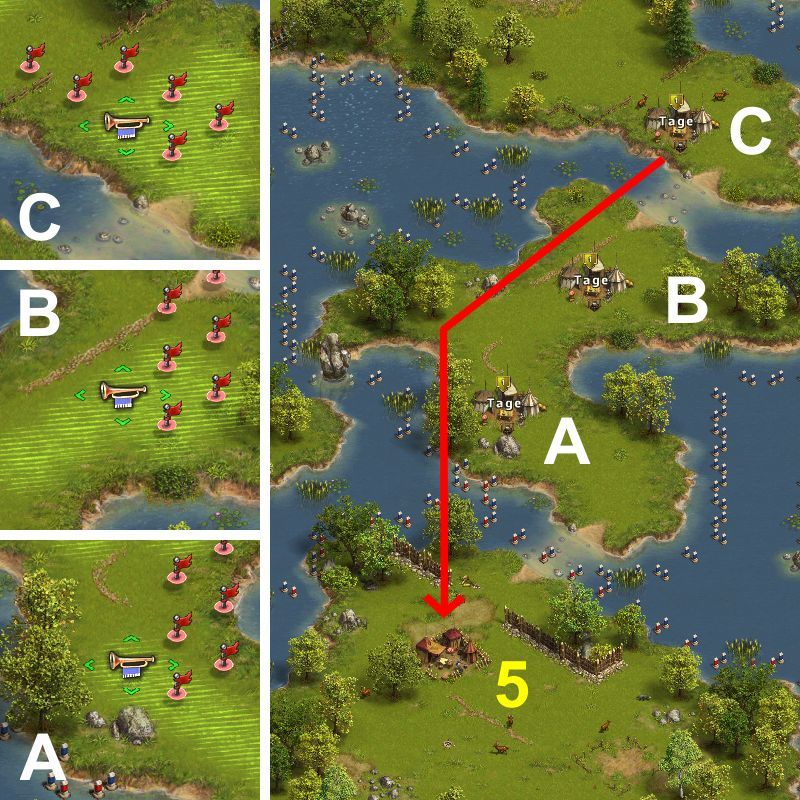
Move your best general and two normal generals to garrison position G2:
- Position A: NORMAL general
- Position B: NORMAL general
- Position C: VETERAN general or BATTLE HARDENED general or ANY general
For the first attack, only your best general is needed:
From C to Camp 5) 60 Soldier Deserters, 60 Longbowman Deserters
ANY general: [54R 2S 75C 69LB (38R - 46R - 54R 1S)]
ANY general: [48R 2S 108C 42XB (35R - 42R - 48R 1S)]
ANY general: [48R 1E 115C 36K (34R - 42R - 48R)]
VETERAN general: [44R 2S 155C 49LB (31R - 39R - 44R 1S)]
VETERAN general: [42R 2S 181C 25XB (30R - 37R - 42R 1S)]
VETERAN general: [42R 1S 1E 184C 22K (29R - 37R - 42R 1S)]
MAJOR general: [41R 1E 212C 16K (27R - 35R - 41R)]
MASTER of Martial Arts: [41R 2S 142C 35LB (29R - 36R - 41R 1S)]
MASTER of Martial Arts: [40R 2S 160C 18XB (27R - 34R - 40R 1S)]
MASTER of Martial Arts: [40R 1S 1E 162C 16K (27R - 34R - 40R 1S)]
If you do not want to try the double block below, kill camp 6 now:
From C to Camp 6) 40 Milita Deserters, 40 Cavalry Deserters, 20 Soldier Deserters, 60 Longbowman Deserters
ANY general: [120R 4S 1E 75K (96R - 110R - 120R 4S)]
VETERAN general: [118R 132S (88R - 102R - 118R 1S)]
VETERAN general: [105R 1E 144K (82R - 94R - 105R)]
MASTER of Martial Arts: [85R 125S (63R - 73R - 85R)]
If you only have normal generals and no cannoneers, you will have to kill camp 6 in two waves:
From A to Camp 6) 40 Milita Deserters, 40 Cavalry Deserters, 20 Soldier Deserters, 60 Longbowman Deserters
ANY general: [125R (125R)]
The first wave will kill all militia deserters, should kill all cavalry deserters and 0-10 (average 4) soldier deserters.
The second wave depends on what still remains in that camp (10-20 soldier deserters and 60 longbowman deserters):
From C to Camp 6) 20 Soldier Deserters, 60 Longbowman Deserters [7R 1S 192C (4R - 6R - 7R)]
From C to Camp 6) 19 Soldier Deserters, 60 Longbowman Deserters [6R 1S 193C (3R - 5R - 6R)]
From C to Camp 6) 18 Soldier Deserters, 60 Longbowman Deserters [5R 1S 194C (3R - 5R - 5R)]
From C to Camp 6) 17 Soldier Deserters, 60 Longbowman Deserters [4R 1S 195C (2R - 4R - 4R)]
From C to Camp 6) 16 Soldier Deserters, 60 Longbowman Deserters [3R 1S 196C (1R - 3R - 3R)]
From C to Camp 6) 15 Soldier Deserters, 60 Longbowman Deserters [2R 1S 197C (1R - 2R - 2R)]
From C to Camp 6) 14 Soldier Deserters, 60 Longbowman Deserters [1R 1S 198C (0R - 1R - 1R)]
From C to Camp 6) 13 Soldier Deserters, 60 Longbowman Deserters [1S 199C (-)]
[1S 199C] kills everything with no losses if there are 13, or fewer, soldier deserters remaining.
If you do not want to try the block at all, kill camp 7 now:
From B to Camp 7) 60 Milita Deserters, 60 Cavalry Deserters, 60 Soldier Deserters
ANY general: [150R 9S 1E 45K (133R - 150R 1S - 150R 9S)]
VETERAN general: [150R 100S (120R - 134R - 150R)]
VETERAN general: [113R 1S 1E 135K (90R - 103R - 113R 1S)]
MASTER of Martial Arts: [130R 90S (105R - 119R - 130R 1S)]
MASTER of Martial Arts: [106R 1S 1E 97K (86R - 96R - 106R 1S)]
If you only have normal generals and no cannoneers, you will have to kill camp 7 in two waves:
From B to Camp 7) 60 Milita Deserters, 60 Cavalry Deserters, 60 Soldier Deserters
ANY general: [168R (168R)]
From C to Camp 7) 40-60 Soldier Deserters
ANY general: [45R 1S 95C 59LB (18R - 30R - 45R)]
ANY general: [42R 1S 127C 30XB (16R - 27R - 42R)]
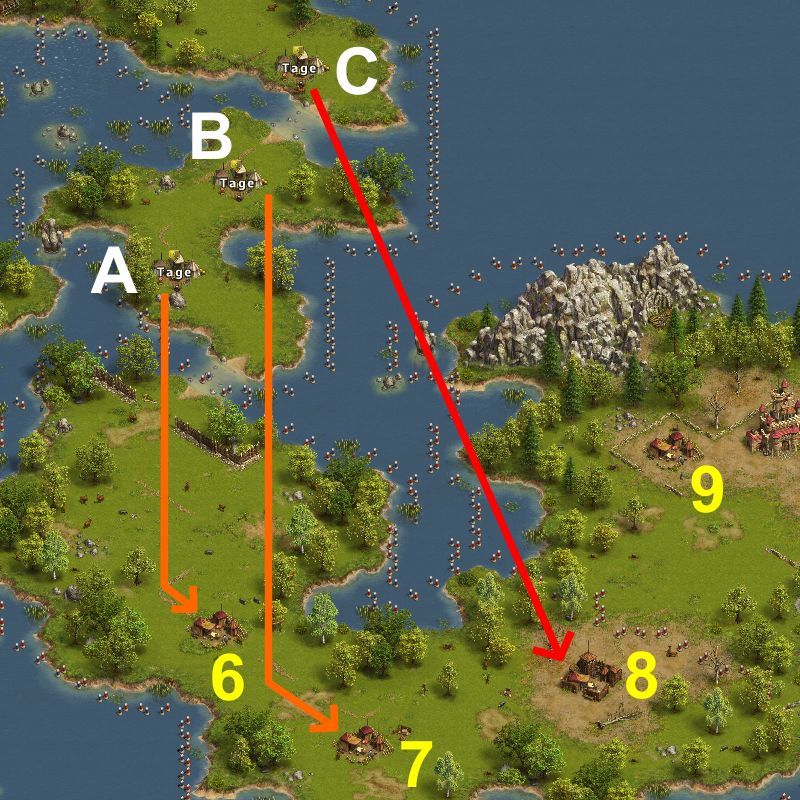
If you have already killed camps 6 and 7:
From C to Camp 8) 60 Soldier Deserters, 100 Longbowman Deserters
ANY general: [70R 6S 124C (52R - 66R - 70R 5S)]
ANY general: [70R 4S 107C 19XB (50R - 62R - 70R 3S)]
ANY general: [70R 2S 1E 109C 18K (47R - 60R - 70R 2S)]
VETERAN general: [49R 2S 137C 62LB (36R - 44R - 49R 1S)]
VETERAN general: [45R 2S 169C 34XB (34R - 41R - 45R 1S)]
VETERAN general: [45R 1S 1E 175C 28K (33R - 41R - 45R 1S)]
MASTER of Martial Arts: [47R 2S 123C 48LB (33R - 41R - 47R 1S)]
MASTER of Martial Arts: [45R 2S 148C 25XB (31R - 39R - 45R 1S)]
MASTER of Martial Arts: [43R 1S 1E 152C 23K (31R - 38R - 43R 1S)]
If you have already killed camp 6, do the block on camp 7 (send general C as soon as general B has appeared outside his garrison):
From B to Camp 7) 60 Milita Deserters, 60 Cavalry Deserters, 60 Soldier Deserters
BLOCKING NORMAL general: [1R 120S (-)] {180-280 seconds of fighting, 1.2% chance of 160 seconds}
BLOCKING NORMAL general: [45S 71E (-)] {180-300 seconds of fighting}
BLOCKING NORMAL general: [110E (-)] {180-300 seconds of fighting}
From C to Camp 8) 60 Soldier Deserters, 100 Longbowman Deserters
BATTLE HARDENED general: [70R 6S 124C (52R - 66R - 70R 5S)] {50-60 seconds of fighting}
BATTLE HARDENED general: [70R 4S 107C 19XB (50R - 62R - 70R 3S)] {40 seconds of fighting}
BATTLE HARDENED general: [70R 2S 1E 109C 18K (47R - 60R - 70R 2S)] {30 seconds of fighting}
VETERAN general: [49R 2S 137C 62LB (36R - 44R - 49R 1S)] {40 seconds of fighting}
VETERAN general: [45R 2S 169C 34XB (34R - 41R - 45R 1S)] {40 seconds of fighting}
VETERAN general: [45R 1S 1E 175C 28K (33R - 41R - 45R 1S)] {30 seconds of fighting}
MASTER of Martial Arts: [47R 2S 123C 48LB (33R - 41R - 47R 1S)] {30 seconds of fighting}
MASTER of Martial Arts: [45R 2S 148C 25XB (31R - 39R - 45R 1S)] {30 seconds of fighting}
MASTER of Martial Arts: [43R 1S 1E 152C 23K (31R - 38R - 43R 1S)] {30 seconds of fighting}
For minimal losses, do the full double block of camps 6 and 7 (send all three generals right after each other):
From A to Camp 6) 40 Milita Deserters, 40 Cavalry Deserters, 20 Soldier Deserters, 60 Longbowman Deserters
BLOCKING NORMAL general: [198C (-)] {160-260 seconds of fighting}
Send general B as soon as general A has appeared outside his garrison:
From B to Camp 7) 60 Milita Deserters, 60 Cavalry Deserters, 60 Soldier Deserters
BLOCKING NORMAL general: [1R 120S (-)] {180-280 seconds of fighting, 1.2% chance of 160 seconds}
BLOCKING NORMAL general: [45S 71E (-)] {180-300 seconds of fighting}
BLOCKING NORMAL general: [110E (-)] {180-300 seconds of fighting}
Send general C as soon as general B has appeared outside his garrison:
From C to Camp 8) 60 Soldier Deserters, 100 Longbowman Deserters
BATTLE HARDENED general: [78R 6S 84C 32LB (64R - 76R - 78R 5S)] {40 seconds of fighting}
BATTLE HARDENED general: [70R 4S 107C 19XB (50R - 62R - 70R 3S)] {40 seconds of fighting}
BATTLE HARDENED general: [70R 2S 1E 109C 18K (47R - 60R - 70R 2S)] {30 seconds of fighting}
VETERAN general: [49R 2S 137C 62LB (36R - 44R - 49R 1S)] {40 seconds of fighting}
VETERAN general: [45R 2S 169C 34XB (34R - 41R - 45R 1S)] {40 seconds of fighting}
VETERAN general: [50R 2S 134C 64XB (36R - 44R - 50R 1S)] {30 seconds of fighting}
VETERAN general: [45R 1S 1E 175C 28K (33R - 41R - 45R 1S)] {30 seconds of fighting}
MAJOR general: [44R 1S 1E 201C 23K (31R - 39R - 44R 1S)] {30 seconds of fighting}
MASTER of Martial Arts: [47R 2S 123C 48LB (33R - 41R - 47R 1S)] {30 seconds of fighting}
MASTER of Martial Arts: [45R 2S 148C 25XB (31R - 39R - 45R 1S)] {30 seconds of fighting}
MASTER of Martial Arts: [43R 1S 1E 152C 23K (31R - 38R - 43R 1S)] {30 seconds of fighting}
If you have enough crossbowmen, I do recommend the option giving 30 seconds of fighting. The marching time for the veteran general from the moment when the attack on camp 6 starts till the moment when the attack on camp 8 starts is just over 100 seconds. Since the shortest fight on camp 6 is 160 seconds, you only have some 15 seconds spare time at the worst. It is thus important that these three generals are indeed sent after each other. In order to leave some breathing time, I have also placed the garrisons as close to each other as possible. Thus, do wait till you see the previous general outside his garrison before sending the next one. If, due to lagging, you would see two generals leave their garrisons at the same time, or if you for some reason feel you've waited unnecessarily long (more than 5 seconds) with sending one of the generals, just recall and do it again, rather than risking to lose a lot of cavalry and soldiers.
Many players cancel the adventure after camp 8, avoiding the big losses on camps 9-11.
The list below shows the minimum-average-maximum losses up till this point:If you do cancel here, you will get 5060 XP, but no loot.
- NORMAL generals: Losses: (420R - 462R - 496R)
- BATTLE HARDENED general: Losses: (234R - 264R - 283R)
- VETERAN general: Losses: (80R - 101R - 113R)
- VETERAN general: Losses: (79R - 99R - 112R)
- VETERAN general: Losses: (76R - 96R - 107R)
- MAJOR general: Losses: (70R - 91R - 105R)
- MASTER of Martial Arts: Losses: (74R - 94R - 108R)
- MASTER of Martial Arts: Losses: (70R - 90R - 105R)
- MASTER of Martial Arts: Losses: (70R - 89R - 103R)
The setup hidden in the spoiler is exclusively for those having cannoneers:
Spoiler
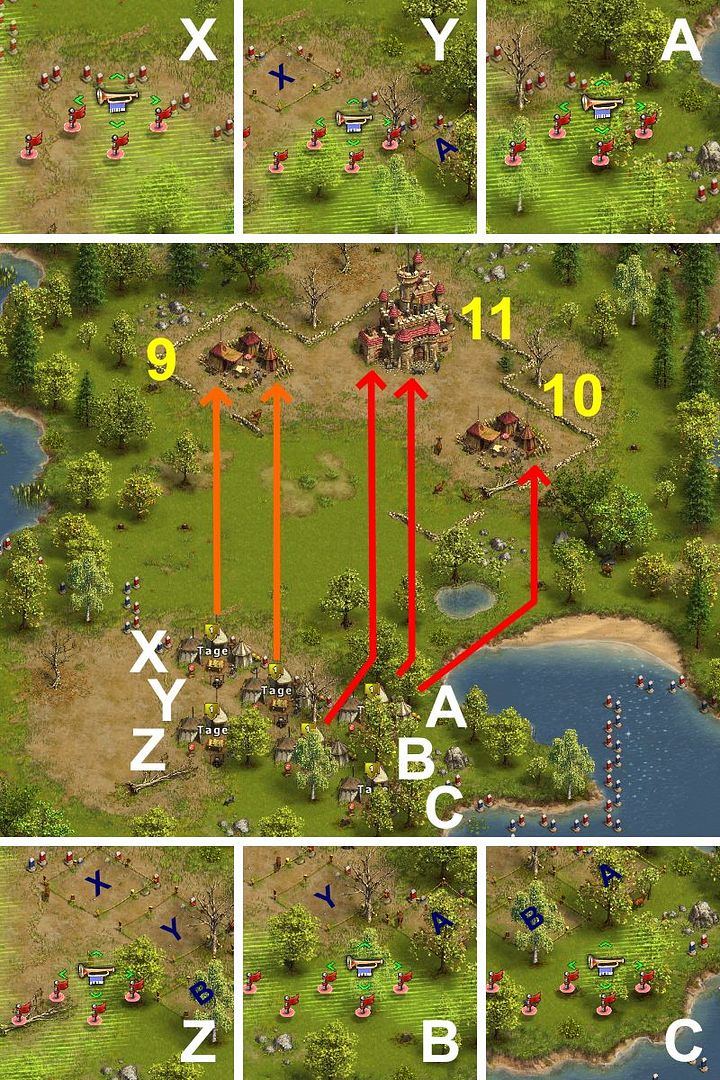
Move your generals to garrison position G3.
If you have only two generals, use positions X and A:
- Position X: NORMAL general
- Position Y: NORMAL general
- Position Z: NORMAL general (not needed if you have a VETERAN general)
- Position A: VETERAN general or BATTLE HARDENED general or ANY general
- Position B: ANY general
- Position C: ANY general (not needed if you have a VETERAN general)
From A to Camp 10) 100 Soldier Deserters, 100 Longbowman Deserters
VETERAN general: [144R 6S 65C 35LB (113R - 137R - 144R 5S)]
VETERAN general: [130R 3S 96C 21XB (100R - 116R - 130R 2S)]
MASTER of Martial Arts: [113R 2S 62C 43LB (87R - 101R - 113R 1S)]
MASTER of Martial Arts: [100R 2S 58C 60XB (68R - 84R - 100R 1S)]
If you do not have a veteran general, camp 10 will have to be killed in two waves:
From C or X to Camp 10) 100 Soldier Deserters, 100 Longbowman Deserters
ANY general: [175R (175R)]
The first wave will kill some 54-66 (average 60) soldier deserters.
The second wave depends on what still remains in that camp (34-46 soldier deserters and 100 longbowman deserters):
From A to Camp 10) 46 Soldier Deserters, 100 Longbowman Deserters [46R 2S 126C 26LB (32R - 39R - 46R)]
From A to Camp 10) 45 Soldier Deserters, 100 Longbowman Deserters [44R 2S 126C 28LB (30R - 37R - 44R)]
From A to Camp 10) 44 Soldier Deserters, 100 Longbowman Deserters [42R 2S 126C 30LB (28R - 35R - 42R)]
From A to Camp 10) 43 Soldier Deserters, 100 Longbowman Deserters [40R 2S 126C 32LB (27R - 33R - 40R)]
From A to Camp 10) 42 Soldier Deserters, 100 Longbowman Deserters [38R 2S 126C 34LB (25R - 32R - 38R)]
From A to Camp 10) 41 Soldier Deserters, 100 Longbowman Deserters [36R 2S 126C 36LB (24R - 30R - 36R)]
From A to Camp 10) 40 Soldier Deserters, 100 Longbowman Deserters [34R 2S 128C 36LB (23R - 29R - 34R)]
From A to Camp 10) 39 Soldier Deserters, 100 Longbowman Deserters [32R 2S 132C 34LB (22R - 28R - 32R)]
From A to Camp 10) 38 Soldier Deserters, 100 Longbowman Deserters [31R 2S 136C 31LB (22R - 27R - 31R)]
From A to Camp 10) 37 Soldier Deserters, 100 Longbowman Deserters [30R 2S 140C 28LB (21R - 26R - 30R)]
From A to Camp 10) 36 Soldier Deserters, 100 Longbowman Deserters [29R 2S 144C 25LB (20R - 25R - 29R)]
From A to Camp 10) 35 Soldier Deserters, 100 Longbowman Deserters [28R 2S 148C 22LB (19R - 24R - 28R)]
From A to Camp 10) 34 Soldier Deserters, 100 Longbowman Deserters [27R 2S 152C 19LB (18R - 23R - 27R)]
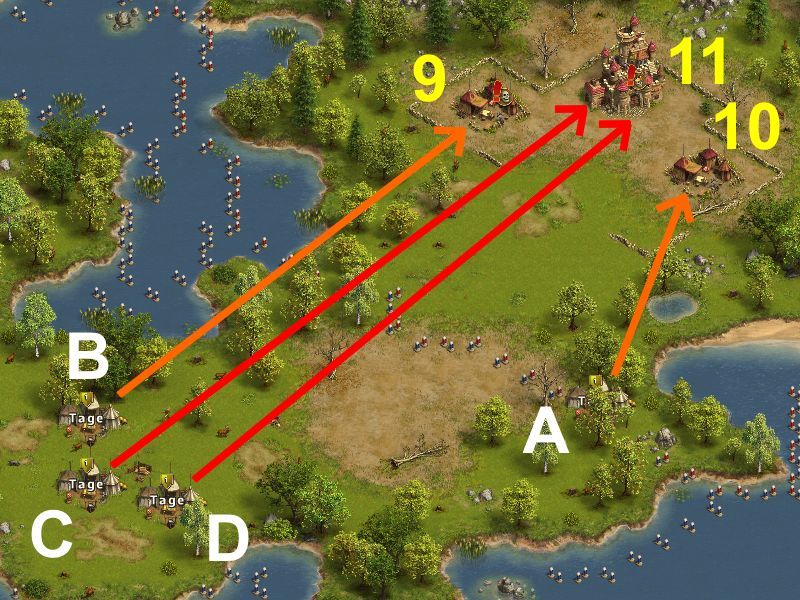
Camp 11 must be attacked 2-3 times, and the number of rounds is so huge, that only block method 1 can be used on camp 9.
Three possible locations for the block and attack are shown in the image above, X&A, Y&B and Z&C.
Each time camp 9 must be blocked (with 1R) and camp 11 be attacked.
Do not send more than one of these combinations at the same time!
E.g. send X&A, then watch the block and attack and let your generals return.
After that send Y&B, watch them block and attack and return.
And finally, if needed, send Z&C to finish it off.
If you have only two generals, use positions X and A only.
After having done the first attack from there, both your generals will be recovering,
and you will have to wait four hours till you can do the second attack.
After the second attack, you may once again have to wait another 4 hours before being able to do the last one.
The more generals you have, the more of these blocks/attacks can be done without having to wait in between.
In these cases, use positions Y and B and/or Z and C as you see fit.
If you do not have a veteran general, three separate blocking attacks will be needed:
From X Camp 9) 150 Soldier Deserters, 50 Cavalry Deserters
BLOCKING NORMAL general: [1R (1R)]
From A Camp 11) 60 Soldier Deserters, 60 Cavalry Deserters, 60 Longbowman Deserters, 1 Sir Robin, 1 Big Bertha
ANY general: [86R (86R)]
From Y Camp 9) 150 Soldier Deserters, 50 Cavalry Deserters
BLOCKING NORMAL general: [1R (1R)]
From B Camp 11) 60 Soldier Deserters, 60 Longbowman Deserters, 1 Sir Robin, 1 Big Bertha
ANY general: [200R (200R)]
From Z Camp 9) 150 Soldier Deserters, 50 Cavalry Deserters
BLOCKING NORMAL general: [1R (1R)]
From C Camp 11) 1 Sir Robin, 1 Big Bertha
ANY general: [82R 118S (27R - 54R - 82R)]
If you do have a veteran general, only two blocking attacks will be needed:
From Y Camp 9) 150 Soldier Deserters, 50 Cavalry Deserters
BLOCKING NORMAL general: [1R (1R)]
From B Camp 11) 60 Soldier Deserters, 60 Cavalry Deserters, 60 Longbowman Deserters, 1 Sir Robin, 1 Big Bertha
ANY general: [175R (175R)]
From X Camp 9) 150 Soldier Deserters, 50 Cavalry Deserters
BLOCKING NORMAL general: [1R (1R)]
From A Camp 11) 8-27 Soldier Deserters, 60 Longbowman Deserters, 1 Sir Robin, 1 Big Bertha
VETERAN general: [150R 100S (82R - 128R - 150R 4S)]
MASTER of Martial Arts: [110R 110S (37R - 89R - 110R 3S)]
If you do have a Master of Martial Arts, the cheapest way is usually to use him for the first attack on camp 11.
Then either wait 2 hours, or use your veteran general for the second attack:
From Y Camp 9) 150 Soldier Deserters, 50 Cavalry Deserters
BLOCKING NORMAL general: [1R (1R)]
From B Camp 11) 60 Soldier Deserters, 60 Cavalry Deserters, 60 Longbowman Deserters, 1 Sir Robin, 1 Big Bertha
MASTER of Martial Arts: [1R (1R)]
From X Camp 9) 150 Soldier Deserters, 50 Cavalry Deserters
BLOCKING NORMAL general: [1R (1R)]
From A Camp 11) 60 Soldier Deserters, 40-45 Longbowman Deserters, 1 Sir Robin, 1 Big Bertha
VETERAN general: [150R 100S (115R - 150R 10S - 150R 38S)]
MASTER of Martial Arts: [150R 70S (82R - 137R - 150R 8S)]
All garrison setups have been simulated at least 5000 times, using this simulator.
Even if I do the utmost to ensure that no errors occur anywhere, I am only human, and errors might always appear.
Thus, I do recommend that you double-check all setups in the simulator, especially before trying an attack the first time in a newly published setup.
All garrison setups where recruits and soldiers are included have a very small chance of one or a few soldiers being killed.
I prefer having it so tight, that in most cases that one soldier survives and actually might save one recruit by taking the last hits in the battle.
That being said, be prepared to lose the odd soldier(s) after playing the same adventure hundreds or thousands of times...
All round blocks have been optimised using Andelar's TSO battle simulator V1.0.1 and double-checked using this simulator.
The durations of the blocks and attacks are based on this post.
Last edited by Tage; 29.07.15 at 20:49. Reason: Added a little more detailed description on how to send the 1R blocks/attacks on camps 9 & 11
Awesome it is! Every block works perfectly and the presentation is excellent. Many thanks to Tage
Another great guide From Tage So wonderful. Would love to see outlaws guide. Keep up the awesome work
Please note!
This guide has been updated to allow for jumping generals.
This update made the guide too long to fit in one post.
Thus, I have reposted the whole guide in two parts, HERE
Victor the Vicious
1-2 Fast Generals and Round Blocks
Average losses (one veteran with crossbows): 1310R 162M 49S 170C
Average losses (two veterans with cannoneers): 806R 212M 2S 160C
Adventure Info:
Player Level: 36+
Difficulty: 8/10
Number of Players: 3
Duration: 8 days
Where to get?: Adventure seek with Explorer or Trader (Shop) for 200 map fragments
Last edited by Tage; 12.03.13 at 15:17. Reason: Removed the guide and added a link to the latest version
Thank you, Rex
Now that Victor is done, Outlaws might very well be the next one I'll update
 Posting Permissions
 Reply With Quote
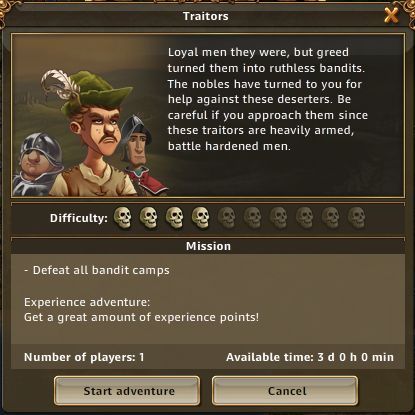

 Back to Map