For the sake of completeness and for those who haven't reached level 26 yet and want a little introduction to my step-by-step guides. 
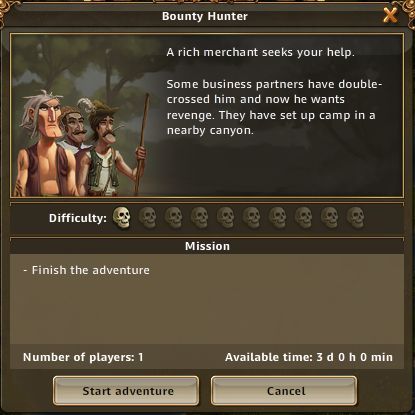
Bounty Hunter
Average Losses: 0R - 24R
Adventure Info:
Player Level: 26+
Difficulty: 1/10
Number of Players: 1
Duration: 3 days
Where to get?: You get this as a reward when you reach level 26. One extra copy can be bought in the Trader (Shop) for 10 fishes.
The loot from the adventure is shown below.
If you fulfil the mission shown above, you will get one item from each slot.
In multiplayer adventures, each player who has killed at least one enemy unit, will get the full loot.

For more information about the loot, please refer to Triple-J's Loot Overview
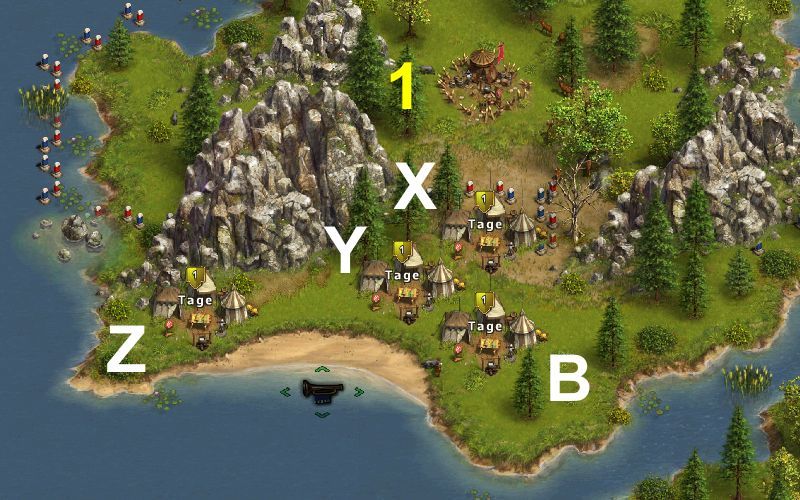
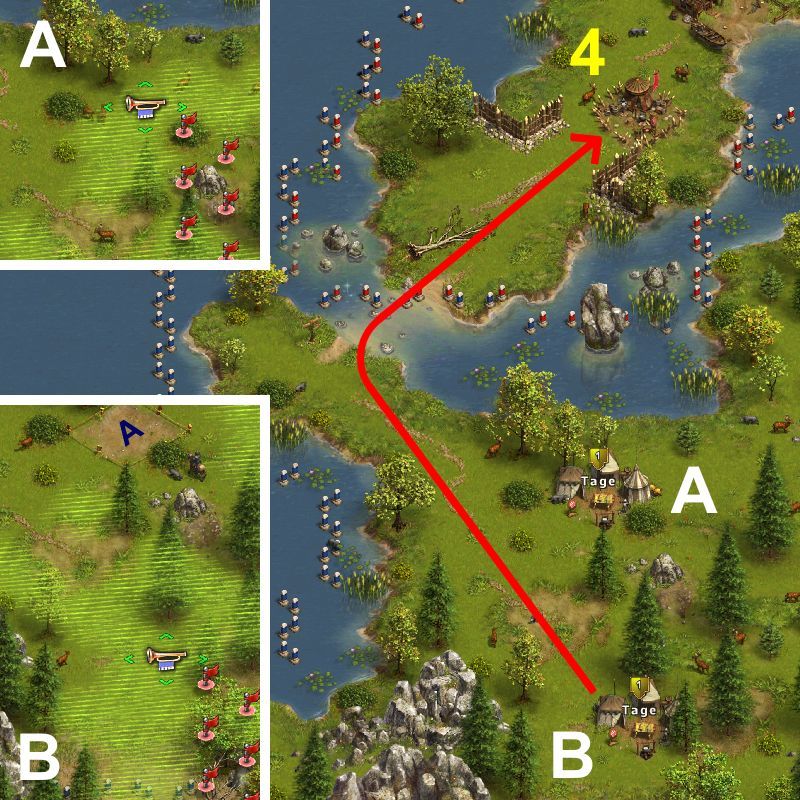
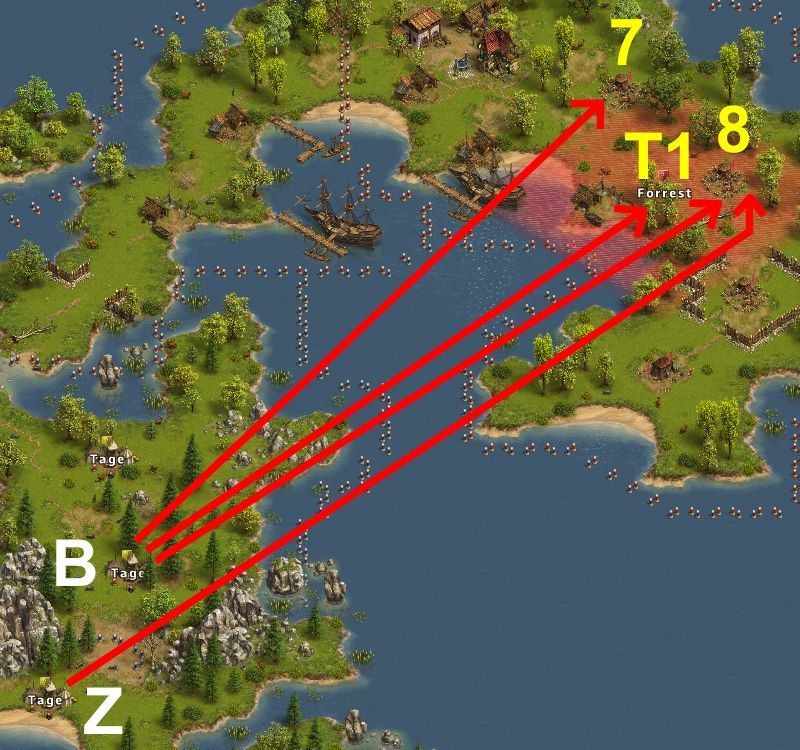
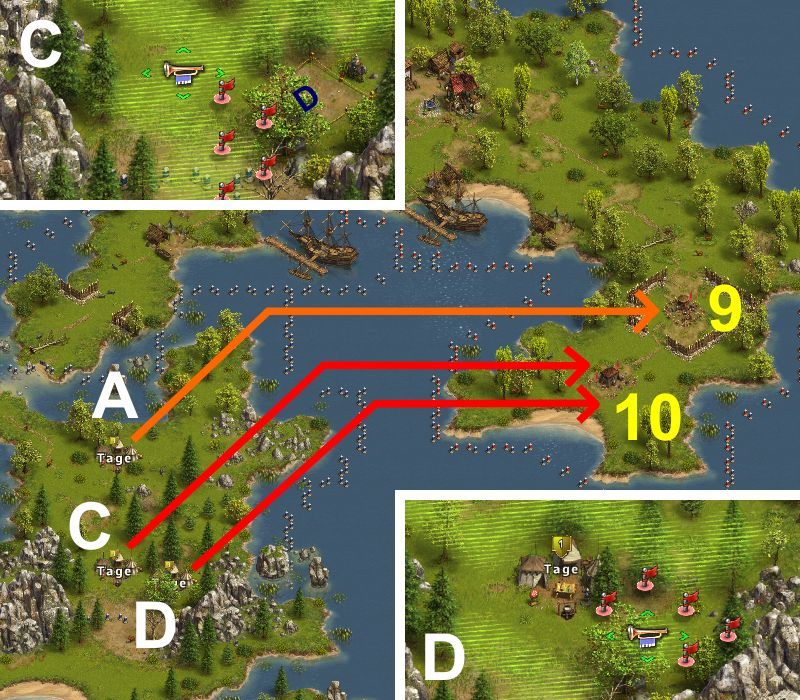
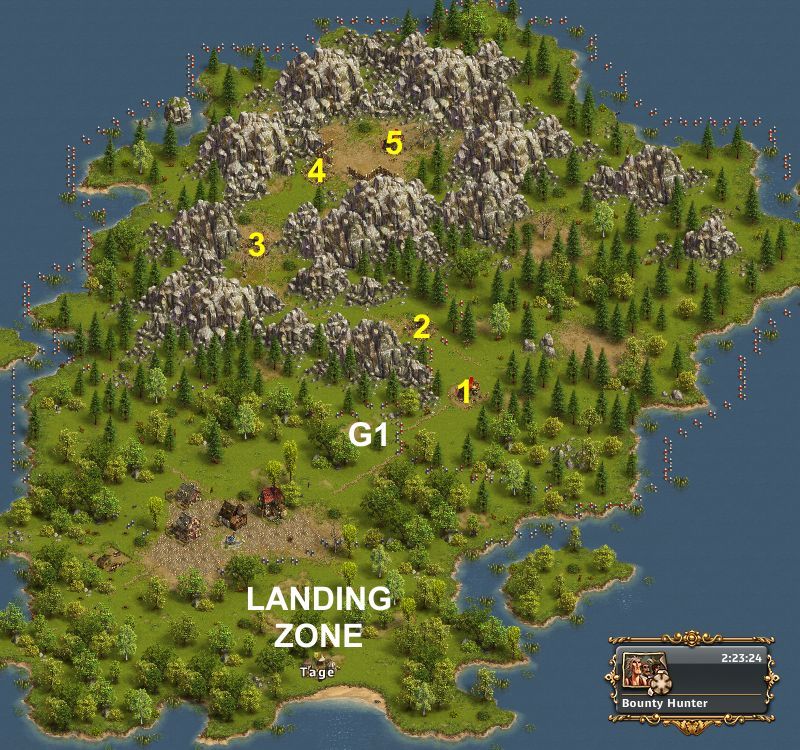
The map shows all relevant camps, with your own garrison positions in white and enemy camps in yellow.
Some multiplayer adventures have several landing zones, and may have different sets of camps,
with identical numbers but different colours to distinguish them from each other.
For this tutorial adventure you need ANY general, and only one of them.
Throughout all my guides the following colour codes are used to distinguish between different types of generals and setups:- NORMAL general: Must be a normal (slow) general, the one you buy in the tavern
- ANY general: Can be any general, no soldiers needed
- ANY general: Can be any general
- ANY general with Crossbows
- ANY general with Cannoneers
- MASTER of Defence: Must be the master of defence, bought for gems inthe shop
- BATTLE HARDENED general: Must be a fast general, bought for gems in the shop (*
- BATTLE HARDENED general with Crossbows
- BATTLE HARDENED general with Cannoneers
- Lord DRACUL: Must be Lord Dracul, bought for gems in the shop
- Lord DRACUL with Crossbows
- Lord DRACUL with Cannoneers
- VETERAN general: Must be a veteran general, bought for gems in the shop, capable of holding 250 units
- VETERAN general with Crossbows
- VETERAN general with Cannoneers
- MAJOR general: Must be a major general, bought for beanstalks in the shop, capable of holding 270 units
- MASTER of Martial Arts: Must be a master of martial arts, bought for gems in the shop, capable of holding 220 units
- MASTER of Martial Arts: with Crossbows
- MASTER of Martial Arts: with Cannoneers
- Champion ANSLEM: Must be Anteria General: Champion Anslem
- Champion ANSLEM with Crossbows
- Champion ANSLEM with Cannoneers
- Champion NUSALA: Must be Anteria General: Champion Nusala
- Champion NUSALA: with Crossbows
- Champion NUSALA: with Cannoneers
- Champion VARGUS: Must be Anteria General: Champion Vargus
- Champion VARGUS with Crossbows
- Champion VARGUS with Cannoneers
*) The following generals are all fast, and can be used whenever a Battle Hardened General is needed: Grim Reaper, General Bighelmet, General Log, Veteran General and Major General. The Master of Martial Arts and Lord Dracul are also fast, but due to their first strike ability, there are always separate setups available for them.
Throughout all my guides the following letters are used to denote different units:- R = Recruit
- M = Militia
- S = Soldier
- E = Elite Soldier
- C = Cavalry
- B = Bowman
- LB = Longbowman
- XB = Crossbowman
- K = Cannoneer
Six versions are presented below, all depending on the amount of cavalry you possess.
The units needed are listed with losses in the format minimum - average - maximum:- Version 1: Needed: 56R, Losses: 17R - 24R - 28R
- Version 2: Needed: 37R 12C, Losses: 9R - 15R - 18R
- Version 3: Needed: 17R 25C, Losses: 6R - 10R - 14R
- Version 4: Needed: 6R 40C, Losses: 2R - 5R - 6R
- Version 5: Needed: 3R 50C, Losses: 1R - 2R - 3R
- Version 6: Needed: 1R 75C, Losses: 0
Game flow, garrison settings and losses (minimum - average - maximum):
 Garrison Position G1
Before starting the adventure, load your general with the troops needed.
Once you've started the adventure, send your general to it.
If you realise you've sent wrong or too few units with your general,
unload the needed units from your general once he's arrived to the adventure, and send him home again.
This way you can use the same general over and over to move units to an adventure.
Note that it takes 30 minutes for normal generals to reach an adventure and to return from it.
A fast general (battle hardened or veteran) travels twice as fast.
Once your general has arrived to the adventure zone with all needed units,
move him from the landing zone to a position closer to the bandit camps, called G1 (garrison position 1).
Note also that you can always move (transfer) your generals across enemy territory without being attacked.
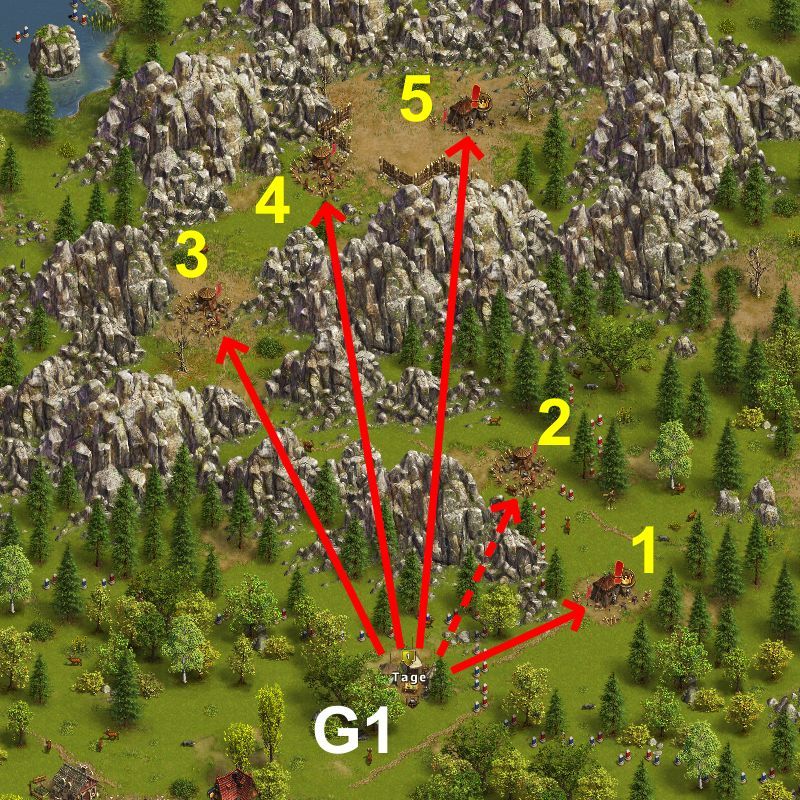
Red arrows in my maps indicate direct attack.
Dashed arrows are intercepted attacks.
Several of my guides include blocks, which are shown in orange arrows.
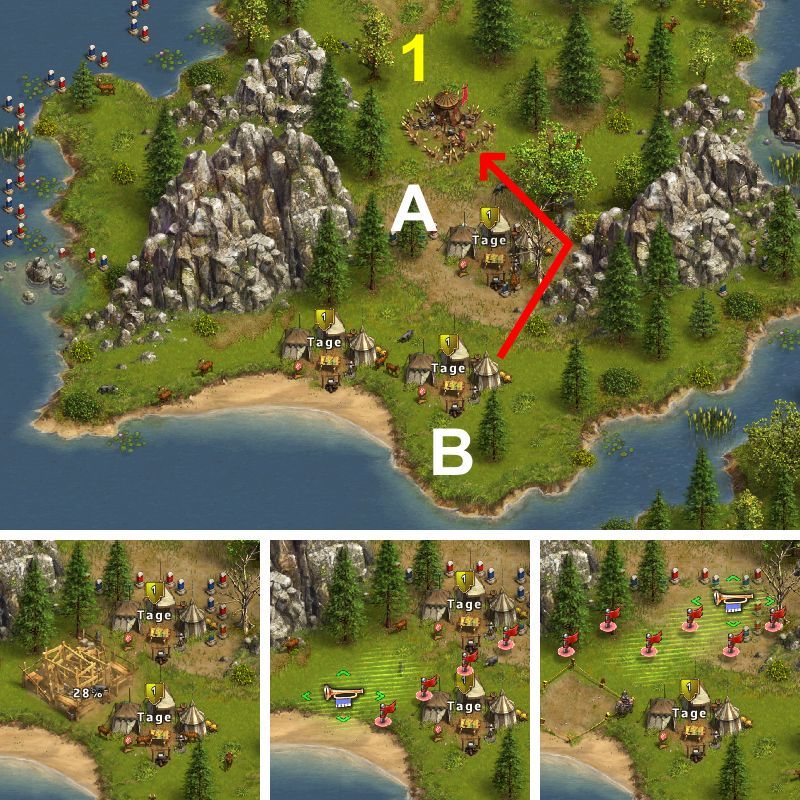
A total of four attacks are needed in this adventure.
Regardless of which version you follow, keep all units assigned to your general:
Camp 1) 10 Scavengers
Version 1: [56R (3R - 4R - 5R)]
Version 2: [37R 12C (2R - 3R - 4R)]
Version 3: [17R 25C (1R - 2R - 3R)]
Version 4: [6R 40C (0R - 1R - 1R)]
Version 5: [3R 50C (-)]
Version 6: [1R 75C (-)]
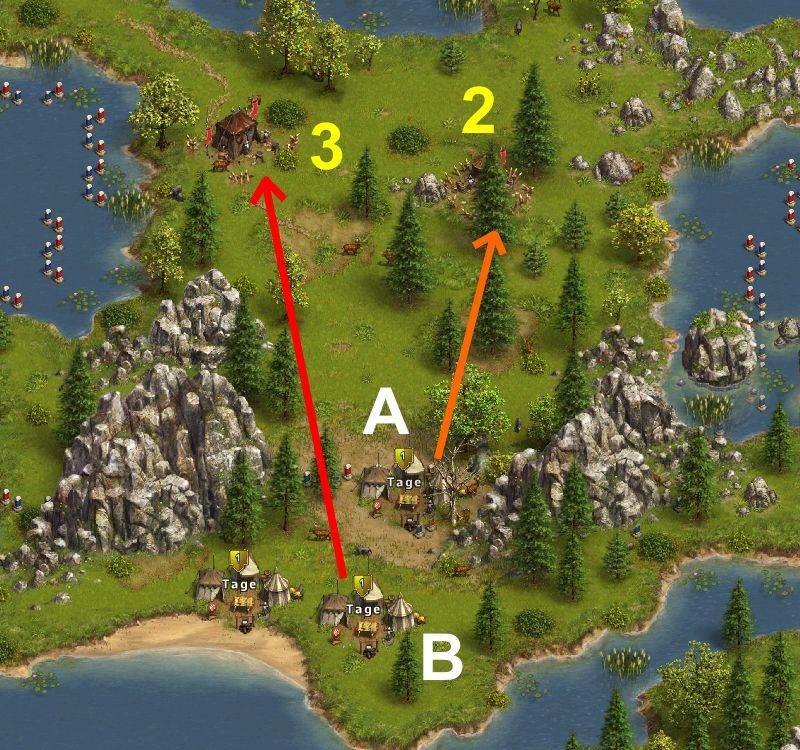
Next, attack camp 3 and let the general be intercepted by camp 2.
The dashed red line in the image above shows an indirect attack.
Such a camp can usually be attacked separately as well, but a controlled interception saves a little marching time.
Camp 3) 5 Scavengers (Camp 2) + 10 Scavengers (Camp 3)
Version 1: [51R (4R - 6R - 7R)]
Version 2: [33R 12C (2R - 4R - 5R)]
Version 3: [14R 25C (1R - 2R - 3R)]
Version 4: [5R 40C (0R - 1R - 1R)]
Version 5: [3R 50C (-)]
Version 6: [1R 75C (-)]
Camp 4) 6 Scavengers, 6 Stone Throwers
Version 1: [44R (5R - 7R - 9R)]
Version 2: [28R 12C (1R - 2R - 3R)]
Version 3: [11R 25C (1R - 2R - 2R)]
Version 4: [4R 40C (-)]
Version 5: [3R 50C (-)]
Version 6: [1R 75C (-)]
Camp 5) 15 Scavengers
Version 1: [35R (5R - 7R - 7R)]
Version 2: [25R 12C (4R - 6R - 6R)]
Version 3: [9R 25C (3R - 4R - 6R)]
Version 4: [4R 40C (2R - 3R - 4R)]
Version 5: [3R 50C (1R - 2R - 3R)]
Version 6: [1R 75C (-)]
When the adventure ends, your general will return to your home island.
A normal general will once again need 30 minutes to travel, and a fast general 15 minutes.
If you've left units unassigned to your general(s), these will need 100 minutes to find their way home.
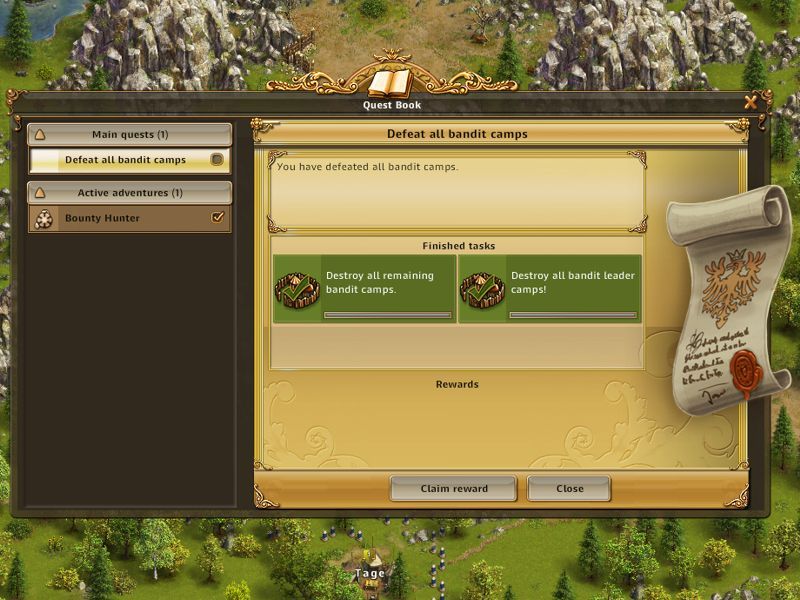
Adventure not Finishing
If you log out or return home to your main island before the last battle, and return to the adventure after it's finished,
you will not automatically get the "Return home" popup window:

In that case you will have to manually open the Quest Book (the exclamation mark next to your avatar).
Once in there, it's a simple matter of clicking "Claim reward", after which the "Return home" message will appear:
All garrison setups have been simulated at least 5000 times, using this simulator.
Even if I do the utmost to ensure that no errors occur anywhere, I am only human, and errors might always appear.
Thus, I do recommend that you double-check all setups in the simulator, especially before trying an attack the first time in a newly published setup.


Originally Posted by TitaniusAngel

Which is why I posted this...
 Reply With Quote
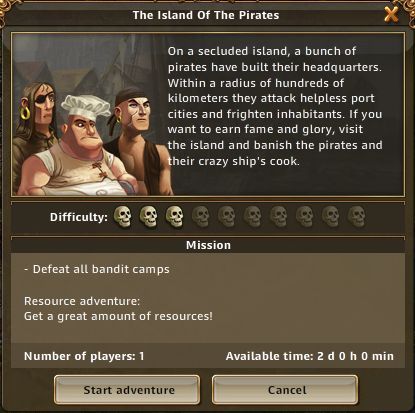


 Back to Map