Reply to Thread
Page 27 of 171 FirstFirst ... 17 25 26 27 28 29 37 77 127 ... LastLast
Results 261 to 270 of 1708

Thread: [Guide] Killste : Collected Adventure Guides by Various Authors

  1. #261
    Original Serf
    Join Date
    Feb 2012
    Location
    England
    Posts
    11
    World
    Northisle
    Tage. I have just started Victor the Vicious and have no BHG. I reworked the blocks for camps 3 & 4 with the following set ups

    Camp 3: 75S 100C (7-9.4-13 rounds of fighting)
    Camp 4: 5S 195C (6-8.9-12 rounds of fighting)

    I don't know if I lucked out but the increased fighting times allowed me to attack and defeat Camp 5 before Camps 3 & 4 were defeated

  2. #262
    Aunt Irma’s Favourite Writer
    Join Date
    Dec 2011
    Location
    Mariehamn
    Posts
    664
    World
    Newfoundland
    Quote Originally Posted by Fat_Taff View Post
    Tage. I have just started Victor the Vicious and have no BHG. I reworked the blocks for camps 3 & 4 with the following set ups

    Camp 3: 75S 100C (7-9.4-13 rounds of fighting)
    Camp 4: 5S 195C (6-8.9-12 rounds of fighting)

    I don't know if I lucked out but the increased fighting times allowed me to attack and defeat Camp 5 before Camps 3 & 4 were defeated
    Well done, and also a little lucky...
    That block of yours on camp 3 does have a fair chance of being lost after 7 rounds (a win lasts 2 rounds longer than a loss).

    Had it done that, you would probably not have had time enough for both attacks on camp 5.
    I did fail that one myself once when testing without a BHG.

  3. #263
    Original Serf
    Join Date
    Jun 2012
    Posts
    20
    World
    Sandycove
    Hi:
    Swamp of the witch:
    Camp5 blockable with (normal general) 54s. It takes 4 round. It needs 10-11 point between two general. minimum 10 maximum 12. camp 6 countdown bar starts 9-10second early.

    Attack 10a: 15r 120b enough for eliminate 100 cultist. It Works 4 times in succession.

    good games...
    Last edited by Mangalyurek; 10.09.12 at 11:26.

  4. #264
    Aunt Irma’s Favourite Writer
    Join Date
    Dec 2011
    Location
    Mariehamn
    Posts
    664
    World
    Newfoundland
    Quote Originally Posted by Mangalyurek View Post
    Hi:
    Swamp of the witch:
    Camp5 blockable with (normal general) 53s. It takes 4 round. It needs 8-9 point between two general.
    Unfortunately that block isn't safe enough...
    There's a 33% chance the block will lose it's battle, and in that case the blocking general will die before camp 6 has been killed.
    67% of the times you will be successful though.

    With 54S you would have a block with a certain victory, and a battle that lasts 3-4 rounds.
    That could be enough, but would be a very tight one...
    Walking across the red influcence area of camp 5 alone takes more than 3 rounds for the general heading for camp 6.


    Quote Originally Posted by Mangalyurek View Post
    Attack 10a: 15r 120b enough for eliminate 100 cultist. It works two times.
    Roughly every second time one cultist would survive. That still wouldn't be too bad for the second wave...
    But in the worst case, you will have over 10 cultists still alive... and in those cases, I'd recommend you to recalculate wave two first.

  5. #265
    Original Serf
    Join Date
    Jun 2012
    Posts
    20
    World
    Sandycove
    Quote Originally Posted by Tage View Post
    Unfortunately that block isn't safe enough...
    There's a 33% chance the block will lose it's battle, and in that case the blocking general will die before camp 6 has been killed.
    67% of the times you will be successful though.

    With 54S you would have a block with a certain victory, and a battle that lasts 3-4 rounds.
    That could be enough, but would be a very tight one...
    Walking across the red influcence area of camp 5 alone takes more than 3 rounds for the general heading for camp 6.


    Roughly every second time one cultist would survive. That still wouldn't be too bad for the second wave...
    But in the worst case, you will have over 10 cultists still alive... and in those cases, I'd recommend you to recalculate wave two first.
    no 54s. with 53s round 4-4. camp6, 1 round. camp6 display bar appears 5-6 second early. I will finished again this advanture today. I will post result again

    ****ok . I have lost 52 soldiers because my general is interrapted. I left 9 point between two general. My veteran general dissappeared near the camp6.
    He is interrapted without alert. I realized after end of the war . This night, I will try again with 10-11 point between two general.
    Last edited by Mangalyurek; 09.09.12 at 14:22.

  6. #266
    Aunt Irma’s Favourite Writer
    Join Date
    Dec 2011
    Location
    Mariehamn
    Posts
    664
    World
    Newfoundland
    Quote Originally Posted by Mangalyurek View Post
    no 54s. with 53s round 4-4. camp6, 1 round.
    You might want to read about the difference in length of fights that are won and fights that are lost (see below)...
    The length of the countdown (if you are victorious) is quite significant... having the same length as two rounds...

    Thus with 54S you'd always win with 3-4 rounds of fighting, having a total time of fighting of 100-120 seconds.

    With 53S you'd lose 33% the battles, resulting in a time of fighting of only 80 seconds (4 rounds),
    and win 67% of the battles with a total time of fighting of 120 seconds.


    Quote Originally Posted by Tage View Post
    I did some timing on these...

    The battle can be split up into three parts...


    1) The time from the moment when the general disappears till the time when the battle starts

    Regardless of the type of general this is always 5 seconds.
    Part of those 5 seconds is probably the 3.3 seconds it takes for the general to walk to the center of the camp.

    The remaining (or preceeding) 1.7 seconds may well be the time that has to elapse till the camp is considered busy engaging the attackers.
    If another general is walking into the same camp's influence area after those 1.7 seconds, that general will not be intercepted.


    2) The time for the battle itself

    This is dependent on the number of rounds, but is independent on the number of phases (first strike, normal and last strike units).
    • For a fast general (bhg or veteran) this is 10 seconds per round of fighting
    • For a normal general this is 20 seconds per round of fighting


    3) The time for the countdown if you are victorious

    This is the part where the camp starts smoking and the countdown bar is going from green to red.
    This part only occurs if you're winning the battle. If you lost, the time for this part is 0 seconds.

    The duration of this part is likewise dependent on the type of general.
    However, in addition to that, it is also dependent on the type of camp:
    • For a fast general killing a trap it is 10 (2+8) seconds
    • For a normal general killing a trap it is 20 (4+16) seconds
    • For a fast general killing a camp it is 20 (2+18) seconds
    • For a normal general killing a camp it is 40 (4+36) seconds
    • For a fast general killing a watch tower it is 80 (2+78) seconds
    • For a normal general killing a watch tower it is 160 (4+156) seconds
    • For a fast general killing a fortified watch tower it is 120 (2+118) seconds
    • For a normal general killing a fortified watch tower it is 240 (4+236) seconds
    The countdown will visually not start until 4 seconds (2 seconds for a fast general) have elapsed.
    That is the time indicated in brackets above.

  7. #267
    Original Serf
    Join Date
    Jun 2012
    Posts
    20
    World
    Sandycove
    Quote Originally Posted by Tage View Post
    You might want to read about the difference in length of fights that are won and fights that are lost (see below)...
    The length of the countdown (if you are victorious) is quite significant... having the same length as two rounds...

    Thus with 54S you'd always win with 3-4 rounds of fighting, having a total time of fighting of 100-120 seconds.

    With 53S you'd lose 33% the battles, resulting in a time of fighting of only 80 seconds (4 rounds),
    and win 67% of the battles with a total time of fighting of 120 seconds.
    thanks Tage. I used 54s. block succesful with 10-11 points between two general. minimum 10 points max 12. camp6 countdown bar starts 9-10 second early.
    Last edited by Mangalyurek; 10.09.12 at 11:20.

  8. #268
    Original Serf
    Join Date
    Jun 2012
    Posts
    20
    World
    Sandycove
    THE ISLAND OF THE PIRATES

    good work two block attack. camp4 with 67s block, camp5 with 54s block. Camp6 is finished before camp4 countdown bar starts. needs 11-12 point between your generals.

  9. #269
    Aunt Irma’s Favourite Writer
    Join Date
    Dec 2011
    Location
    Mariehamn
    Posts
    664
    World
    Newfoundland
    If you have never tried any blocks, this adventure is the best one for a first try.
    The first block would fail only if you send your generals to the wrong camp (could also happen without a block),
    with erroneous troops (could also happen without a block) or in the wrong order (so better practise so that you won't).
    And even if you would manage to fail it, the losses would still be small enough for a good lesson. Happy blocking!


    The Dark Priests
    Average Losses (Veteran with Crossbows): 299R 12C 12B
    Average Losses (Veteran with Cannoneers): 318R 12B
    Average Losses (MoMA with Cannoneers): 162R

    Adventure Info:
    Player Level: 26+
    Difficulty: 3/10
    Number of Players: 2
    Duration: 2 days
    Where to get?: Adventure seek with Explorer or Trader (Shop) for 150 map fragments


    For more information about the loot, please refer to Triple-J's Loot Overview


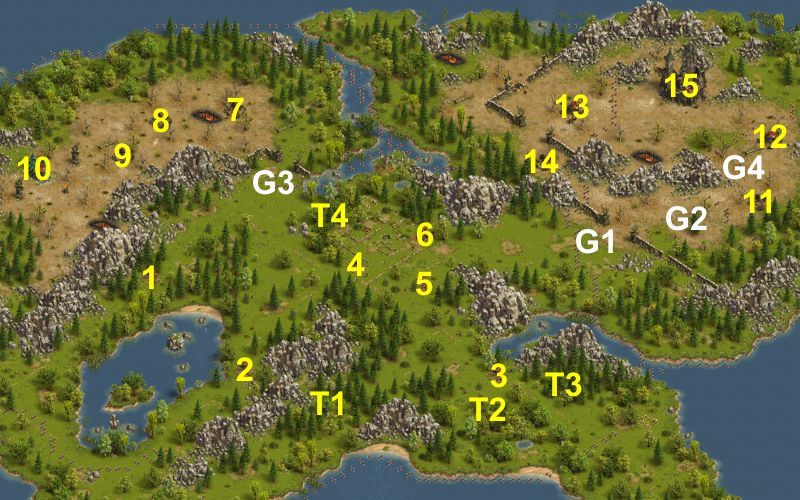
    QUICK LINKS: ... G1 ... G2 ... G3 ... G4

    This guide is based on a single player doing everything in this 2-player adventure.
    A suggestion for when to sell the lootspot is included below, under garrison position G4.

    You need to send troops 4-5 times.


    This guide contains several optional setups.
    Ten versions are summarized below, with the number of needed generals and troops and with the following lost troops:

    One NORMAL general, no blocks
    • Units needed, average: 459R 8M 193C 135LB (795 units)
    • Units needed, maximum: 484R 8M 193C 135LB (820 units)
    • Units lost, minimum: 393R 4C
    • Units lost, average: 454R 3M 12C
    • Units lost, maximum: 484R 8M 19C

    Two NORMAL generals, using one 1R block (or one round block)
    • Units needed, average: 444R 8M 193C 135LB (780 units)
    • Units needed, maximum: 463R 8M 193C 135LB (799 units)
    • Units lost, minimum: 383R 4C
    • Units lost, average: 439R 3M 12C
    • Units lost, maximum: 463R 8M 19C

    Two NORMAL generals with Longbows, using one round block
    • Units needed, average: 437R 8M 161S 194C 135LB (935 units)
    • Units needed, maximum: 451R 8M 161S 194C 135LB (949 units)
    • Units lost, minimum: 382R 4C
    • Units lost, average: 436R 3M 12C
    • Units lost, maximum: 451R 8M 3S 19C

    Two NORMAL generals with Crossbows, using one round block
    • Units needed, average: 399R 161S 194C 88XB (842 units)
    • Units needed, maximum: 417R 161S 194C 200XB (972 units)
    • Units lost, minimum: 357R 4C
    • Units lost, average: 398R 12C
    • Units lost, maximum: 417R 2S 19C

    One BATTLE HARDENED general with Longbows
    One NORMAL general, using two round blocks
    • Units needed, average: 422R 8M 161S 194C 135LB (920 units)
    • Units needed, maximum: 435R 8M 161S 194C 135LB (933 units)
    • Units lost, minimum: 370R 4C
    • Units lost, average: 421R 3M 12C
    • Units lost, maximum: 435R 8M 3S 19C

    One BATTLE HARDENED general with Crossbows
    One NORMAL general, using two round blocks
    • Units needed, average: 391R 161S 194C 88XB (834 units)
    • Units needed, maximum: 408R 161S 194C 200XB (963 units)
    • Units lost, minimum: 344R 4C
    • Units lost, average: 387R 12C
    • Units lost, maximum: 408R 3S 19C

    One BATTLE HARDENED general with Cannoneers
    One NORMAL general, using two round blocks
    • Units needed, average: 376R 161S 194C 100K (831 units)
    • Units needed, maximum: 391R 161S 194C 100K (846 units)
    • Units lost, minimum: 347R 4S
    • Units lost, average: 376R 8S
    • Units lost, maximum: 391R 9S

    One VETERAN general with Longbows
    One NORMAL general, using two round blocks
    • Units needed, average: 338R 200S 249C 18B 123LB (928 units)
    • Units needed, maximum: 352R 200S 249C 18B 123LB (942 units)
    • Units lost, minimum: 296R 4C 5B
    • Units lost, average: 336R 12C 12B
    • Units lost, maximum: 352R 2S 19C 18B

    One VETERAN general with Crossbows
    One NORMAL general, using two round blocks
    • Units needed, average: 300R 200S 249C 18B 148XB (915 units)
    • Units needed, maximum: 314R 200S 249C 18B 148XB (929 units)
    • Units lost, minimum: 267R 4C 5B
    • Units lost, average: 299R 12C 12B
    • Units lost, maximum: 314R 2S 19C 18B

    One VETERAN general with Cannoneers
    One NORMAL general, using two round blocks
    • Units needed, average: 319R 200S 249C 18B 148XB 183K (1117 units)
    • Units needed, maximum: 331R 200S 249C 18B 148XB 183K (1129 units)
    • Units lost, minimum: 291R 5B
    • Units lost, average: 318R 12B
    • Units lost, maximum: 331R 2S 18B
    • Units needed, average: 347R 200S 249C 183K (979 units)
    • Units needed, maximum: 360R 200S 249C 183K (992 units)
    • Units lost, minimum: 313R
    • Units lost, average: 346R
    • Units lost, maximum: 360R

    This guide includes two round blocks of method 2. One of the round blocks can be replaced by a 1R block of method 1.
    If you opt to use the 1R block, do watch your main general and be prepared to recall him, if he gets intercepted.


    Game flow, garrison settings and losses (minimum - average - maximum):


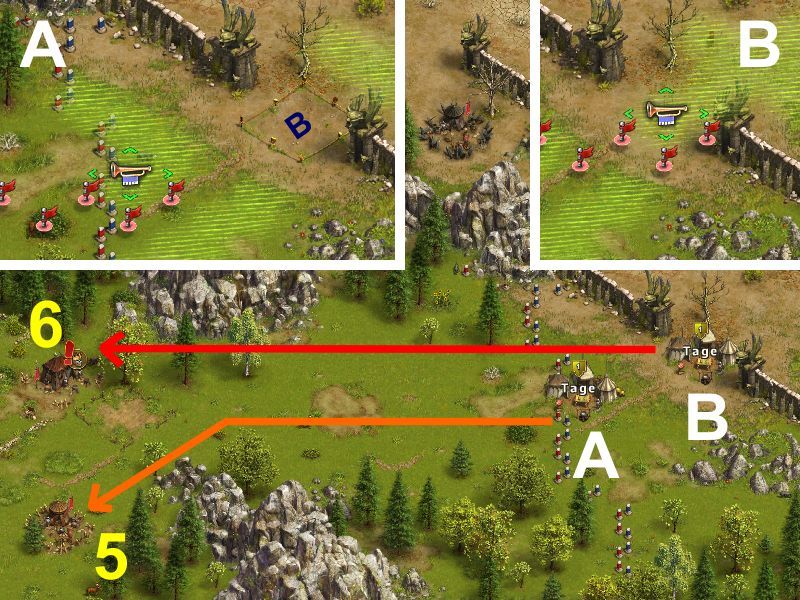
    Garrison Position G1 (Camps 5-6, BLOCK)
    Move your best general and one normal general (for the block) to garrison position G1:
    • Position A: NORMAL general or MASTER of Defence (needed for the block)
    • Position B: VETERAN general or BATTLE HARDENED general or ANY general


    This is probably one of the easiest blocks in all adventures, and a very good place to practice your first block.
    If you still do not want to try any blocks, kill camp 5 first:

    Camp 5) 20 Thugs, 10 Guard Dogs
    ANY general: [70R (11R - 16R - 22R)]
    ANY general: [20R 42S (11R - 16R - 20R)]
    MASTER of Martial Arts: [14R 23S (8R - 11R - 14R)]


    The block can be either a round block or a 1R block. The round block is always recommended if you do have the troops needed.
    Send both generals right after each other:

    From A to Camp 5) 20 Thugs, 10 Guard Dogs
    BLOCKING NORMAL general: [1R (1R)] {20 seconds of fighting}
    BLOCKING NORMAL general: [55C (-)] {120 - 180 seconds of fighting}
    BLOCKING NORMAL general: [19S (-)] {120 - 200 seconds of fighting}
    BLOCKING NORMAL general: [16E 1C (-)] {120 - 240 seconds of fighting}
    BLOCKING MASTER of Defence: [17R (-)] {140 - 230 seconds of fighting}
    BLOCKING MASTER of Defence: [36C (-)] {150 - 240 seconds of fighting}

    From B to Camp 6) 20 Thugs, 20 Guard Dogs, 20 Rangers, 1 Skunk
    ANY general: [200R (25R - 33R - 41R)] {80 seconds of fighting}
    ANY general: [39R 161S (25R - 33R - 39R 1S)] {80 seconds of fighting}
    BATTLE HARDENED general: [39R 161S (25R - 33R - 39R 1S)] {40 seconds of fighting}
    Lord DRACUL: [38R 162S (23R - 30R - 38R)] {30-40 seconds of fighting}
    VETERAN general: [37R 200S (25R - 32R - 37R 1S)] {30 seconds of fighting}
    MASTER of Martial Arts: [19R 175S (12R - 16R - 19R)] {20 seconds of fighting}

    The marching time through the corner of the red area of camp 5 is less than 10 seconds.


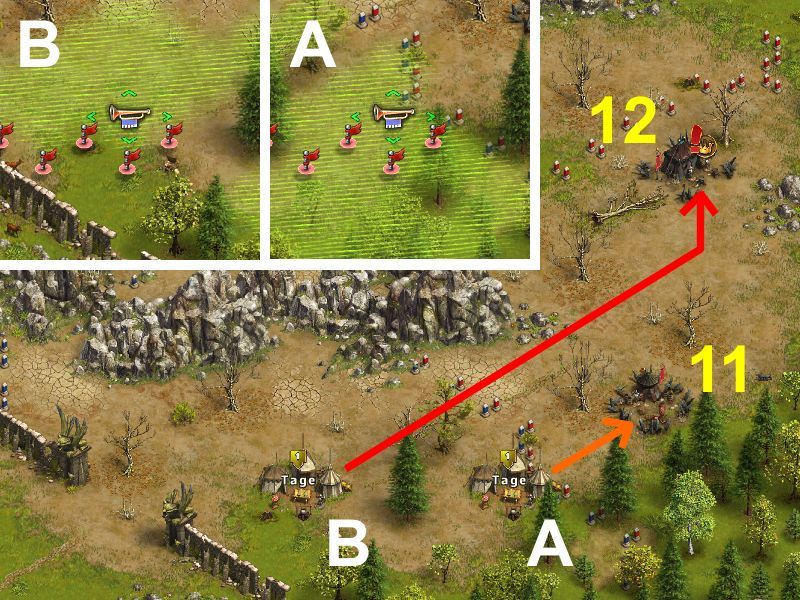
    Garrison Position G2 (Camps 11-12, BLOCK)
    Move your best general and one normal general (for the block) to garrison position G2:
    • Position A: NORMAL general or MASTER of Defence (needed for the block)
    • Position B: VETERAN general or BATTLE HARDENED general


    If you do not have a fast general (veteran or battle hardened), or if you don't want to use the block, kill camps 11 and 12 one at a time:

    Camp 11) 60 Cultists, 20 Dark Priests
    ANY general: [18R 182C (12R - 15R - 17R)]
    ANY general: [16R 1S 183C (12R - 15R - 16R)]
    Lord DRACUL: [14R 1S 145C (9R - 11R - 14R)]
    VETERAN general: [10R 1S 239C (7R - 9R - 10R)]
    MAJOR general: [8R 1E 261C (5R - 7R - 8R)]
    MASTER of Martial Arts: [8R 1S 211C (4R - 6R - 8R)]

    Camp 12) 25 Cultists, 25 Shadowsneakers, 30 Fanatics, 10 Firedancers
    ANY general: [140R (44R - 51R - 55R)]
    ANY general: [54R 72S (44R - 51R - 54R 1S)]
    Lord DRACUL: [54R 70S (40R - 48R - 54R)]
    MASTER of Martial Arts: [39R 40S (31R - 35R - 39R)]


    If you have a fast general, the following round block is recommended.
    Send general B at the moment when general A appears outside his camp:

    From A to Camp 11) 60 Cultists, 20 Dark Priests
    BLOCKING NORMAL general: [124C (-)] {120 - 220 seconds of fighting}
    BLOCKING MASTER of Defence: [111C (-)] {110 - 230 seconds of fighting}

    From B to Camp 12) 25 Cultists, 25 Shadowsneakers, 30 Fanatics, 10 Firedancers
    BATTLE HARDENED general: [140R (44R - 51R - 55R)] {30 seconds of fighting}
    BATTLE HARDENED general: [54R 72S (44R - 51R - 54R 1S)] {30 seconds of fighting}
    Lord DRACUL: [54R 70S (40R - 48R - 54R)] {20-30 seconds of fighting}
    MASTER of Martial Arts: [39R 40S (31R - 35R - 39R)] {20 seconds of fighting}

    The marching time through the red area of camp 11 takes about 50-55 seconds.
    Despite this I have successfully done this block with two normal generals as well.
    It is rather tight, 55 + 60 = 115 seconds marching and fighting time for the main general.
    It is doable, but requires that there is no delay with sending general B after general A has appeared.


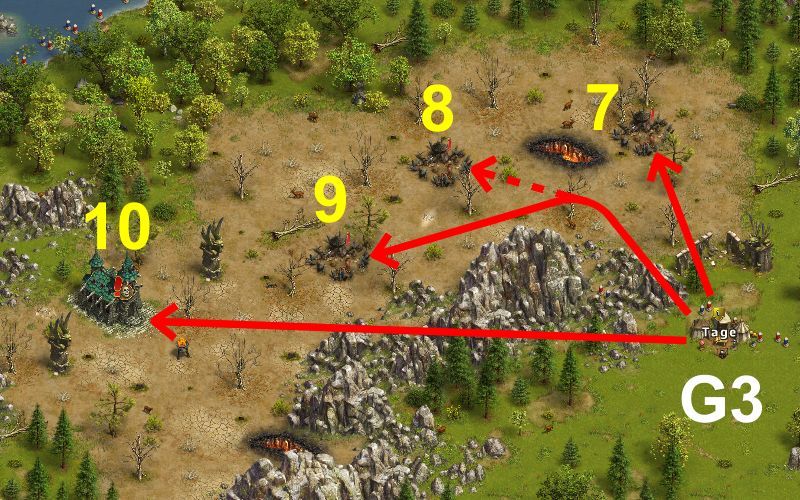
    Garrison Position G3 (Camps 7-10)
    Move your best general to garrison position G3:


    Camp 7) 30 Cultists, 40 Dark Priests
    ANY general: [7R 193C (2R - 4R - 6R)]
    ANY general: [5R 1S 194C (2R - 4R - 5R)]
    Lord DRACUL: [3R 1S 196C (0R - 1R - 3R)]
    VETERAN general: [1S 249C (-)]
    MASTER of Martial Arts: [1S 191C (-)]

    Next, attack camp 9. The general will be intercepted by camp 8, and then continue to camp 9.

    Camp 9) 30 Dark Priests, 30 Shadowsneakers (Camp 8) and 30 Cultists, 20 Shadowsneakers, 10 Firedancers (Camp 9)
    ANY general: [140R (53R - 58R - 60R)]
    ANY general: [60R 65S (53R - 58R - 60R)]
    Lord DRACUL: [59R 60S (42R - 48R - 59R)]
    MASTER of Martial Arts: [34R 33S (28R - 30R - 34R)]

    Camp 10) 40 Cultists, 30 Dark Priests, 20 Shadowsneakers, 1 Witch of the Swamp
    ANY general: [98R 8M 60C 34LB (71R 4C - 97R 3M 12C - 98R 8M 19C)]
    ANY general: [89R 28M 18S 65C (79R 4C - 89R 18M 12C - 89R 28M 3S 19C)] (provided for achievement quest)
    ANY general: [75R 1S 70C 54XB (56R 4C - 70R 12C - 75R 19C)]
    ANY general: [112R 1S 87K (102R - 109R - 112R)]
    Lord DRACUL: [97R 9M 47C 47LB (73R 4C - 93R 12C - 97R 8M 19C)]
    Lord DRACUL: [74R 1S 73C 52XB (51R 4C - 65R 12C - 74R 19C)]
    Lord DRACUL: [112R 1S 87K (96R - 106R - 112R)]
    VETERAN general: [189R 61S (155R - 178R - 189R)] (provided for achievement quests)
    VETERAN general: [187R 63E (152R - 175R - 187R)] (provided for achievement quests)
    VETERAN general: [62R 1S 113C 74LB (46R 4C - 58R 12C - 62R 19C)]
    VETERAN general: [49R 1S 112C 88XB (36R 4C - 45R 12C - 49R 19C)]
    VETERAN general: [66R 1E 183K (60R - 64R - 66R)]
    MAJOR general: [66R 1E 188K (60R - 64R - 66R)]
    MASTER of Martial Arts: [78R 142S (60R - 73R - 78R)]
    MASTER of Martial Arts: [49R 1E 159K (39R - 45R - 49R)]


    If you have a Master of Martial Arts, it is cheaper to use him for a suicidal first wave on the bone church.
    This wave can also be taken by a lootspot buyer:

    Camp 10a) 40 Cultists, 30 Dark Priests, 20 Shadowsneakers, 1 Witch of the Swamp
    MASTER of Martial Arts: [1R (1R)]

    Camp 10b) 40 Cultists, 10-13 Dark Priests, 1 Witch of the Swamp
    ANY general: [62R 1M 60C 77LB (44R - 57R - 62R)]
    ANY general: [46R 1S 64C 89XB (33R - 43R - 46R)]
    ANY general: [43R 1E 94C 62K (30R - 40R - 43R)]
    Lord DRACUL: [60R 1M 65C 74LB (40R - 53R - 60R)]
    Lord DRACUL: [44R 1S 68C 87XB (29R - 39R - 44R)]
    Lord DRACUL: [40R 1E 98C 61K (26R - 36R - 40R)]
    VETERAN general: [44R 1S 77C 128LB (32R - 41R - 44R)]
    VETERAN general: [39R 1S 130C 80XB (27R - 36R - 39R)]
    VETERAN general: [30R 1E 76C 143K (22R - 28R - 30R)]
    MAJOR general: [27R 1E 104C 138K (19R - 25R - 27R)]
    MASTER of Martial Arts: [41R 1S 54C 124LB (29R - 38R - 41R)]
    MASTER of Martial Arts: [36R 1S 105C 78XB (24R - 33R - 36R)]
    MASTER of Martial Arts: [26R 1E 55C 138K (19R - 24R - 26R)]


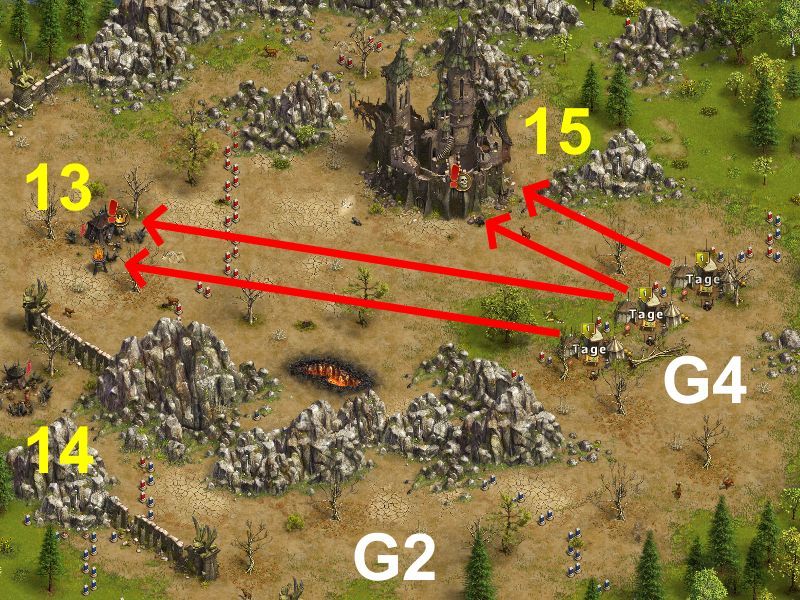
    Garrison Position G4 (Camps 13-15, LOOTSPOT)
    Move your best general and (at least) one extra general, for the suicide(s), to garrison position G4:


    A lootspot buyer can be invited now and asked to sacrify the 31R needed in attack 13a.
    This is recommended if you swap two of these lootspots with a friend,
    and especially if you have only 2 generals and need them both for the attack on camp 15.

    Instead of sacrificing the 31R, a lootspot buyer can also bring 1C to be sent either onto camp 14 (from G2) or onto camp 15.


    Camp 13a) 30 Shadowsneakers, 50 Fanatics, 10 Firedancers
    ANY general: [31R (31R)]
    MASTER of Defence: [22R (22R)]
    Lord DRACUL: [10R (10R)]

    The above setup with 31R has about one chance in 50 of leaving 1 Shadowsneaker alive.
    If that happens, you have a 60% chance of losing one cavalry in the next attack.
    All-in-all, count on losing one cavalry per 100 attacks.
    If you prefer losing 100R over 1C, send 32R in the above suicidal wave instead.

    Camp 13b) 0-1 Shadowsneakers, 48-50 Fanatics, 10 Firedancers
    ANY general: [173C (0C - 0C - 1C)]


    If you, or your lootspot buyer, has a MASTER of Martial Arts, the cheapest way is to use him for the suicidal wave.
    With only 1R he would kill all Shadowsneakers and 15-17 Fanatics:

    Camp 13a) 30 Shadowsneakers, 50 Fanatics, 10 Firedancers
    MASTER of Martial Arts: [1R (1R)]

    Camp 13b) 33-35 Fanatics, 10 Firedancers
    ANY general: [135C (-)]
    MASTER of Martial Arts: [76C (-)]


    If you have a Master of Martial Arts, it is cheaper to use him for a suicidal first wave on the dark castle.
    This wave can also be taken by a lootspot buyer:

    Camp 15a) 40 Cultists, 40 Dark Priests, 40 Shadowsneakers, 1 Dark High Priest
    MASTER of Martial Arts: [1R (1R)]

    Camp 15b) 40 Cultists, 25-28 Dark Priests, 1 Dark High Priest
    ANY general: [95R 15S 56C 34LB (95R - 95R 9S - 95R 14S)]
    ANY general: [95R 1S 71C 34XB (77R - 90R - 95R)]
    ANY general: [74R 1E 61C 64K (57R - 67R - 74R)]
    Lord DRACUL: [105R 1S 41C 53LB (81R - 96R - 105R)]
    Lord DRACUL: [57R 1S 37C 105XB (43R - 50R - 57R)]
    VETERAN general: [66R 1S 103C 80LB (53R - 63R - 66R)]
    VETERAN general: [40R 1S 112C 97XB (32R - 38R - 40R)]
    MAJOR general: [36R 1E 139C 94XB (30R - 35R - 36R)]
    MASTER of Martial Arts: [62R 1S 81C 76LB (50R - 59R - 62R)]
    MASTER of Martial Arts: [36R 1S 88C 95XB (29R - 34R - 36R)]


    Otherwise, if you have a veteran general or cannoneers, the witch tower can be killed in one wave:

    Camp 15) 40 Cultists, 40 Dark Priests, 40 Shadowsneakers, 1 Dark High Priest
    ANY general: [90R 9S 1E 100K (90R 4S - 90R 8S - 90R 9S)]
    Lord DRACUL: [132R 1S 18B 49XB (94R 5B - 126R 12B - 132R 18B)]
    Lord DRACUL: [108R 1S 1E 90K (97R - 106R - 108R 1S)]
    VETERAN general: [137R 113S (120R - 133R - 137R)]
    VETERAN general: [108R 1S 18B 123LB (97R 5B - 106R 12B - 108R 18B)]
    VETERAN general: [83R 1S 18B 148XB (78R 5B - 82R 12B - 83R 18B)]
    VETERAN general: [112R 1S 94K (100R - 110R - 112R)]
    MASTER of Martial Arts: [125R 95S (106R - 119R - 125R)]
    MASTER of Martial Arts: [96R 18B 1S 105LB (83R 5B - 92R 12B - 96R 18B)]
    MASTER of Martial Arts: [71R 18B 1S 130XB (63R 5B - 69R 12B - 71R 18B)]
    MASTER of Martial Arts: [100R 1E 119K (85R - 95R - 100R)]

    Note that it isn't really advantegeous to use cannoneers if you have a veteran general or master of martial arts.
    Use them only if you have the cannoneers, but lack the otherwise needed bowmen and crossbowmen.
    It is better to be able to kill the dark high priest with crossbowmen in the second round,
    before he (having last strike, just like cannoneers) gets a chance to fire a second time.


    If you do not have a veteran general, you will have to send a suicidal wave first.
    Note that the suicidal wave depends on whether you have crossbows for the second wave.
    If Lord Dracul is one of your generals, it is better to use him in the first suicidal wave.

    Camp 15a) 40 Cultists, 40 Dark Priests, 40 Shadowsneakers, 1 Dark High Priest
    ANY general: [124R (124R)]
    ANY general: [131B (131B)]
    Lord DRACUL: [114R (114R)]
    Lord DRACUL: [122B (122B)]
    Camp 15b) 0-16 Dark Priests, 1 Dark High Priest
    ANY general: [30R 35C 135LB (20R - 25R - 30R)]
    ANY general: [52R 114S 34C (40R - 48R - 52R)] (provided for achievement quests)
    ANY general: [24R 2S 39C 135LB (20R - 23R - 24R 1S)]

    Camp 15a) 40 Cultists, 40 Dark Priests, 40 Shadowsneakers, 1 Dark High Priest
    ANY general: [134R (134R)]
    ANY general: [145B (145B)]
    Lord DRACUL: [123R (123R)]
    Lord DRACUL: [140B (140B)]
    Camp 15b) 1 Dark High Priest
    ANY general: [200XB (-)]

    Camp 15a) 40 Cultists, 40 Dark Priests, 40 Shadowsneakers, 1 Dark High Priest
    ANY general: [114R (114R)]
    ANY general: [116B (116B)]
    Lord DRACUL: [98R (98R)]
    Lord DRACUL: [104B (104B)]
    Camp 15b) 14-32 Dark Priests, 1 Dark High Priest
    ANY general: [23R 1S 88C 88XB (20R - 22R - 23R)]

    Camp 15a) 40 Cultists, 40 Dark Priests, 40 Shadowsneakers, 1 Dark High Priest
    ANY general: [108R (108R)]
    ANY general: [107B (107B)]
    Lord DRACUL: [95R (95R)]
    Lord DRACUL: [96B (96B)]
    Camp 15b) 26-40 Dark Priests, 1 Dark High Priest
    VETERAN general: [29R 1S 91C 129LB (20R - 26R - 29R)]
    VETERAN general: [23R 1S 144C 82XB (20R - 22R - 23R)]


    All garrison setups have been simulated at least 5000 times, using this simulator.
    Even if I do the utmost to ensure that no errors occur anywhere, I am only human, and errors might always appear.
    Thus, I do recommend that you double-check all setups in the simulator, especially before trying an attack the first time in a newly published setup.

    All garrison setups where recruits and soldiers are included have a very small chance of one or a few soldiers being killed.
    I prefer having it so tight, that in most cases that one soldier survives and actually might save one recruit by taking the last hits in the battle.
    That being said, be prepared to lose the odd soldier(s) after playing the same adventure hundreds or thousands of times...

    On the other hand, all garrison setups have also been made so that the risk of losing longbows or crossbows is next to negligible.
    Due to this, some setups have more recruits/soldiers than what can be seen in other guides.
    In some cases this will increase the maximum losses (of recruits), but save the rare occasion of losing crossbows.

    The durations of the blocks and attacks are based on this post.
    Last edited by Tage; 11.12.15 at 01:08. Reason: Added Lord Dracul and MoMA suicide on camp 10

  10. #270
    Aunt Irma’s Favourite Writer
    Join Date
    Dec 2011
    Location
    Mariehamn
    Posts
    664
    World
    Newfoundland
    Quote Originally Posted by Mangalyurek View Post
    THE ISLAND OF THE PIRATES

    good work two block attack. camp4 with 67s block, camp5 with 54s block. Camp6 is finished before camp4 countdown bar starts. needs 11-12 point between your generals.
    I'm gonna have to give this a try myself...

    Attacking camp 4 with 67S there is always a chance (just over 1%, 26 out of 2200) of getting only 100-120 seconds of fighting...


    On the other hand, if you have a few elite soldiers, that block would be quite feasible...
    The following graph is based on 59E (only an 0.4% chance, 9 out of 2200, of the block lasting 140 seconds):


    Without elite soldiers, the following could be a better option than 67S.
    It is based on 68S (basically no chance that the block will last less than 140 seconds):

    Last edited by Tage; 12.09.12 at 14:19.

Reply to Thread

Similar Threads

  1. [Guide] corona88 adventure guides
    By corona88 in forum Adventure Guides
    Replies: 313
    Last Post: 25.09.19, 13:11
  2. [Guide] Fill : Collected Adventure Guides by Filalithis
    By Filalithis in forum Adventure Guides
    Replies: 6
    Last Post: 04.03.13, 16:39
  3. Replies: 62
    Last Post: 22.04.12, 00:50
  4. [Guide] Adventure guides by Tage
    By Tage in forum Adventure Guides
    Replies: 0
    Last Post: 14.04.12, 16:35

Posting Permissions

  • You may not post new threads
  • You may not post replies
  • You may not post attachments
  • You may not edit your posts

Ubisoft uses cookies to ensure that you get the best experience on our websites. By continuing to use this site you agree to accept these cookies. More info on our privacy.