Reply to Thread
Page 30 of 171 FirstFirst ... 20 28 29 30 31 32 40 80 130 ... LastLast
Results 291 to 300 of 1708

Thread: [Guide] Killste : Collected Adventure Guides by Various Authors

  1. #291
    Ruler of the Land TheVictorious's Avatar
    Join Date
    May 2012
    Posts
    1,078
    World
    Sandycove
    Which general (B or C) got intercepted?
    That first block should be critical only if the generals are dispatched at the same time (due to lagging).
    Well, All hit without any issue, not intercept, but General A finished before General C end his battle, all bars was one, but leader bar started when General C was has 20% left from his bar !


    Please do!
    Especially if it doesn't require any timing (if you can send the generals right after each other).
    I'm using this: http://osettlers.ru/adventure/outlaws (for BHG one)
    There is no timing, but actually I making always my modification in builds, in this guide builds are not the best, but still good, blocks taking medium time, not longest or about longest, as example blocks maybe take 5 rounds while you can make then 9 in avg with lower troops, so I found my better builds so maybe will be good idea to translate it and make builds better in English version.


    In most causes I'm doing adventures without guides, but using guides to take a look for avg losses and if there is better ideas on them, for builds I do my builds using this simulator : http://settlersonlinesimulator.com/d...pfsimulator/en

    And thanks

  2. #292
    Pathfinder
    Join Date
    Feb 2012
    Location
    Wales, UK
    Posts
    4
    World
    Newfoundland
    Hi Tage, just a quick comment. I do like your guides, but on 'Island of the Pirates' I have been caught out twice wasting time. You should mention that for even just the first block on camp 2 & 3, the amount of soldiers sent to the island needs to be 168s + the 53s that are going to be sent to camp 2. I am definitely going to try and remember next time. Thanks for the guides, a lot of work has gone into them. Cheers!

  3. #293
    Aunt Irma’s Favourite Writer
    Join Date
    Dec 2011
    Location
    Mariehamn
    Posts
    664
    World
    Newfoundland
    I'll get back to you a little later, TheVictorious...


    Quote Originally Posted by Kae_Otic View Post
    Hi Tage, just a quick comment. I do like your guides, but on 'Island of the Pirates' I have been caught out twice wasting time. You should mention that for even just the first block on camp 2 & 3, the amount of soldiers sent to the island needs to be 168s + the 53s that are going to be sent to camp 2. I am definitely going to try and remember next time. Thanks for the guides, a lot of work has gone into them. Cheers!
    Thanks!

    168 + 53 = 221... and isn't that what it says?

    Quote Originally Posted by Tage View Post
    One VETERAN general
    One BATTLE HARDENED general
    Two NORMAL generals, using three round blocks
    • Units needed, average: 387R 1M 221S 249C 68XB (926 units)
    • Units needed, maximum: 421R 168S 56E 249C 100LB/68XB (994 units)
    Alternatively 168S + 56E (if you have the needed elite soldiers for the blocks).

  4. #294
    Aunt Irma’s Favourite Writer
    Join Date
    Dec 2011
    Location
    Mariehamn
    Posts
    664
    World
    Newfoundland
    Quote Originally Posted by TheVictorious View Post
    Well, All hit without any issue, not intercept, but General A finished before General C end his battle, all bars was one, but leader bar started when General C was has 20% left from his bar !
    If you've got a battle hardened genenral, that first block is indeed rather tight.
    I changed my guide a little, adding some further information about the timing:

    Quote Originally Posted by Tage View Post
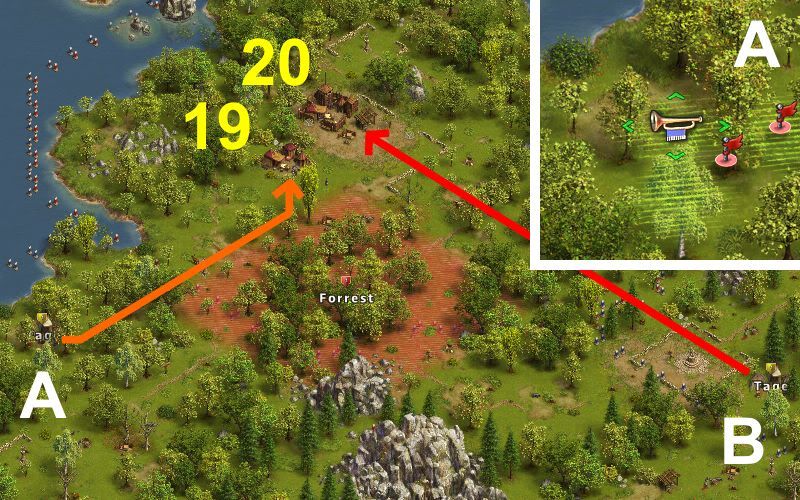
    From these positions, send your generals right after each other:

    From A to Camp 20) 100 Scavengers, 50 Stone Throwers
    BLOCKING NORMAL general: [197C (-)] {140 - 200 seconds of fighting, 0.1% chance of 120 seconds}

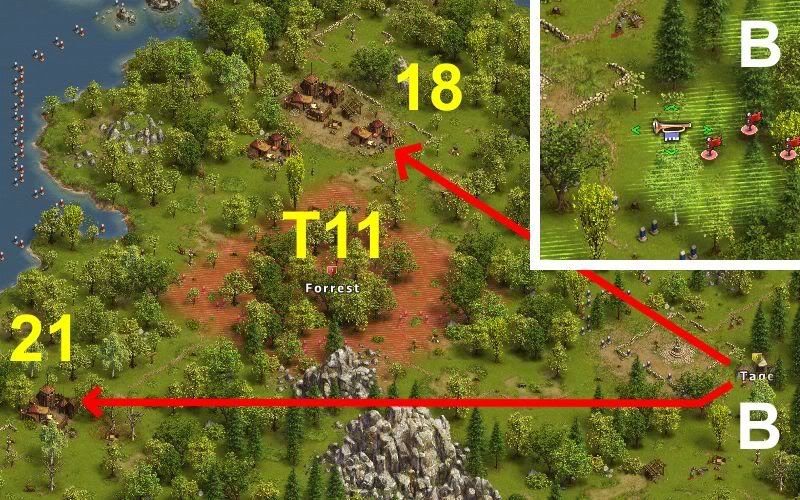
    Note that general B must be sent to the leader camp 22. He will be intercepted by camp 21, which is his real target.

    From B to Camp 22) 50 Scavengers, 50 Guard Dogs, 50 Stone Throwers (Camp 21)
    BLOCKING NORMAL general: [161C (-)] {120 - 180 seconds of fighting}

    From C to Camp 22) 1 Skunk, 100 Guard Dogs, 80 Stone Throwers
    BATTLE HARDENED general: [89R 111S (66R - 78R - 89R)] {40 seconds of fighting}
    VETERAN general: [87R 163S (66R - 77R - 87R)] {30 seconds of fighting}

    The marching time for general C, from the moment general A starts his battle, till the moment general C starts his battle, is 70 seconds (21 steps marching) plus the time it takes to send off generals B and C, some 5 seconds each. If general C is a battle hardened general, his total time of marching and fighting will thus be 70+5+5+40 = 120 seconds. Since there is an 0.1% chance that the blocking general A will fight for only 120 seconds, this block is rather tight. If possible, try to send generals B and C within 4-5 seconds from sending the previous general. If for some reason you do notice that one general has been sent off a little late, do recall all of them and resend.
    I understand that your block A was a victory though, and thus it should have lasted 5 rounds, or 140 seconds.
    This would indicate that it took almost 15 seconds to send general B and 15 seconds to send general C: 70+15+15+40 = 140 seconds.
    I know it is difficult to send the generals right after each other, when the distance on the map is so long.
    This is also the reason why I added the warning above, to recommend a recall if you feel it took too long to send the generals.


    Quote Originally Posted by TheVictorious View Post
    I'm using this: http://osettlers.ru/adventure/outlaws (for BHG one)
    The marching distance between generals "A" and "VETERAN" in the Russian guide (although that veteran should be battle hardened) is almost identical to the distance between generals A and C in my guide. Thus, between the two guides, there isn't really any difference in marching time from the moment general A starts to fight till the moment the battle hardened general starts to fight. The only (and main) difference lies of course in the distance that the generals have to march on the map, and thus the dispatching will require some more time in my guide. Thanks to the long distance though, it is always easy to recall and resend them, if you didn't get the generals to march after each other. And the more you practise, the easier it will be the next time.


    Quote Originally Posted by TheVictorious View Post
    There is no timing, but actually I making always my modification in builds, in this guide builds are not the best, but still good, blocks taking medium time, not longest or about longest, as example blocks maybe take 5 rounds while you can make then 9 in avg with lower troops
    The suggested block of 20S 135C is indeed far from optimal, with more than half the fights lasting only 120 seconds:


    Using fewer troops would certainly give longer average fighting, but the goal should always be to find a solution that would never fail, or that fails as seldom as possible. The block that I'm using, 197C, would normally last 140 seconds (5 rounds of fighting plus the victory countdown). Only 3 times out of 2200 did this fight last 120 seconds (6 rounds with a loss):


  5. #295
    Quartermaster
    Join Date
    Apr 2012
    Posts
    276
    World
    Northisle
    Hey Tage, thanks for these awesome guides.

    I use Sons regularly as this seems to be the adventure my explorers find most frequently. And at least with your guide it is doable. A suggestion on the last block, but I'm not sure if it works.

    You block camp 19 because otherwise the block on 21 would be intercepted right? However if you send it to the leadercamp 23, it will be intercepted by 21. So you wouldn't need to block 19. I haven't tried it as I have only a small army and my cav is way to precious . Also I'm sot sure how that would affect the timing.

  6. #296
    Aunt Irma’s Favourite Writer
    Join Date
    Dec 2011
    Location
    Mariehamn
    Posts
    664
    World
    Newfoundland
    Quote Originally Posted by Wreckless- View Post
    I use Sons regularly as this seems to be the adventure my explorers find most frequently. And at least with your guide it is doable. A suggestion on the last block, but I'm not sure if it works.

    You block camp 19 because otherwise the block on 21 would be intercepted right? However if you send it to the leadercamp 23, it will be intercepted by 21. So you wouldn't need to block 19. I haven't tried it as I have only a small army and my cav is way to precious . Also I'm sot sure how that would affect the timing.
    All generals heading for camps 21, 22 and 23 would be intercepted by camp 19 if it wasn't blocked.
    They all walk on the northern side of camp 20, and thus cannot avoid entering the influence area of camp 19.

    Before the pathing changed it was possible to first kill camp 20, and then bypass camp 19 on the southern side of its influence area
    (as long as camp 20 still stands, the space between it and the wall on the southern side is too narrow to allow a general to pass through).
    However, after the pathing changed it would still be impossible to avoid camp 19, even if camp 20 was killed first.

  7. #297
    Aunt Irma’s Favourite Writer
    Join Date
    Dec 2011
    Location
    Mariehamn
    Posts
    664
    World
    Newfoundland
    I've just updated the guide for Stealing from the Rich.

    Garrison position G4 is new, replacing both old garrison positions G4 and G5. The old G6 (lootspot) is now G5.
    This new G4 allows the use of a 1R block in the west instead of the round block, which was only available for those having a veteran general.

    I have also added garrison settings for those having only one or two normal generals, and no soldiers.

  8. #298
    Skilled Student Eschatos's Avatar
    Join Date
    Jul 2012
    Posts
    26
    World
    Sandycove
    Tage, I liked the old garrison positioning better. The long distance attacks seem to take more time to do overall
    Some they learn, some thy burn...

  9. #299
    Aunt Irma’s Favourite Writer
    Join Date
    Dec 2011
    Location
    Mariehamn
    Posts
    664
    World
    Newfoundland
    Quote Originally Posted by Eschatos View Post
    Tage, I liked the old garrison positioning better. The long distance attacks seem to take more time to do overall
    Yeah, I know the waiting is long, watching those generals walk...
    But I didn't want to have separate versions for the round block and the 1R block...
    Attacking through the mountain pass from the north is the only way to approach camp 20 from the right side, considering the 1R attack.
    And that also gives an even larger margin for the round block.

    However, if you still prefer the old setup, those images are still available...


    Stealing from the Rich - Camps 21 and 18


    From B to Camp 21) 85 Recruit Deserters, 65 Bowman Deserters
    ANY general: [40R 129C 31LB (30R - 35R - 40R)]
    ANY general: [39R 1S 129C 31LB (30R - 35R - 39R)]
    ANY general: [37R 1S 139C 23XB (29R - 33R - 37R)]
    VETERAN general: [27R 1S 222C (21R - 25R - 27R)]

    From B to Camp 18) 20 Militia Deserters, 60 Longbowman Deserters
    ANY general: [4R 196C (0R - 2R - 4R)]
    ANY general: [2R 1S 197C (0R - 1R - 2R)]
    VETERAN general: [1S 230C (-)]


    Stealing from the Rich - Camps 19 and 20 (BLOCK)


    Send both generals after each other:

    From A to Camp 19) 40 Militia Deserters, 40 Longbowman Deserters
    BLOCKING NORMAL general: [104C (-)] {120 - 220 seconds of fighting}

    From B to Camp 20) 40 Militia Deserters, 40 Longbowman Deserters, 1 Sir Robin
    VETERAN general: [110R 140S (68R - 96R - 110R)] {50 seconds of fighting}


    And if you don't have a veteran, kill the camps one at a time:

    From A or B to Camp 19) 40 Militia Deserters, 40 Longbowman Deserters
    ANY general: [21R 179C (11R - 15R - 21R)]
    ANY general: [18R 1S 181C (11R - 15R - 18R)]

    From A or B to Camp 20) 40 Militia Deserters, 40 Longbowman Deserters, 1 Sir Robin
    ANY general: [200R (74R - 126R - 172R)]
    ANY general: [138R 62S (74R - 111R - 138R 1S)]

  10. #300
    Pathfinder
    Join Date
    Jul 2012
    Posts
    7
    World
    Sandycove
    Hi Tage,

    love your adventure guides but am just a bit confused with your setup for Stealing From The Rich

    You say

    One VETERAN general
    Two NORMAL generals, using two round blocks•Units needed, average: 645R 199S 244C (1089 units)
    •Units needed, maximum: 726R 199S 244C (1157 units)
    •Units lost, minimum: 453R
    •Units lost, average: 643R
    •Units lost, maximum: 726R

    Ok on the very first attack your directions are

    Camp 1) 30 Recruit Deserters, 40 Bowman Deserters
    ANY general: [1R 199C (0R - 0R - 1R)]
    ANY general: [1S 199C (-)]

    Trap T9) 40 Wolves
    ANY general: [41R (2R)]
    ANY general: [1R 39S (1R)]

    Camp 12) 20 Elite Soldier Deserters, 20 Crossbowman Deserters, 20 Cannoneer Deserters, 1 Sir Robin
    ANY general: [200R (54R - 98R - 115R)]
    ANY general: [97R 103S (46R - 87R - 97R)]
    VETERAN general: [82R 168S (46R - 74R - 82R)]

    If you have a vet general you pretty much cant use any S except with him on this attack
    if you add the total up it makes 208S and you say you only need 199S

    Following your color coded guide you suggest to use the S than the R.

    Not too much of a biggie I just use the R setup but would just like to point this out

    BommerNZ

Reply to Thread

Similar Threads

  1. [Guide] corona88 adventure guides
    By corona88 in forum Adventure Guides
    Replies: 313
    Last Post: 25.09.19, 13:11
  2. [Guide] Fill : Collected Adventure Guides by Filalithis
    By Filalithis in forum Adventure Guides
    Replies: 6
    Last Post: 04.03.13, 16:39
  3. Replies: 62
    Last Post: 22.04.12, 00:50
  4. [Guide] Adventure guides by Tage
    By Tage in forum Adventure Guides
    Replies: 0
    Last Post: 14.04.12, 16:35

Posting Permissions

  • You may not post new threads
  • You may not post replies
  • You may not post attachments
  • You may not edit your posts

Ubisoft uses cookies to ensure that you get the best experience on our websites. By continuing to use this site you agree to accept these cookies. More info on our privacy.