Reply to Thread
Page 53 of 171 FirstFirst ... 3 43 51 52 53 54 55 63 103 153 ... LastLast
Results 521 to 530 of 1708

Thread: [Guide] Killste : Collected Adventure Guides by Various Authors

  1. #521
    Pathfinder
    Join Date
    Dec 2012
    Posts
    5
    World
    Newfoundland
    Quote Originally Posted by Tage View Post
    Are any of the leader camps in the same sector?

    Looks like garrisons G2, G3 and G4 are placed within small areas that are friendly territory from the start?
    L3, L4 & L5 are all in the same sector (that's what I remember and what can see on the picture )
    And yeah, there are some friendly territories from the start. Thanks to them and the aggro zones on the leader camps we can skip some nasty camps

  2. #522
    Original Serf
    Join Date
    Aug 2012
    Posts
    19
    World
    Sandycove
    Is hasmir's nords guide broken? I get intercepted on the first attack?

  3. #523
    Pathfinder
    Join Date
    Dec 2012
    Posts
    5
    World
    Newfoundland
    Quote Originally Posted by TheRook21 View Post
    Is hasmir's nords guide broken? I get intercepted on the first attack?
    It might be broken. I recommend you this one:

    http://forum.thesettlersonline.com/t...nimized-losses

    I've done it dozen of times, works like charm.

  4. #524
    Aunt Irma’s Favourite Writer
    Join Date
    Dec 2011
    Location
    Mariehamn
    Posts
    664
    World
    Newfoundland


    I finally figured out why my block on sector 2 in the End of the World has failed so many time for me...

    Quote Originally Posted by Tage View Post
    After conquering sector 5 and placing garrisons C, D and E within that sector for the block above,
    I realised that the border poles of sector 5 were still RED...
    In other words, sector 5 was still considered enemy territory (despite my three garrisons in there).

    Because of this general D becomes intercepted by camp 23, while still marching in friendly territory, before general C hits that camp.

    To fix this, make sure you do return to your home island before starting the block.
    Coming back to the adventure island all border poles of sector 5 will be BLUE and recognised as your territory.

    I have lost over 200 elite soldiers before finally realising why... please don't do the same mistake!!!


    I now suspect this might also be the reason for Driller7's general being intercepted in Secluded Experiments...

    Quote Originally Posted by Driller7 View Post
    Polymer your block C55 is 100% fail the way the adv is now... From what i see in your picture they must have changed the agro range.

    http://prntscr.com/khanb

    The veteran gets intercepted by the blocking camp as soon as he leaves his position. The agro rage seems to be extended from your map.

  5. #525
    Original Serf
    Join Date
    Jun 2012
    Posts
    20
    World
    Sandycove
    VICTOR...
    You can block Camp18 1r,5c,150e %94round 12.12, 2r, 120s, 50e- 13.27r0und - %90

  6. #526
    Pathfinder
    Join Date
    Oct 2012
    Location
    Serbia
    Posts
    5
    World
    Northisle
    Quote Originally Posted by Tage View Post
    Witch of the Swamp
    Spoiler
    Average Losses (best versions):
    299R 5M 6S 132B ... or ... 483R 20C
    Spoiler


    Adventure Info:
    Player Level: 26+
    Difficulty: 3/10
    Number of Players: 1
    Duration: 2 days
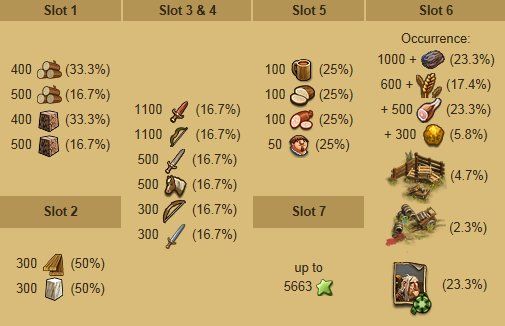
    Where to get?: Adventure seek with Explorer or Trader (Shop) for 100 map fragments


    If you want to use the block, you need 2 generals, one of which must be a NORMAL general.
    If you decide not to use the block, then you only need 1 general, of any kind.
    The number of troops needed below are based on the block being used.

    You need to send troops 5 times.


    Ten main versions are presented below.
    Eight of the versions have one additional alternative given that includes elite soldiers.
    Only the very first version includes the extra troops needed if not using the block.

    ANY general with Longbows and Cavalry, no block
    • Units needed, average: 540R 196C 140LB (876 units)
    • Units needed, maximum: 563R 196C 140LB (899 units)
    • Units lost, minimum: 476R 125C
    • Units lost, average: 528R 125C
    • Units lost, maximum: 563R 125C

    ANY general with Longbows and Cavalry, with block
    • Units needed, average: 492R 45M 196C 60LB (793 units)
    • Units needed, maximum: 514R 45M 196C 60LB (815 units)
    • Units lost, minimum: 397R 125C
    • Units lost, average: 480R 125C
    • Units lost, maximum: 514R 18M 125C

    ANY general with Longbows and Militia
    • Units needed, average: 404R 82M 85S 194C 73LB (838 units)
    • Units needed, maximum: 413R 82M 85S 194C 73LB (847 units)
    • Units lost, minimum: 378R 45M 88C
    • Units lost, average: 404R 65M 2S 88C
    • Units lost, maximum: 413R 82M 25S 88C
    • Units needed, average: 402R 82M 12S 76E 194C 73LB (839 units)
    • Units needed, maximum: 411R 82M 15S 76E 194C 73LB (851 units)
    • Units lost, minimum: 378R 45M 88C
    • Units lost, average: 402R 65M 2S 88C
    • Units lost, maximum: 411R 82M 15S 88C

    ANY general with Longbows and Cavalry
    • Units needed, average: 447R 85S 194C 88LB (814 units)
    • Units needed, maximum: 456R 85S 194C 88LB (823 units)
    • Units lost, minimum: 400R 125C
    • Units lost, average: 442R 2S 125C
    • Units lost, maximum: 456R 28S 125C
    • Units needed, average: 445R 15S 76E 194C 88LB (818 units)
    • Units needed, maximum: 454R 18S 76E 194C 88LB (830 units)
    • Units lost, minimum: 400R 125C
    • Units lost, average: 440R 2S 125C
    • Units lost, maximum: 454R 18S 125C

    ANY general with Crossbows and Militia
    • Units needed, average: 401R 55M 85S 194C 53XB (788 units)
    • Units needed, maximum: 409R 55M 85S 194C 53XB (796 units)
    • Units lost, minimum: 375R 34M 88C
    • Units lost, average: 401R 47M 2S 88C
    • Units lost, maximum: 409R 55M 21S 88C
    • Units needed, average: 399R 55M 9S 76E 194C 53XB (786 units)
    • Units needed, maximum: 407R 55M 12S 76E 194C 53XB (797 units)
    • Units lost, minimum: 375R 34M 88C
    • Units lost, average: 399R 47M 2S 88C
    • Units lost, maximum: 407R 55M 11S 88C

    ANY general with Crossbows and Cavalry
    • Units needed, average: 499R 85S 194C 56XB (834 units)
    • Units needed, maximum: 507R 85S 194C 56XB (842 units)
    • Units lost, minimum: 431R 85C
    • Units lost, average: 482R 2S 85C
    • Units lost, maximum: 507R 17S 85C
    • Units needed, average: 497R 9S 76E 194C 56XB (832 units)
    • Units needed, maximum: 505R 9S 76E 194C 56XB (840 units)
    • Units lost, minimum: 431R 85C
    • Units lost, average: 480R 2S 85C
    • Units lost, maximum: 505R 7S 85C

    VETERAN general with Longbows and Bows
    • Units needed, average: 331R 19M 145S 244C 132B 20LB (891 units)
    • Units needed, maximum: 349R 19M 145S 244C 132B 20LB (909 units)
    • Units lost, minimum: 289R 4M 132B
    • Units lost, average: 331R 19M 4S 132B
    • Units lost, maximum: 349R 19M 10S 132B
    • Units needed, average: 311R 19M 102S 70E 244C 132B 20LB (898 units)
    • Units needed, maximum: 322R 19M 102S 70E 244C 132B 20LB (909 units)
    • Units lost, minimum: 289R 4M 132B
    • Units lost, average: 311R 19M 4S 132B
    • Units lost, maximum: 322R 19M 11S 132B

    VETERAN general with Longbows and Cavalry
    • Units needed, average: 487R 145S 244C 73LB (949 units)
    • Units needed, maximum: 505R 145S 244C 73LB (967 units)
    • Units lost, minimum: 410R 47C
    • Units lost, average: 475R 47C
    • Units lost, maximum: 505R 1S 47C
    • Units needed, average: 467R 102S 70E 244C 73LB (956 units)
    • Units needed, maximum: 478R 102S 70E 244C 73LB (967 units)
    • Units lost, minimum: 410R 47C
    • Units lost, average: 455R 47C
    • Units lost, maximum: 478R 2S 47C

    VETERAN general with Crossbows and Bows
    • Units needed, average: 319R 5M 145S 244C 132B 41XB (886 units)
    • Units needed, maximum: 335R 5M 144S 1E 244C 132B 41XB (902 units)
    • Units lost, minimum: 277R 3M 132B
    • Units lost, average: 319R 5M 6S 132B
    • Units lost, maximum: 335R 5M 10S 132B
    • Units needed, average: 299R 5M 102S 70E 244C 132B 41XB (893 units)
    • Units needed, maximum: 308R 5M 102S 70E 244C 132B 41XB (902 units)
    • Units lost, minimum: 277R 3M 132B
    • Units lost, average: 299R 5M 6S 132B
    • Units lost, maximum: 308R 5M 11S 132B

    VETERAN general with Crossbows and Cavalry
    • Units needed, average: 519R 145S 244C 43XB (951 units)
    • Units needed, maximum: 535R 145S 244C 43XB (967 units)
    • Units lost, minimum: 439R 20C
    • Units lost, average: 503R 20C
    • Units lost, maximum: 535R 1S 20C
    • Units needed, average: 499R 102S 70E 244C 43XB (958 units)
    • Units needed, maximum: 508R 102S 70E 244C 43XB (967 units)
    • Units lost, minimum: 439R 20C
    • Units lost, average: 483R 20C
    • Units lost, maximum: 508R 2S 20C

    This guide includes one (optional) block of method 1.


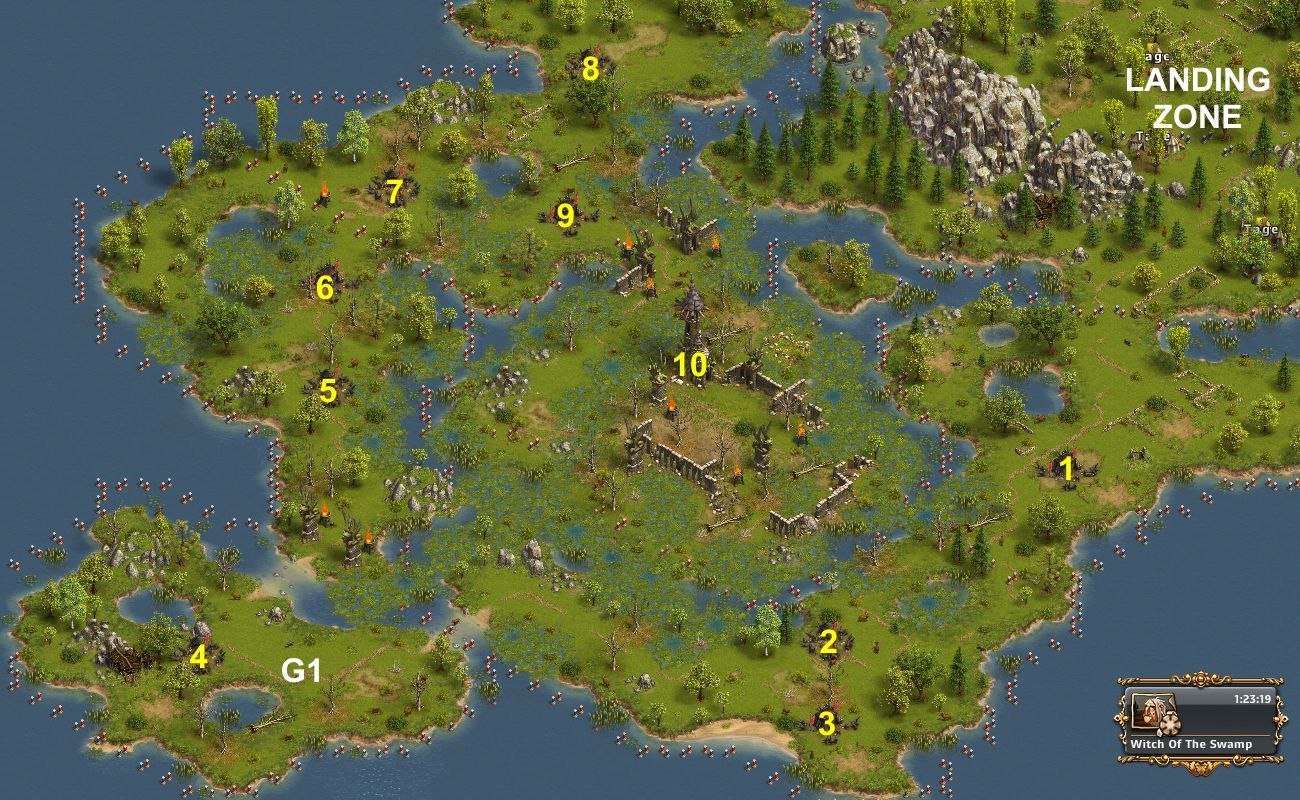
    Game flow, garrison settings and losses (minimum - average - maximum):


    Camps 1-7 (THE EASY ONES)

    No garrison placements are presented here.
    Move your generals forward whenever possible for shorter attack routes.


    Camp 1) 40 Cultists
    ANY general: [1R 196C (-)]
    ANY general: [1S 194C (-)]


    If you do have a veteran general, attack camp 3 directly, and let him be intercepted by camp 2:

    Camp 3) 50 Cultists (Camp 2) and 40 Cultists, 40 Fanatics (Camp 3)
    VETERAN general: [5R 1S 244C (2R - 4R - 5R)]

    Otherwise, attack them one at a time:

    Camp 2) 50 Cultists
    ANY general: [6R 194C (2R - 4R - 6R)]
    ANY general: [5R 1S 194C (2R - 4R - 5R)]
    VETERAN general: [1S 244C (-)]

    Camp 3) 40 Cultists, 40 Fanatics
    ANY general: [12R 188C (8R - 10R - 12R)]
    ANY general: [11R 1S 188C (8R - 10R - 11R)]
    VETERAN general: [5R 1S 244C (2R - 4R - 5R)]


    Camp 4) 60 Cultists
    ANY general: [12R 188C (7R - 10R - 11R)]
    ANY general: [11R 1S 188C (7R - 10R - 11R)]
    VETERAN general: [5R 1S 244C (2R - 4R - 5R)]


    Camps 5 and 6 can be attacked at the same time. Send the general to camp 6, and let him be intercepted by camp 5:

    Camp 6) 60 Shadowsneakers, 40 Dark Priests (Camp 5) and 33 Cultists, 33 Shadowsneakers, 33 Dark Priests (Camp 6)
    ANY general: [200R (91R - 95R - 99R)]
    ANY general: [97R 85S (91R - 95R - 97R)]
    ANY general: [97R 15S 70E (91R - 95R - 97R)]

    They can of course also be attacked one at a time:

    Camp 5) 60 Shadowsneakers, 40 Dark Priests
    ANY general: [125R (42R - 44R - 46R)]
    ANY general: [45R 65S (42R - 44R - 45R)]
    ANY general: [45R 65E (42R - 44R - 45R)]

    Camp 6) 33 Cultists, 33 Shadowsneakers, 33 Dark Priests
    ANY general: [155R (49R - 51R - 53R)]
    ANY general: [52R 85S (49R - 51R - 52R)]
    ANY general: [52R 15S 70E (49R - 51R - 52R)]


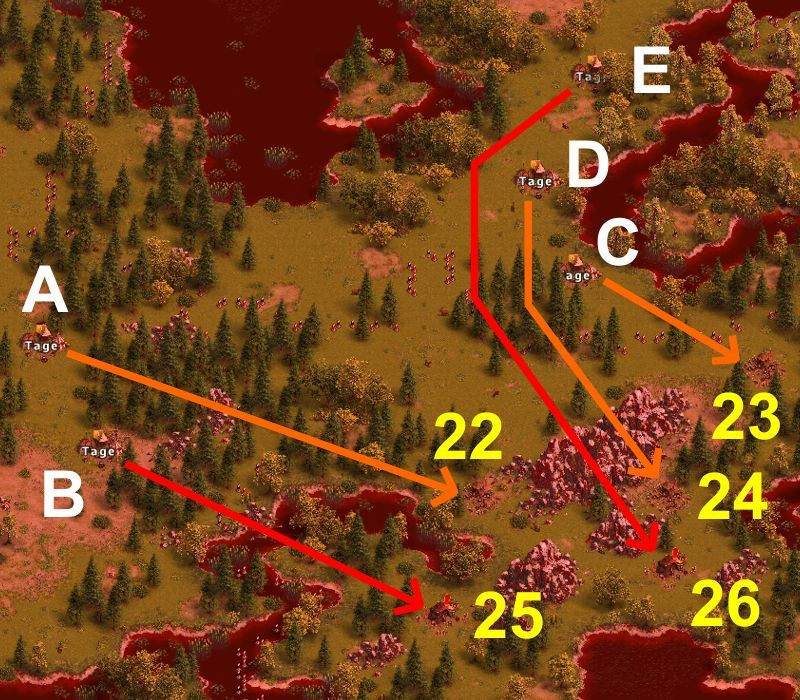
    Camp 7) 120 Cultists
    ANY general: [59R 69C 72LB (48R - 52R - 58R)]
    ANY general: [56R 2S 70C 72LB (48R - 52R - 56R)]
    ANY general: [53R 1S 93C 53XB (46R - 49R - 52R)]
    VETERAN general: [45R 1S 184C 20LB (36R - 40R - 45R)]
    VETERAN general: [42R 1S 189C 18XB (35R - 39R - 42R)]


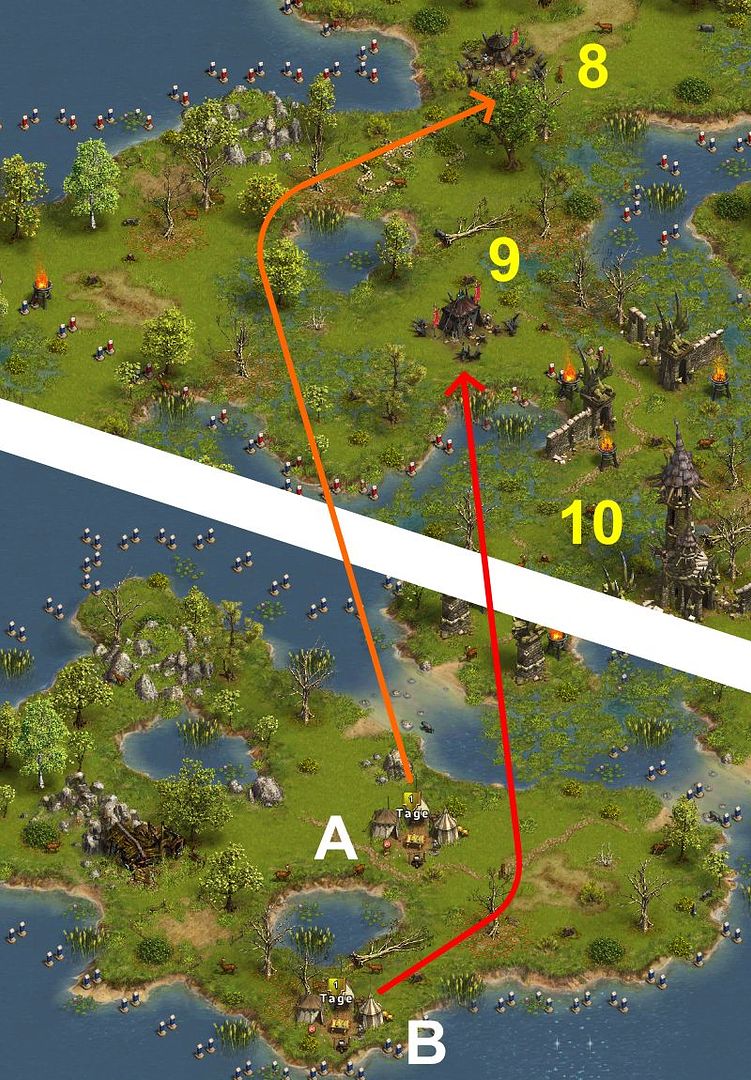
    Camp 8 (CAN BE BLOCKED) and Camp 9

    If you do not wish to use the block, attack camps 8 and 9 one at a time (from any convenient position up close):

    Camp 8) 80 Cultists, 60 Dark Priests
    ANY general: [58R 142C (45R - 50R - 58R)]
    ANY general: [56R 1S 143C (45R - 49R - 56R)]
    VETERAN general: [35R 1S 214C (28R - 32R - 35R)]

    Camp 9) 40 Cultists, 120 Shadowsneakers, 1 Dark High Priest
    ANY general: [155R 45M (107R - 147R - 155R 18M)]
    ANY general: [120R 80S (107R - 120R 2S - 120R 16S)]
    ANY general: [118R 6S 76E (107R - 118R 2S - 118R 6S)]
    VETERAN general: [105R 145S (66R - 96R - 105R)]
    VETERAN general: [78R 102S 70E (66R - 76R - 78R 1S)]

    Without soldiers, camp 9 can also be taken in two waves:

    Camp 9a) 40 Cultists, 120 Shadowsneakers, 1 Dark High Priest
    ANY general: [121R (121R)]
    Camp 9b) 1 Dark High Priest
    ANY general: [25R 140LB (20R - 24R - 25R)]


    If you wish to use the block, move two generals to garrison position G1:
    • Position A: NORMAL general
    • Position B: ANY general (your best general)


    Send the generals right after each other:

    From A to Camp 8) 80 Cultists, 60 Dark Priests
    BLOCKING NORMAL general: [1R (1R)]

    From B to Camp 9) 40 Cultists, 120 Shadowsneakers, 1 Dark High Priest
    ANY general: [155R 45M (107R - 147R - 155R 18M)]
    ANY general: [120R 80S (107R - 120R 2S - 120R 16S)]
    ANY general: [118R 6S 76E (107R - 118R 2S - 118R 6S)]
    VETERAN general: [105R 145S (66R - 96R - 105R)]
    VETERAN general: [78R 102S 70E (66R - 76R - 78R 1S)]


    Spoiler
    Camp 10 (WITCH TOWER)

    If you do not own a veteran general, and prefer losing militia over cavalry, choose the first alternative.

    Camp 10a) 100 Cultists, 99 Dark Priests, 1 Witch of the Swamp
    ANY general: [112R 88C (112R 88C)]

    Camp 10b) 47-55 Cultists, 23-39 Dark Priests, 1 Witch of the Swamp
    ANY general: [82M 10S 35C 73LB (45M - 65M - 82M 9S)]
    ANY general: [55M 5S 87C 53XB (34M - 47M - 55M 4S)]


    If you do own a veteran general, this is probably the cheapest setup (thanks Mangalyurek):

    Camp 10a) 100 Cultists, 99 Dark Priests, 1 Witch of the Swamp
    ANY general: [15R 132B (15R 132B)]

    Camp 10b) 99 Dark Priests, 1 Witch of the Swamp
    VETERAN general: [76R 19M 10S 127C 18LB (76R 4M - 76R 19M 4S - 76R 19M 10S)]
    VETERAN general: [65R 5M 10S 1E 128C 41XB (65R 3M - 65R 5M 6S - 65R 5M 10S)]


    The solutions below are all based on losing only cavalry and recruits:

    Camp 10a) 100 Cultists, 99 Dark Priests, 1 Witch of the Swamp
    ANY general: [75R 125C (75R 125C)]
    Camp 10b) 65-72 Cultists, 0-17 Dark Priests, 1 Witch of the Swamp
    ANY general: [99R 41C 60LB (59R - 87R - 98R)]
    ANY general: [80R 13S 19C 88LB (59R - 75R - 80R 12S)]

    Camp 10a) 100 Cultists, 99 Dark Priests, 1 Witch of the Swamp
    ANY general: [115R 85C (115R 85C)]
    Camp 10b) 46-53 Cultists, 23-40 Dark Priests, 1 Witch of the Swamp
    ANY general: [95R 2S 47C 56XB (53R - 78R - 95R 1S)]

    Camp 10a) 100 Cultists, 99 Dark Priests, 1 Witch of the Swamp
    ANY general: [153R 47C (153R 47C)]
    Camp 10b) 23-35 Cultists, 55-64 Dark Priests, 1 Witch of the Swamp
    VETERAN general: [94R 2S 81C 73LB (59R - 82R - 94R 1S)]

    Camp 10a) 100 Cultists, 99 Dark Priests, 1 Witch of the Swamp
    ANY general: [180R 20C (180R 20C)]
    Camp 10b) 3-16 Cultists, 79-86 Dark Priests, 1 Witch of the Swamp
    VETERAN general: [100R 2S 105C 43XB (62R - 84R - 100R 1S)]


    All garrison setups where recruits and soldiers are included have a very small chance of one or a few soldiers being killed.
    I prefer having it so tight, that in most cases that one soldier survives and actually saves one recruit by taking the last hits in the battle.
    That being said, be prepared to lose the odd soldier(s) after playing the same adventure hundreds of times...


    Is this 1R block really works here?
    My general was intercepted and I lost 80 soldiers.

  7. #527
    Pathfinder
    Join Date
    Jul 2012
    Posts
    3
    World
    Sandycove
    When I send X to 9, A to 11: immediately after the y to 9, B to 11 or should I wait?

  8. #528
    Pathfinder
    Join Date
    Jul 2012
    Posts
    3
    World
    Sandycove
    When do i send
    From X Camp 9) 150 Soldier Deserters, 50 Cavalry Deserters
    BLOCKING NORMAL general: [1R (1R)]
    From A Camp 11) 8-27 Soldier Deserters, 60 Longbowman Deserters, 1 Sir Robin, 1 Big Bertha
    VETERAN general: [150R 100S (82R - 129R - 150R 16S)]

  9. #529
    Aunt Irma’s Favourite Writer
    Join Date
    Dec 2011
    Location
    Mariehamn
    Posts
    664
    World
    Newfoundland
    Quote Originally Posted by heroina84 View Post
    Is this 1R block really works here?
    My general was intercepted and I lost 80 soldiers.
    If the generals are sent right after each other, then it will work, yes.
    But 1R blocks are always critical with the timing.

    The 1R block itself only fights for 20 seconds,
    and it takes about 13-14 seconds for the main general to walk through the red incfluence area of camp 8.

    If sent right after each other, there should roughly be about 3 seconds spare time before and after.
    The 3 seconds before is needed in case the two generals would march out at the same time (can happen due to lag).
    The 3 seconds after is what spare time you have to send out the generals after each other.

    Normally, you should be able to send the second general at the very moment when the military tattoo (music) stops playing for the first general.
    The 3 seconds spare time means that you must send your main general within a maximum of 3 seconds after the music stopped.
    Otherwise, there is a risk that he will be intercepted.

    Always when doing blocks, and especially when doing 1R blocks, do watch your main general closely.
    If he does get intercepted by the camp you've blocked, retreat him immediately.
    In that case you would only lose the single recruit, and four hours of waiting time while he recovers.

  10. #530
    Aunt Irma’s Favourite Writer
    Join Date
    Dec 2011
    Location
    Mariehamn
    Posts
    664
    World
    Newfoundland
    Quote Originally Posted by laaxaalaa View Post
    When I send X to 9, A to 11: immediately after the y to 9, B to 11 or should I wait?
    All those garrison positions in Traitors work pairwise, and you can use them in any order but always pairwise.
    You should send only one pair at a time, then see what remains in camp 11 before sending the next pair.
    Each pair consists of one block (going to camp 9) and one attack (going to camp 11).


    Quote Originally Posted by laaxaalaa View Post
    When do i send
    From X Camp 9) 150 Soldier Deserters, 50 Cavalry Deserters
    BLOCKING NORMAL general: [1R (1R)]
    From A Camp 11) 8-27 Soldier Deserters, 60 Longbowman Deserters, 1 Sir Robin, 1 Big Bertha
    VETERAN general: [150R 100S (82R - 129R - 150R 16S)]
    The block and attack are always meant to be sent right after each other:
    • Block from X, attack from A (sent within 5 seconds after X)
    • Block from Y, attack from B (sent within 5 seconds after Y)
    • Block from Z, attack from C (sent within 5 seconds after Z)

Reply to Thread

Similar Threads

  1. [Guide] corona88 adventure guides
    By corona88 in forum Adventure Guides
    Replies: 313
    Last Post: 25.09.19, 13:11
  2. [Guide] Fill : Collected Adventure Guides by Filalithis
    By Filalithis in forum Adventure Guides
    Replies: 6
    Last Post: 04.03.13, 16:39
  3. Replies: 62
    Last Post: 22.04.12, 00:50
  4. [Guide] Adventure guides by Tage
    By Tage in forum Adventure Guides
    Replies: 0
    Last Post: 14.04.12, 16:35

Posting Permissions

  • You may not post new threads
  • You may not post replies
  • You may not post attachments
  • You may not edit your posts

Ubisoft uses cookies to ensure that you get the best experience on our websites. By continuing to use this site you agree to accept these cookies. More info on our privacy.