Reply to Thread
Page 163 of 171 FirstFirst ... 63 113 153 161 162 163 164 165 ... LastLast
Results 1,621 to 1,630 of 1708

Thread: [Guide] Killste : Collected Adventure Guides by Various Authors

  1. #1621
    Aunt Irma’s Favourite Writer
    Join Date
    Dec 2011
    Location
    Mariehamn
    Posts
    664
    World
    Newfoundland
    Quote Originally Posted by iridium21 View Post
    In Outlaws, and from what I've found, it doesn't matter if your Vet is in this position for the first attack.


    Normally that would work quite well. Especially if you're not superfast with sending out your veteran.
    If generals B and C would march out at the same (or almost at the same) time, do recall them immediately though.
    Rather wait an extra 3 seconds after general B appears outside his garrison, before sending out general C.

    I also must admit that I have done this myself, when I've failed to get the generals to arrive in proper order.


    On another note, I've added the Master of Defence for DP and for the first attack in IotP.

  2. #1622
    Pathfinder
    Join Date
    Aug 2012
    Posts
    3
    World
    Newfoundland
    On Bandit Nest, the first block with suicidal MoMA and Vet with cannons can go wrong, if you use these:

    From C to Camp 6) 100 Thugs, 100 Rangers, 1 One-Eyed Bert
    MASTER of Martial Arts: [1R (1R)] {10 seconds of fighting}

    From D to Camp 6) 100 Thugs, 50-55 Rangers, 1 One-Eyed Bert
    MASTER of Martial Arts: [86R 1S 1E 50C 52XB 30K (64R - 77R - 86R 1S)] {30 seconds of fighting}

    With 55 Rangers left, it's very possible that the battle goes on for 3 rounds, and then you lose the single elite, cavalry and some crossbowmen. I checked with the combat sim, and it happens. I think I double-checked that my troops were correct, and still lost 86R 1S 1E 50C 6XB.

    Anyway, thought I'd let you know, and thanks again for the guides!

  3. #1623
    Aunt Irma’s Favourite Writer
    Join Date
    Dec 2011
    Location
    Mariehamn
    Posts
    664
    World
    Newfoundland
    Quote Originally Posted by Nodens View Post
    On Bandit Nest, the first block with suicidal MoMA and Vet with cannons can go wrong, if you use these:

    From C to Camp 6) 100 Thugs, 100 Rangers, 1 One-Eyed Bert
    MASTER of Martial Arts: [1R (1R)] {10 seconds of fighting}

    From D to Camp 6) 100 Thugs, 50-55 Rangers, 1 One-Eyed Bert
    MASTER of Martial Arts: [86R 1S 1E 50C 52XB 30K (64R - 77R - 86R 1S)] {30 seconds of fighting}

    With 55 Rangers left, it's very possible that the battle goes on for 3 rounds, and then you lose the single elite, cavalry and some crossbowmen. I checked with the combat sim, and it happens. I think I double-checked that my troops were correct, and still lost 86R 1S 1E 50C 6XB.
    That would happen only if you didn't use a Master of Martial Arts in the second round as well.
    Using a Veteran you need more than 50 cavalry to kill all remaining rangers in the first round.
    Note also that a General Log is not a MoMA.

  4. #1624
    Pathfinder
    Join Date
    Aug 2012
    Posts
    3
    World
    Newfoundland
    Once again, my bad. I swear it didn't say MoMA in the morning when I copypasted it! I promise to never again complain about your work before having my morning coffee! Thanks for the reply.

  5. #1625
    Original Serf exetlaios's Avatar
    Join Date
    Sep 2012
    Location
    HELLAS
    Posts
    10
    World
    Sandycove
    Your guide is awesome...1.ooo.ooo thanks mate !!!!!

  6. #1626
    Pathfinder
    Join Date
    May 2014
    Posts
    2
    World
    Newfoundland

    Talking Traitors endgame

    I found a much simpler way to finish this adventure with 2 MMA and 2 Normal gens

    (looks like it will not show the picture so added link click )

    Block
    A and B is normal gens with 1R each.

    Castle
    1 MMA 1R
    2 MMA 93R, 3M 124K (max loss 93R, 2M)

    Alternative
    2 MG 127R, 3M, 140K (max loss 127R, 2M)

    2 Vet 127R, 3M, 120K (max loss 127R, 2M)
    *max loss is highly unlikely

    Wave 1
    Send 1 first then after send block A

    Wave 2
    Send 2 first then after send block B

    yes in this setup send attack general first then block after since there is quite a walk so no rush with block actually

    For camp 10 i used this
    MMA 94R, 1S, 1ES, 75C, 49K (max loss 94R 1S)

    I just did it now and it worked, but it is untested by others but give it a try
    Last edited by Fexno; 06.04.15 at 06:04. Reason: fixed image

  7. #1627
    Aunt Irma’s Favourite Writer
    Join Date
    Dec 2011
    Location
    Mariehamn
    Posts
    664
    World
    Newfoundland
    Quote Originally Posted by Mozit View Post
    I found a much simpler way to finish this adventure with 2 MMA and 2 Normal gens


    If you do have 2 MoMAs and cannoneers, I would still much prefer and recommend the roundblock shown a little earlier in the guide:

    Quote Originally Posted by Tage View Post
    Garrison Position G3 (CAMPS 9, 10 and 11 for Cannoneers)
    The setup hidden in the spoiler is exclusively for those having cannoneers:
    Spoiler


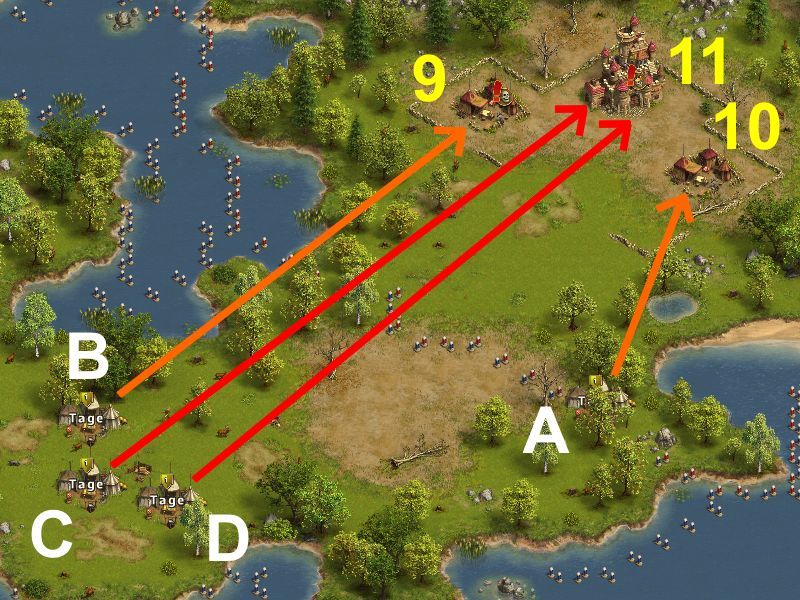
    Send all four generals right after each other:

    From A to Camp 10) 100 Soldier Deserters, 100 Longbowman Deserters
    BLOCKING NORMAL general: [57S 139C (-)] {180-300 seconds of fighting, 0.1% chance of 160 seconds}
    BLOCKING NORMAL general: [48E 149C (-)] {180-280 seconds of fighting, 0.2% chance of 160 seconds}

    From B to Camp 9) 50 Cavalry Deserters, 150 Soldier Deserters
    BLOCKING NORMAL general: [66S 89E (-)] {180-320 seconds of fighting}


    If your best general is a BATTLE HARDENED general, follow this:

    From C to Camp 11) 60 Cavalry Deserters, 60 Soldier Deserters, 60 Longbowman Deserters, 1 Sir Robin, 1 Big Bertha
    ANY general: [168R (168R)] {40 seconds of fighting}
    BATTLE HARDENED general: [168R (168R)] {20 seconds of fighting}

    From D to Camp 11) 12-30 Soldier Deserters, 60 Longbowman Deserters, 1 Sir Robin, 1 Big Bertha
    BATTLE HARDENED general: [92R 22M 86K (68R - 92R 8M - 92R 22M)] {70 seconds of fighting}


    If your best general is a VETERAN general, follow this:

    From C to Camp 11) 60 Cavalry Deserters, 60 Soldier Deserters, 60 Longbowman Deserters, 1 Sir Robin, 1 Big Bertha
    ANY general: [77R (77R)] {20 seconds of fighting}
    BATTLE HARDENED general: [77R (77R)] {10 seconds of fighting}

    From D to Camp 11) 0-10 Cavalry Deserters, 60 Soldier Deserters, 60 Longbowman Deserters, 1 Sir Robin, 1 Big Bertha
    VETERAN general: [140R 8M 102K (102R - 130R - 140R 8M)] {60-70 seconds of fighting}


    If your best general is a MAJOR general, follow this and kill camp 11 in one wave:

    From C to Camp 11) 60 Cavalry Deserters, 60 Soldier Deserters, 60 Longbowman Deserters, 1 Sir Robin, 1 Big Bertha
    MAJOR general: [155R 3M 112K (112R - 140R - 155R 2M)] {60 seconds of fighting}


    If your best general is a MASTER of Martial Arts, follow this:

    From C to Camp 11) 60 Cavalry Deserters, 60 Soldier Deserters, 60 Longbowman Deserters, 1 Sir Robin, 1 Big Bertha
    MASTER of Martial Arts: [1R (1R)] {10 seconds of fighting}

    From D to Camp 11) 60 Soldier Deserters, 40-45 Longbowman Deserters, 1 Sir Robin, 1 Big Bertha
    BATTLE HARDENED general: [103M 97K (66M - 86M - 102M)] {60-70 seconds of fighting}
    VETERAN general: [130R 4M 116K (87R - 115R - 130R 3M)] {60 seconds of fighting}
    MAJOR general: [128R 10M 132K (84R - 112R - 128R 2M)] {50 seconds of fighting}
    MASTER of Martial Arts: [96R 1M 123K (57R - 82R - 96R)] {50 seconds of fighting}


    If your best general is a MASTER of Martial Arts, camp 11 can also be killed in one wave.
    This is recommended if you do not have a veteran or major general in addition to the Master of Martial Arts:

    From C to Camp 11) 60 Cavalry Deserters, 60 Soldier Deserters, 60 Longbowman Deserters, 1 Sir Robin, 1 Big Bertha
    MASTER of Martial Arts: [118R 32M 70K (106R - 118R 18M - 118R 32M)] {80 seconds of fighting}
    MASTER of Martial Arts: [160R 10M 50K (110R - 150R - 160R 9M)] {90-100 seconds of fighting}


    If you have a VETERAN general and at least two MASTERs of Martial Arts, use two of them for suicidal waves.
    Place general E directly behind general D:

    From C to Camp 11) 60 Cavalry Deserters, 60 Soldier Deserters, 60 Longbowman Deserters, 1 Sir Robin, 1 Big Bertha
    MASTER of Martial Arts: [1R (1R)] {10 seconds of fighting}

    From D to Camp 11) 60 Soldier Deserters, 40-45 Longbowman Deserters, 1 Sir Robin, 1 Big Bertha
    MASTER of Martial Arts: [1R (1R)] {10 seconds of fighting}

    From E to Camp 11) 59-60 Soldier Deserters, 1 Sir Robin, 1 Big Bertha
    MASTER of Martial Arts: [92R 1M 127K (53R - 79R - 92R)] {50 seconds of fighting}
    VETERAN general: [77R 1M 172K (48R - 66R - 77R)] {40 seconds of fighting}


    It takes less than 40 seconds for general C to reach camp 11 from the moment when general A starts his fight on camp 10. Thus, in the worst case, if the first block would last only 160 seconds and the fight for camp 11 would last 40+70 = 110 seconds, you would have a margin of only 10 seconds. If possible, do use a battle hardened general for the first wave on camp 11 (general C).


    The setups are shown within the spoiler, and the one for you, having two MoMAs, would be this one:

    Quote Originally Posted by Tage View Post
    From A to Camp 10) 100 Soldier Deserters, 100 Longbowman Deserters
    BLOCKING NORMAL general: [57S 139C (-)] {180-300 seconds of fighting, 0.1% chance of 160 seconds}
    BLOCKING NORMAL general: [48E 149C (-)] {180-280 seconds of fighting, 0.2% chance of 160 seconds}

    From B to Camp 9) 50 Cavalry Deserters, 150 Soldier Deserters
    BLOCKING NORMAL general: [66S 89E (-)] {180-320 seconds of fighting}

    From C to Camp 11) 60 Cavalry Deserters, 60 Soldier Deserters, 60 Longbowman Deserters, 1 Sir Robin, 1 Big Bertha
    MASTER of Martial Arts: [1R (1R)] {10 seconds of fighting}

    From D to Camp 11) 60 Soldier Deserters, 40-45 Longbowman Deserters, 1 Sir Robin, 1 Big Bertha
    MASTER of Martial Arts: [96R 1M 123K (57R - 82R - 96R)] {50 seconds of fighting}
    Last edited by Tage; 07.04.15 at 00:29.

  8. #1628
    Original Serf KartacsBela's Avatar
    Join Date
    Aug 2013
    Posts
    16
    World
    Sandycove
    Dear author
    Thx for all Your guides
    In BK adv to attack camp 6 it is a bit too much R has defined.
    113R 2M - I usually use 105R 10M. And the blocks are not in risk because this change.
    Thanks for attention

  9. #1629
    Aunt Irma’s Favourite Writer
    Join Date
    Dec 2011
    Location
    Mariehamn
    Posts
    664
    World
    Newfoundland
    Quote Originally Posted by KartacsBela View Post
    Dear author
    Thx for all Your guides
    In BK adv to attack camp 6 it is a bit too much R has defined.
    113R 2M - I usually use 105R 10M. And the blocks are not in risk because this change.
    Thanks for attention
    Yes, the average loss for both those versions is exactly the same, 100R.
    However, I usually try to minimise the number of dead M and S,
    and favour having a few extra dead R in those cases when bad luck strikes.

    In your case you'd loose 1M roughly every 4 times, with a risk of losing up to 6M every 1000 times.
    In my case, the risk of losing militia is in the region of 1M every 10000 times.

  10. #1630
    Nifty
    Join Date
    Apr 2012
    Location
    Finland
    Posts
    59
    World
    Northisle
    is it possible to have guiges for mma with x-bows troops needed seems every guide with mma is only calculated if you have cannoneers.. other than that really great guides

Reply to Thread

Similar Threads

  1. [Guide] corona88 adventure guides
    By corona88 in forum Adventure Guides
    Replies: 313
    Last Post: 25.09.19, 13:11
  2. [Guide] Fill : Collected Adventure Guides by Filalithis
    By Filalithis in forum Adventure Guides
    Replies: 6
    Last Post: 04.03.13, 16:39
  3. Replies: 62
    Last Post: 22.04.12, 00:50
  4. [Guide] Adventure guides by Tage
    By Tage in forum Adventure Guides
    Replies: 0
    Last Post: 14.04.12, 16:35

Posting Permissions

  • You may not post new threads
  • You may not post replies
  • You may not post attachments
  • You may not edit your posts

Ubisoft uses cookies to ensure that you get the best experience on our websites. By continuing to use this site you agree to accept these cookies. More info on our privacy.