NB!
If your player level is 36 or higher, you should probably check the Hard Version rather than this one.
Save the Christmas feast
Easy version (levels 26-35)
Average Losses (best version): 81R
Adventure Info:
Player Level: 26-35
Difficulty: 3/10
Number of Players: 1
Duration: 2 days
Where to get?: As a reward from one of the daily Christmas quests

You need to send troops 3-4 times.
Six versions are summarized below, with the number of needed generals and troops and with the following lost troops:
One ANY general only recruits, no block- Units needed, average: 378R (378 units)
- Units needed, maximum: 402R (402 units)
- Units lost, minimum: 200R
- Units lost, average: 239R
- Units lost, maximum: 270R
One ANY general, no block- Units needed, average: 296R 192C 164LB (652 units)
- Units needed, maximum: 314R 192C 164LB (670 units)
- Units lost, minimum: 125R
- Units lost, average: 157R
- Units lost, maximum: 182R
One ANY general
One NORMAL general, using one 1R block- Units needed, average: 291R 174C 164LB (629 units)
- Units needed, maximum: 307R 174C 164LB (645 units)
- Units lost, minimum: 126R
- Units lost, average: 152R
- Units lost, maximum: 175R
One ANY general with Longbows
One NORMAL general using one round block and one 1R block- Units needed, average: 116R 154S 174C 164LB (608 units)
- Units needed, maximum: 127R 155E 174C 164LB (620 units)
- Units lost, minimum: 86R
- Units lost, average: 110R
- Units lost, maximum: 127R
One ANY general with Crossbows
One NORMAL general using one round block and one 1R block- Units needed, average: 111R 154S 174C 120XB (559 units)
- Units needed, maximum: 122R 155E 174C 120XB (571 units)
- Units lost, minimum: 82R
- Units lost, average: 105R
- Units lost, maximum: 122R
One VETERAN general with Longbows
One NORMAL general, using one round block- Units needed, average: 89R 218S 247C 151LB (705 units)
- Units needed, maximum: 98R 200S 18E 248C 151LB (715 units)
- Units lost, minimum: 67R
- Units lost, average: 86R
- Units lost, maximum: 98R
One VETERAN general with Crossbows
One NORMAL general, using one round block- Units needed, average: 84R 218S 247C 109XB (658 units)
- Units needed, maximum: 93R 200S 18E 248C 109XB (668 units)
- Units lost, minimum: 64R
- Units lost, average: 81R
- Units lost, maximum: 93R
This guide includes one round block of method 2 and one 1R block of method 1.
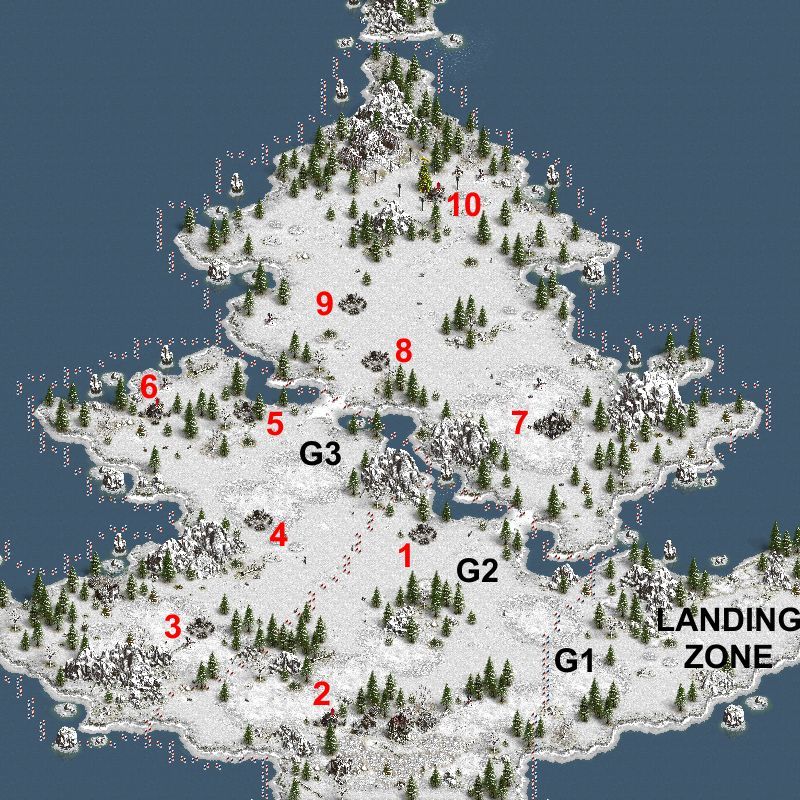
Game flow, garrison settings and losses (minimum - average - maximum):
 Garrison Position G1
Move your best general to garrison position G1, or attack directly from the landing zone:
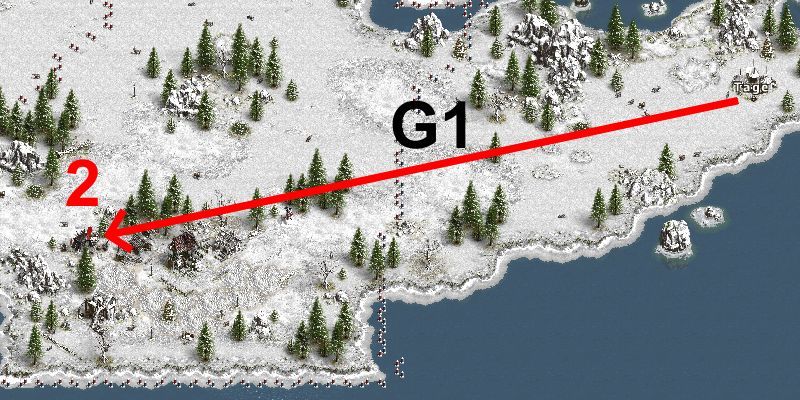
Camp 2) 40 Thugs, 40 Fanatics
ANY general: [160R (54R - 65R - 73R)]
ANY general: [26R 174C (15R - 21R - 26R)]
ANY general: [25R 1S 174C (15R - 21R - 25R)]
VETERAN general: [18R 1S 231C (10R - 15R - 18R)]
Garrison Position G2 (BLOCK)
Move your best general and one normal general (for the block) to garrison position G2:- Position A: NORMAL general (needed for the block)
- Position B: VETERAN general or ANY general
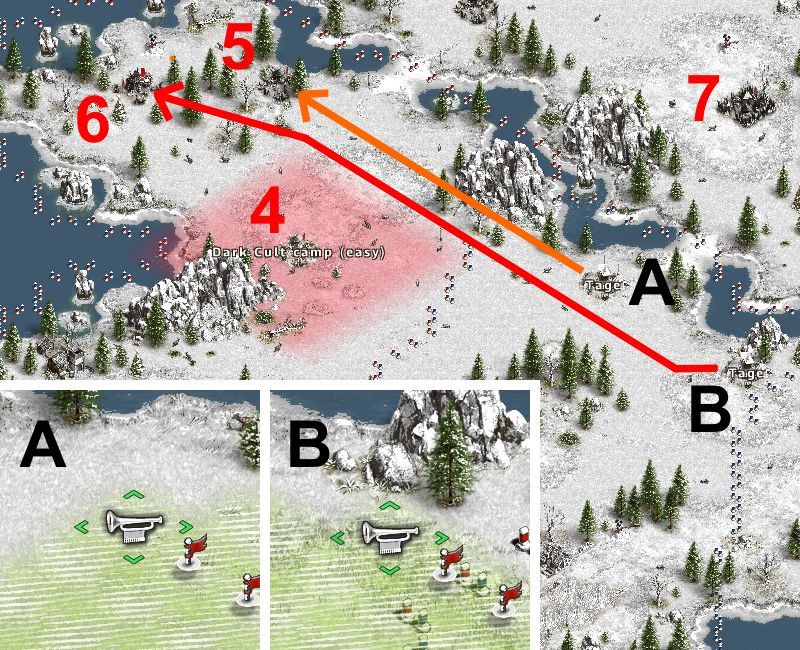
If you do not have the needed troops for the block, or if you don't want to use the block, kill camps 5 and 6 one at a time:
Camp 5) 40 Recruit Deserters, 40 Shadowsneakers
ANY general: [130R (18R - 21R - 24R)]
ANY general: [23R 85S (18R - 21R - 23R)]
Camp 6) 30 Scavengers, 1 Skunk, 30 Thralls
ANY general: [200R (26R - 30R - 32R)]
ANY general: [14R 19C 164LB (9R - 12R - 13R)]
ANY general: [13R 1S 19C 164LB (9R - 12R - 13R)]
ANY general: [8R 1S 71C 120XB (5R - 7R - 8R)]
ANY general: [7R 1E 72C 120XB (4R - 7R - 7R)]
VETERAN general: [5R 1S 93C 151LB (3R - 5R - 5R)]
VETERAN general: [4R 1E 94C 151LB (3R - 4R - 4R)]
VETERAN general: [1S 140C 109XB (0 - 0 - 1S)]
VETERAN general: [1E 140C 109XB (-)]
If you have the needed troops, the following round block is recommended.
Send both generals right after each other:
From A to Camp 5) 40 Recruit Deserters, 40 Shadowsneakers
BLOCKING NORMAL general: [27S (-)] {160 - 340 seconds of fighting, 0.2% chance of 140 seconds}
BLOCKING NORMAL general: [6S 18E (-)] {180 - 380 seconds of fighting, 0.2% chance of 160 seconds}
From B to Camp 6) 30 Scavengers, 1 Skunk, 30 Thralls
ANY general: [14R 19C 164LB (9R - 12R - 13R)] {60 seconds of fighting}
ANY general: [13R 1S 19C 164LB (9R - 12R - 13R)] {60 seconds of fighting}
ANY general: [8R 1S 71C 120XB (5R - 7R - 8R)] {60 seconds of fighting}
ANY general: [7R 1E 72C 120XB (4R - 7R - 7R)] {60 seconds of fighting}
BATTLE HARDENED general: [13R 1S 19C 164LB (9R - 12R - 13R)] {30 seconds of fighting}
BATTLE HARDENED general: [7R 1E 72C 120XB (4R - 7R - 7R)] {30 seconds of fighting}
VETERAN general: [5R 1S 93C 151LB (3R - 5R - 5R)] {30 seconds of fighting}
VETERAN general: [4R 1E 94C 151LB (3R - 4R - 4R)] {30 seconds of fighting}
VETERAN general: [1S 140C 109XB (0 - 0 - 1S)] {30 seconds of fighting}
VETERAN general: [1E 140C 109XB (-)] {30 seconds of fighting}
The marching time through the red area of camp 5 takes about 50 seconds.
Thus a total block duration of 110 seconds is nedeed for a successful block, even if you do not use a fast general attacking camp 6.
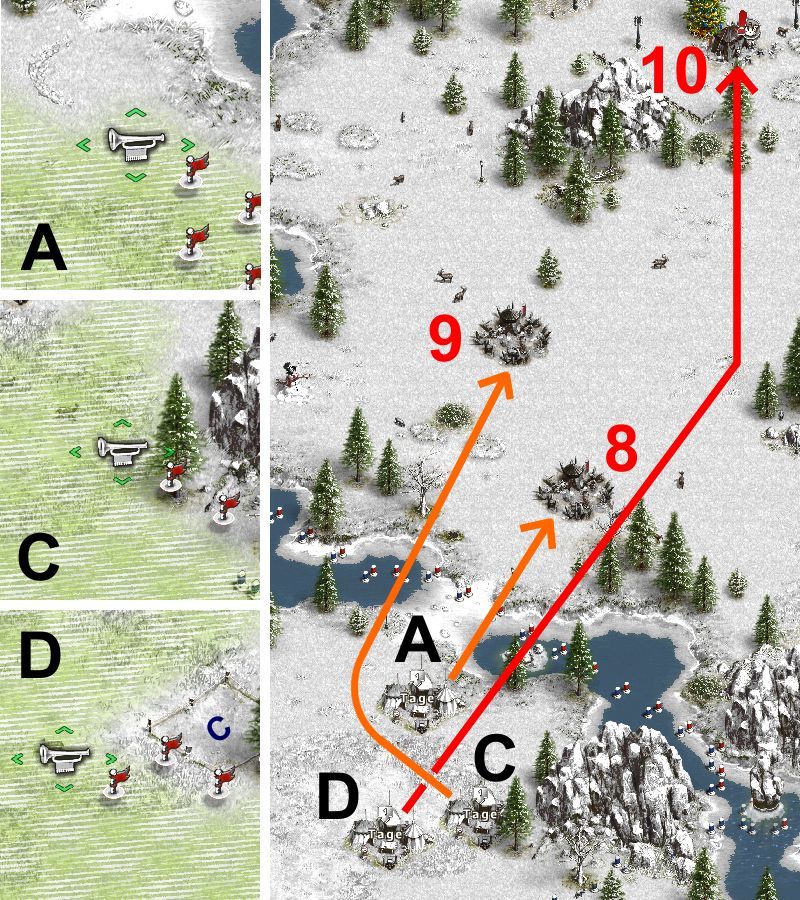
Garrison Position G3
Move your best general and one normal general (for the block) to garrison position G3:- Position A: NORMAL general (needed for the block, but not if you have a veteran in B)
- Position B: VETERAN general or ANY general
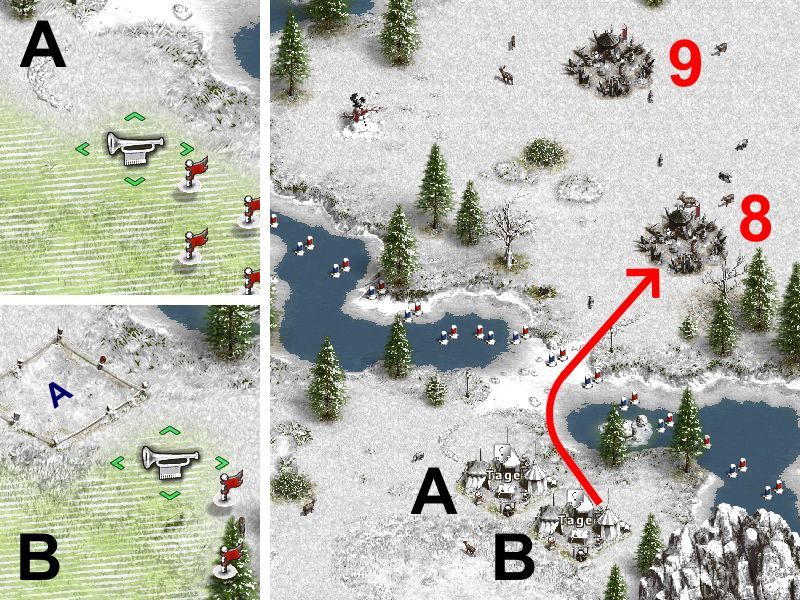
Camp 8) 20 Thugs, 20 Rangers, 40 Cavalry Deserters
ANY general: [125R (29R - 36R - 43R)]
ANY general: [42R 80S (29R - 36R - 42R)]
Garrison Position G3 (BLOCK)
Send both generals right after each other:
From A to Camp 9) 20 Scavengers, 20 Cultists, 20 Nomads
BLOCKING NORMAL general: [1R (1R)] {20 seconds of fighting}
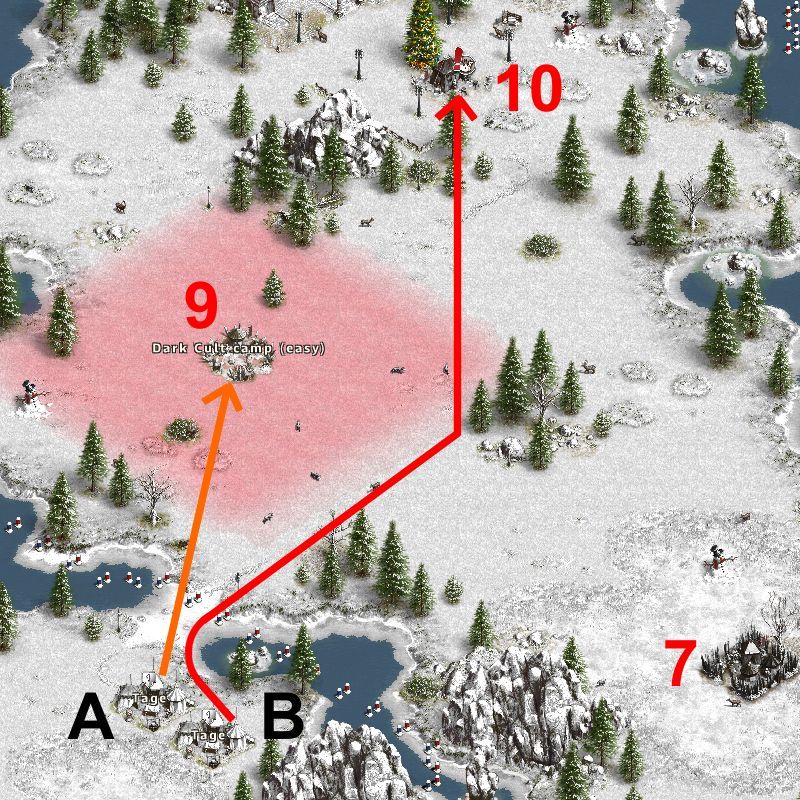
From B to Camp 10) 60 Lance Riders, 60 Karls, 1 Croaker
ANY general: [200R (54R - 61R - 68R)]
ANY general: [46R 154S (32R - 40R - 46R 1S)]
ANY general: [45R 155E (30R - 38R - 45R)]
VETERAN general: [32R 218S (24R - 29R - 32R)]
VETERAN general: [32R 218E (23R - 29R - 32R)]
If you have only one general, kill camps 9 and 10 one by one.
Also, if you have a veteran general, you may as well kill camp 9 first:
Camp 9) 20 Scavengers, 20 Cultists, 20 Nomads
ANY general: [115R (23R - 26R - 30R)]
ANY general: [8R 192C (4R - 6R - 8R)]
ANY general: [7R 1S 192C (4R - 6R - 7R)]
VETERAN general: [2R 1S 247C (0R - 1R - 2R)]
VETERAN general: [1R 1E 248C (0R - 1R - 1R)]
Camp 10) 60 Lance Riders, 60 Karls, 1 Croaker
ANY general: [200R (50R - 61R - 68R)]
ANY general: [46R 154S (32R - 40R - 46R 1S)]
ANY general: [45R 155E (30R - 38R - 45R)]
VETERAN general: [32R 218S (24R - 29R - 32R)]
VETERAN general: [32R 218E (23R - 29R - 32R)]
All garrison setups have been simulated at least 5000 times, using this simulator.
Even if I do the utmost to ensure that no errors occur anywhere, I am only human, and errors might always appear.
Thus, I do recommend that you double-check all setups in the simulator, especially before trying an attack the first time in a newly published setup.
All garrison setups where recruits and soldiers are included have a very small chance of one or a few soldiers being killed.
I prefer having it so tight, that in most cases that one soldier survives and actually might save one recruit by taking the last hits in the battle.
That being said, be prepared to lose the odd soldier(s) after playing the same adventure hundreds or thousands of times...
On the other hand, all garrison setups have also been made so that the risk of losing longbows or crossbows is next to negligible.
Due to this, some setups have more recruits/soldiers than what can be seen in other guides.
In some cases this will increase the maximum losses (of recruits), but save the rare occasion of losing crossbows.
All round blocks have been optimised using this simulator.
The durations of the blocks and attacks are based on this post.


Originally Posted by Tage

 Reply With Quote