This adventure guide became two long for the board to allow it in one post...
Thus I had to split it up into four parts.
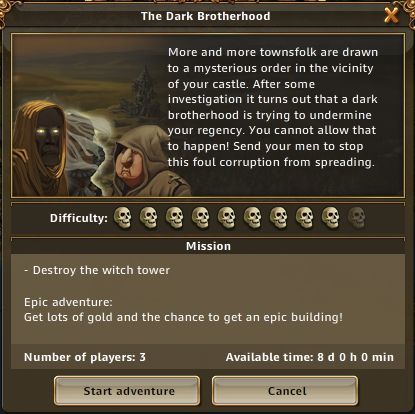
The Dark Brotherhood adventure is best known for the Witch Tower,
an epic building which can be yours, after first killing it and (maybe) losing 1000C.
The fun part with this adventure is the block in the central area.
For this guide I owe a lot to Lisztes (who posted his walk-through while he was playing it)
and to Fishslice (who demonstrated how not to do a 4-way block in the central area),
and also to Killste, NightEye and Yass for their continuous support (and fishes).
The Dark Brotherhood
Part 1
Veteran or Battle Hardened General and Round Blocks
Average Losses (veteran with crossbows): ???
Average Losses (veteran with cannons): ???
Adventure Info:
Player Level: 42+
Difficulty: 9/10
Number of Players: 3
Duration: 8 days
Where to get?: Adventure seek with Explorer or Trader (Shop) for 300 map fragments

For more information about the loot, please refer to Triple-J's Loot Overview
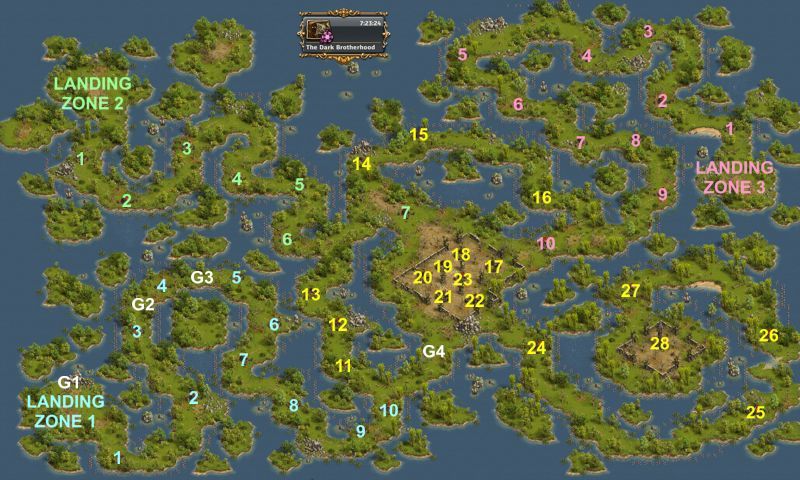
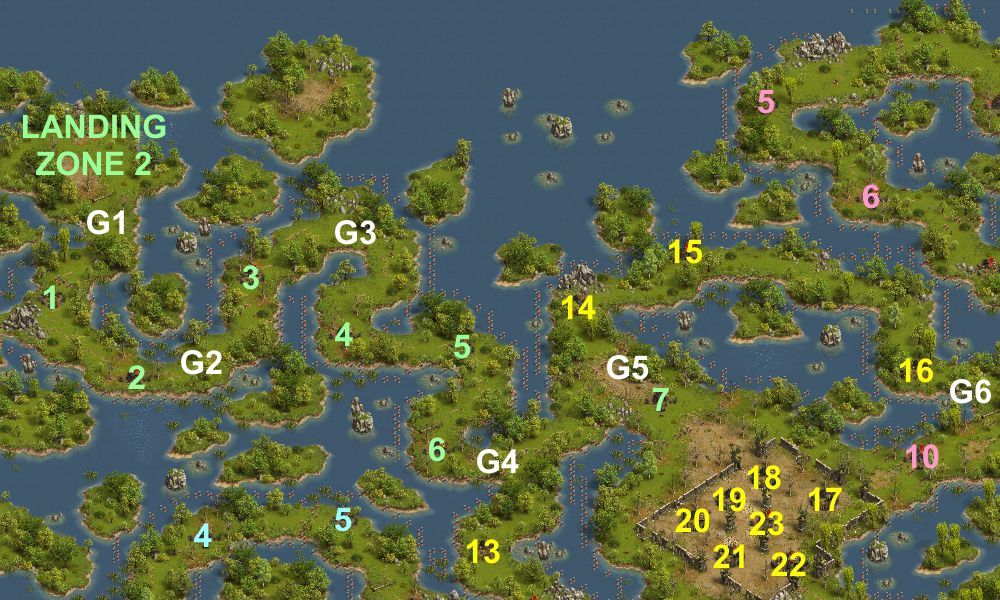
QUICK LINKS: ... LANDING ZONE ... G1 ... G2 ... G3 ... G4
This adventure has three landing zones, and this guide presents attack routes from all of them:- from Landing Zone 1 in the southwest, which is the shortest and fastest route, avoiding most of the large cluster in the middle
- from Landing Zone 2 in the northwest
- from Landing Zone 3 in the east
The guide itself is divided into four parts:- The attack route from Landing Zone 1 in the southwest
- The attack route from Landing Zone 2 in the northwest
- The attack route from Landing Zone 3 in the east
- The Block in the central area and the final assault on the witch tower
You first need to decide if you want to kill the cluster in the middle, including a huge block.
If you want to minimise your losses, and feel you don't need all the XP provided, choose the attack route from Landing Zone 1.
Otherwise, you need to select one of the other attack routes, from Landing Zone 2 (Part 2) or from Landing Zone 3 (Part 3).
The first aim with them is to kill leader camps 7, 15, 9 and 10 in order to provide space for the block in Part 4.
After reaching the central area, the opposite attack route can be cleared inside out, killing only the leader camps.
The same applies to the southwestern route (Landing Zone 1), which can be cleared after the central area has been cleared.
This guide contains several versions, and they are all based on one player doing everything in this 3-player adventure.
You're free to invite friends right from the start, and share the camps between you.
A suggestion for the lootspots is presented further down (see before garrison position G8).
Several versions are listed, but no summary of needed troops is available, since it all depends on which extra camps you want to take for XP.
This guide includes several round blocks of method 2.
Game flow, garrison settings and losses (minimum - average - maximum):
 Landing Zone
If you started this adventure, then all your generals will arrive in Landing Zone 1.
Your lootspot buyers or friends will arrive in Landing Zones 2 and 3.
NB!
There are a number of camps that can be cleared in two waves for minimal losses.
The aim with the first wave is to leave so few Dark Priests remaining, that they can be killed without losses in the second wave.
This becomes especially significant if you do not have a veteran general.
The second wave for these camps is presented here for easy reference:
The attack route below is the fast route, providing minimum losses.
Use this especially if you want to fulfil certain achievement quests.
Note that there's space enough only for seven generals to arrive in each landing zone.
All generals arriving after these will be unloaded of troops and available for placement later on.
They cannot be placed anywhere else than in your own landing zone though.
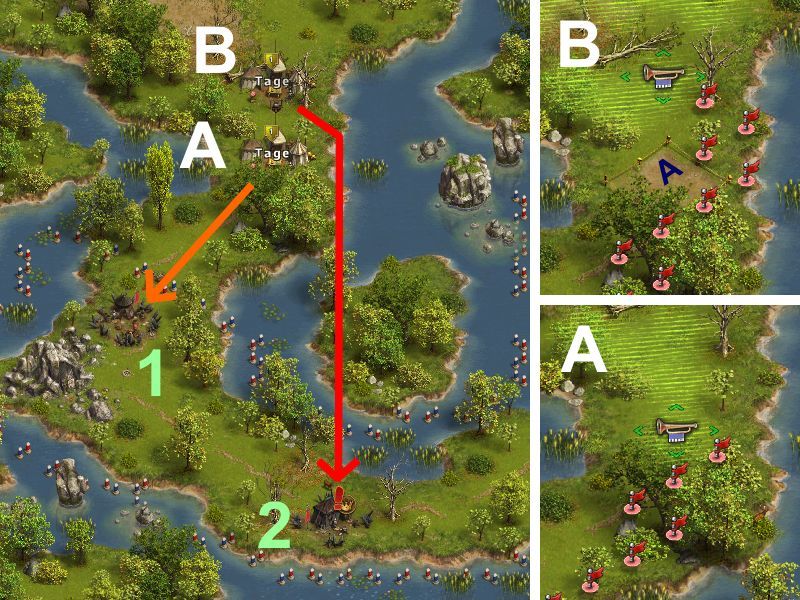
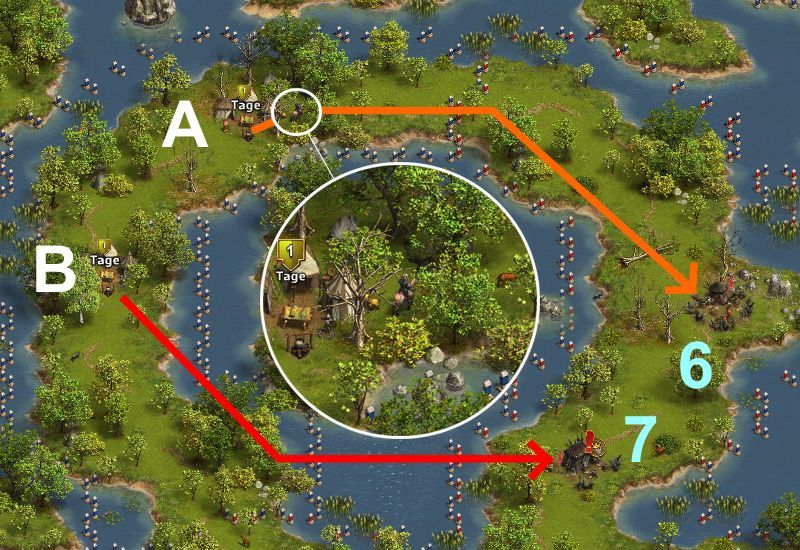
Garrison Position G1
Rearrange your generals within your landing zone accordingly:
Note that general X is needed only if you do not have a veteran general, and that he can be anywhere in your landing zone.- Position A: NORMAL general
- Position B: VETERAN general or BATTLE HARDENED general
- Position C: BATTLE HARDENED general (only needed if you do not have a veteran general)
- Position X: ANY general (only needed if you do not have a veteran general)
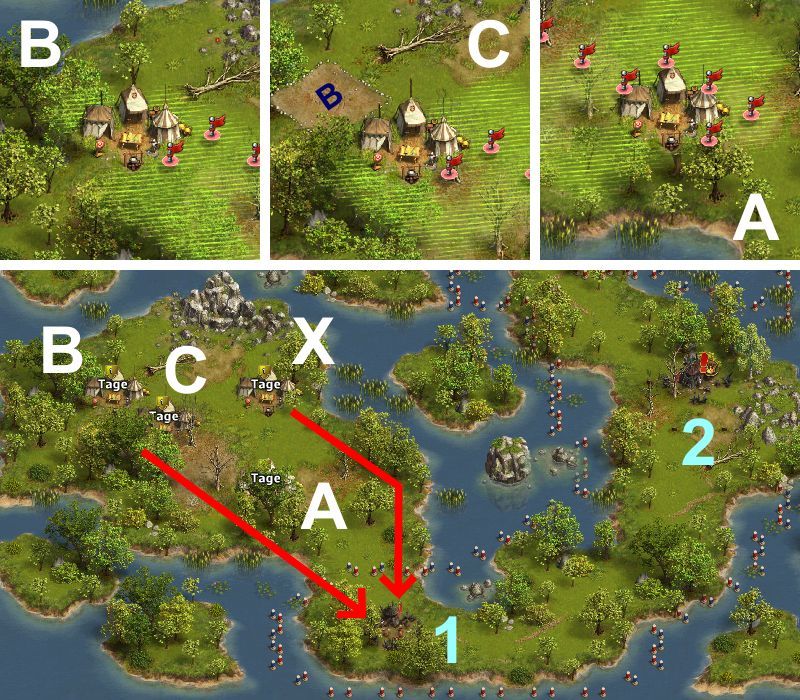
Only your best general is needed for the first attack:
Camp 1) 100 Cultists, 100 Fanatics
ANY general: [1: 156B, 2: 1E 199C (156B)]
VETERAN general: [112R 1S 1E 136C (95R - 105R - 112R 1S)]
MAJOR general: [95R 1E 174C (77R - 87R - 95R)]
MASTER of Martial Arts: [90R 1S/E 129C (73R - 81R - 90R)]
Champion ANSLEM: [98R 1S/E 51C (85R - 91R - 98R)]
Champion NUSALA: [75R 1S/E 89C (42R - 49R - 75R)]
Camp 2 can be skipped. However, if you want to kill it, open the spoiler for the setup:
Garrison Position G1 (BLOCK)

If you have a VETERAN general, send generals A and B right after each other:
From A to Camp 3) 80 Cultists, 40 Shadowsneakers, 80 Fanatics
BLOCKING NORMAL general: [26S 174C (-)] {120 - 200 seconds of fighting}
BLOCKING NORMAL general: [12S 13E 170C (-)] {120 - 200 seconds of fighting}
BLOCKING NORMAL general: [23E 170C (-)] {120 - 220 seconds of fighting}
From B to Camp 4) 80 Cultists, 40 Shadowsneakers, 40 Fanatics, 40 Dark Priests
VETERAN general: [154R 96S (141R - 148R - 154R 1S)] {40 seconds of fighting}
VETERAN general: [154R 96E (141R - 148R - 154R)] {40 seconds of fighting}
VETERAN general: [153R 2M 95K (139R - 147R - 153R 1M)] {30 seconds of fighting}
MAJOR general: [122R 2M 146K (111R - 118R - 122R 1M)] {20 seconds of fighting}
MASTER of Martial Arts: [110R 110S/E (99R - 105R - 110R)] {20 seconds of fighting}
Champion ANSLEM: [116R 1E 33K (89R - 103R - 116R)] {30 seconds of fighting}
Champion NUSALA: [82R 1E 82K (53R - 59R - 82R)] {20(30) seconds of fighting}
Champion VARGUS: [126R 1S/E 53C (92R - 100R - 126R)] {30(40) seconds of fighting}
If you have two BATTLE HARDENED generals, first send generals A and B right after each other:
From A to Camp 3) 80 Cultists, 40 Shadowsneakers, 80 Fanatics
BLOCKING NORMAL general: [26S 174C (-)] {120 - 200 seconds of fighting}
BLOCKING NORMAL general: [12S 13E 170C (-)] {120 - 200 seconds of fighting}
BLOCKING NORMAL general: [23E 170C (-)] {120 - 220 seconds of fighting}
From B to Camp 4) 80 Cultists, 40 Shadowsneakers, 40 Fanatics, 40 Dark Priests
ANY general: [161B (161B)] {20 seconds of fighting}
BATTLE HARDENED general: [161B (161B)] {10 seconds of fighting}
Send general C when general B has reached the spot shown in the inset above:
From C to Camp 4) 13-40 Fanatics, 40 Dark Priests
BATTLE HARDENED general: [3R 1E 196C (0R - 0R - 3R)] {30 seconds of fighting}
BATTLE HARDENED general: [3R 196C 1K (0R - 0R - 3R)] {20 seconds of fighting}
If sent within 3 seconds after general A, the remaining marching time for general B, from the moment general A starts his fight, is about 70 seconds. With the fight for camp 4 lasting a maximum of 40 seconds, a block of 110 seconds would be needed. Thus, you have at least 10 seconds spare time with this block. Avoid using any combination of attacks lasting 50 seconds on camp 4!
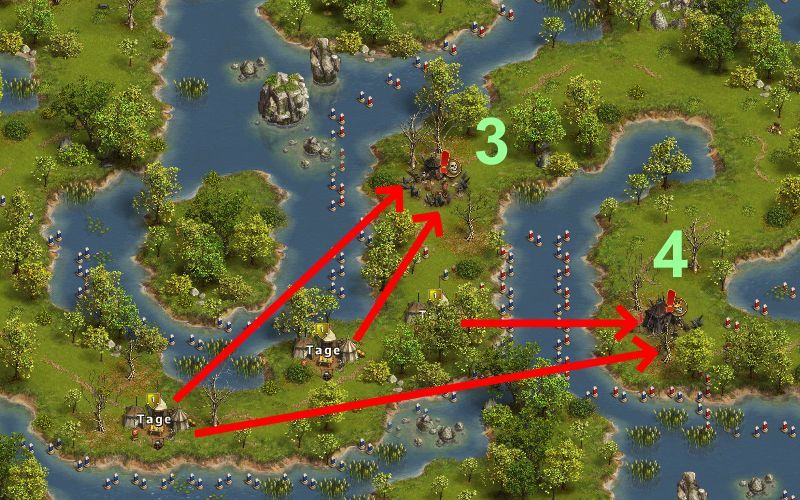
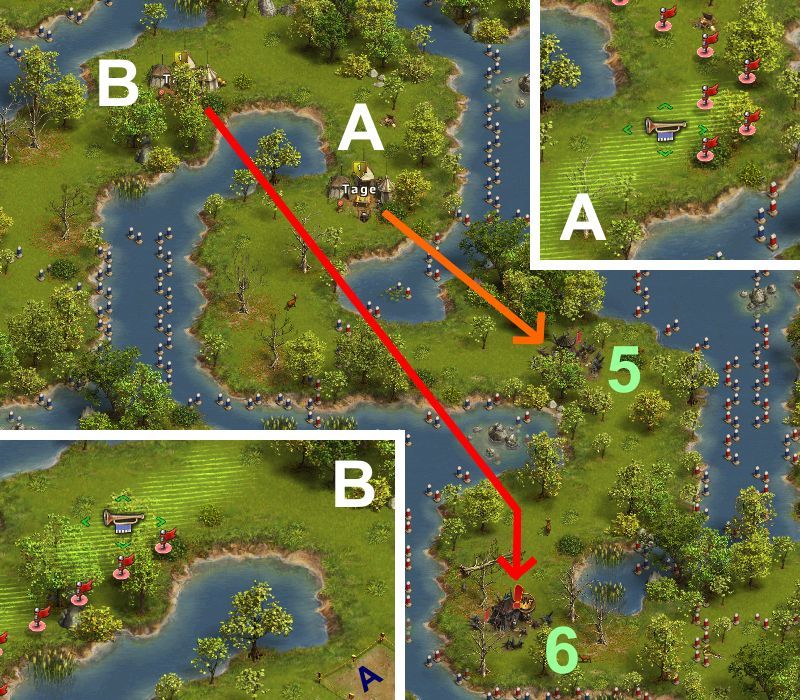
Garrison Position G2
Move your best general and one normal general to garrison position G2:- Position A: NORMAL general
- Position B: VETERAN general or BATTLE HARDENED general
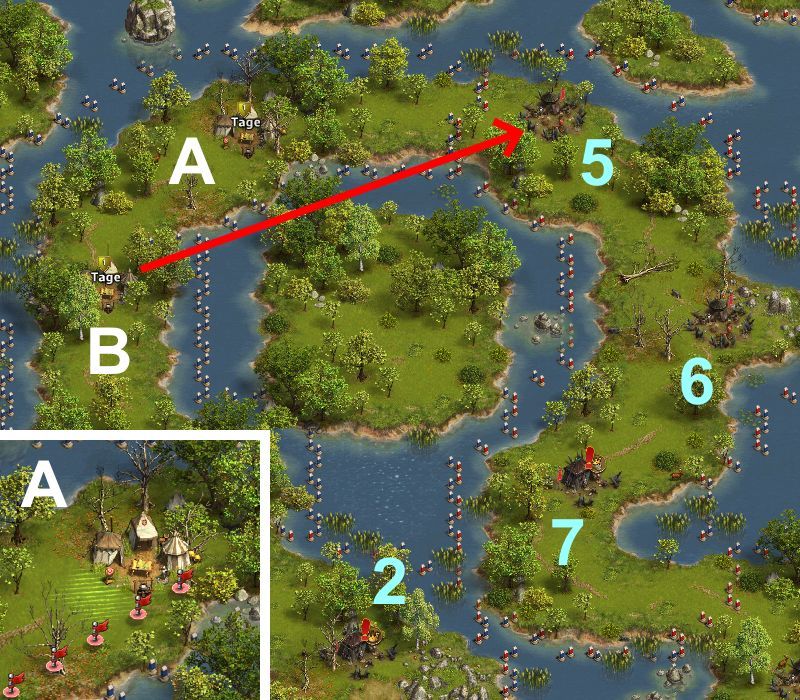
Only your best general is needed for the first attack:
Camp 5) 200 Cultists
ANY general: [155R 4S 41LB (141R - 149R - 155R 3S)]
ANY general: [131R 3S 66XB (126R - 130R - 131R 2S)]
ANY general: [131R 2S 1E 66K (126R - 130R - 131R 2S)]
VETERAN general: [118R 2S 130LB (105R - 113R - 118R 1S)]
VETERAN general: [98R 2S 150XB (94R - 98R - 98R 1S)]
VETERAN general: [98R 1S 1E 150K (94R - 98R - 98R 1S)]
MAJOR general: [98R 1S 1E 155K (94R - 98R - 98R)]
MASTER of Martial Arts: [112R 2S 106LB (100R - 107R - 112R 1S)]
MASTER of Martial Arts: [98R 1S 121XB (90R - 95R - 98R)]
MASTER of Martial Arts: [97R 1E 122XB (90R - 95R - 97R)]
MASTER of Martial Arts: [97R 1E 122K (90R - 95R - 97R)]
Champion ANSLEM: [89R 1E 60K (86R - 88R - 89R)]
Champion NUSALA: [83R 1S 1E 34C 46XB (72R - 77R - 83R 1S)]
Champion VARGUS: [109R 1E 70K (85R - 93R - 109R)]
Garrison Position G2 (BLOCK)
First, send general A, then wait till he has reached the spot indicated in the inset above before sending general B:
From A to Camp 6) 80 Cultists, 40 Shadowsneakers, 80 Fanatics
BLOCKING NORMAL general: [50S 143C (-)] {120 - 200 seconds of fighting}
BLOCKING NORMAL general: [35E 162C (-)] {120 - 220 seconds of fighting}
BLOCKING NORMAL general: [2S 34E 160C (-)] {120 - 220 seconds of fighting}
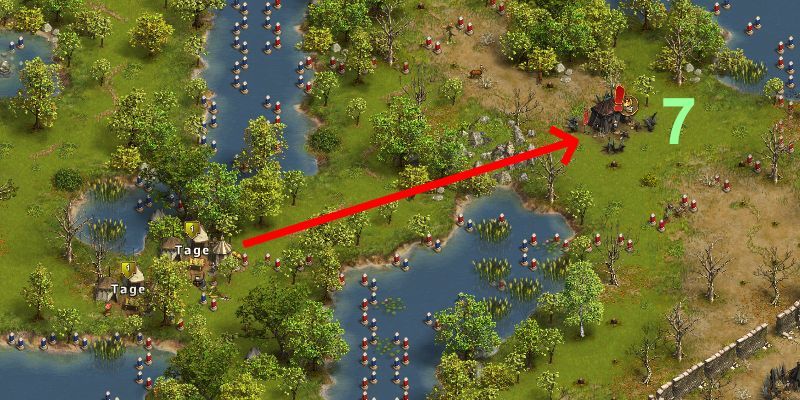
From B to Camp 7) 70 Cultists, 70 Shadowsneakers, 60 Dark Priests
BATTLE HARDENED general: [162R 38S/E (156R - 160R - 162R)] {40 seconds of fighting}
VETERAN general: [121R 129S (109R - 114R - 121R)] {40 seconds of fighting}
VETERAN general: [119R 131E (107R - 113R - 119R)] {40 seconds of fighting}
VETERAN general: [110R 3M 137K (102R - 107R - 110R 3M)] {30 seconds of fighting}
MAJOR general: [101R 2M 155K (96R - 99R - 101R 1M)] {20 seconds of fighting}
MASTER of Martial Arts: [95R 95S/E (89R - 93R - 95R)] {20 seconds of fighting}
Champion ANSLEM: [81R 1E 65K (81R)] {20 seconds of fighting}
Champion NUSALA: [68R 82E (39R - 45R - 68R)] {20 seconds of fighting}
Champion VARGUS: [80R 1S/E 99C (67R - 73R - 80R)] {30 seconds of fighting}
If sent right when general A has reached the indicated spot, the remaining marching time for general B, from the moment general A starts his fight, is about 60 seconds. With the fight for camp 7 lasting a maximum of 40 seconds, a block of 100 seconds would be needed. Thus, you have at least 20 seconds spare time with this block.
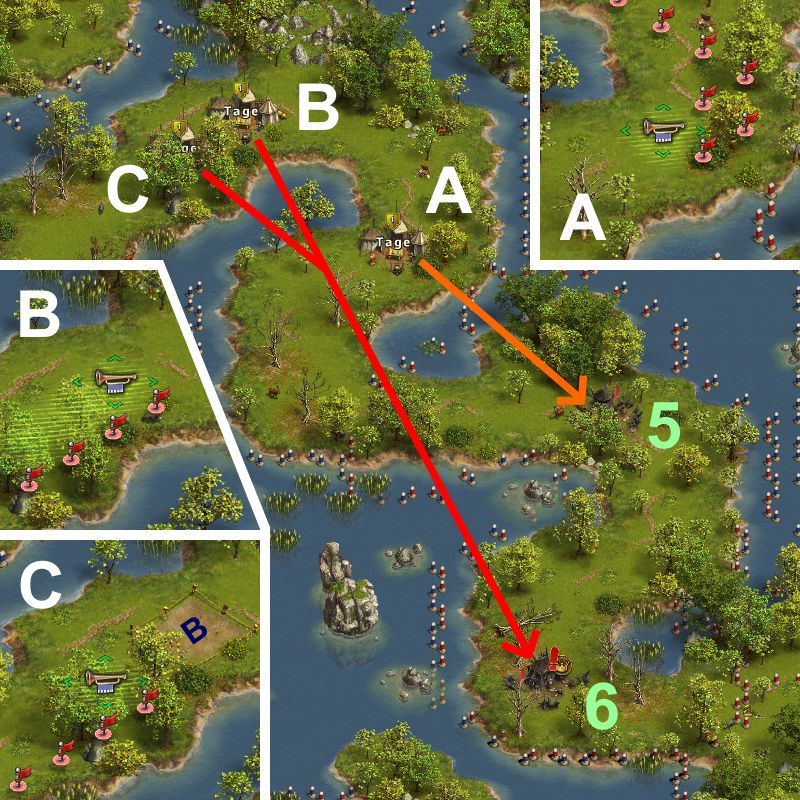
Garrison Position G3
Move your best general and 1-2 normal generals to garrison position G3:- Position A: NORMAL general
- Position B: VETERAN general or BATTLE HARDENED general
- Position X: ANY general (needed if you do not have a major general or a master of martial arts)
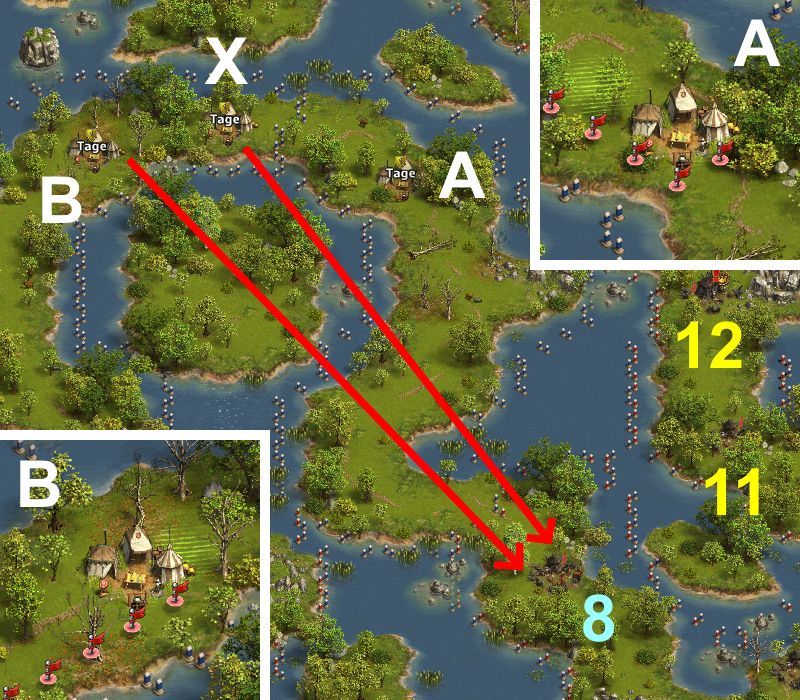
First, kill camp 8.
If you have a MAJOR general or a MASTER of Martial Arts, only one wave is needed:
From B to Camp 8) 80 Cultists, 120 Dark Priests
MAJOR general: [105R 1S 1E 163C (91R - 99R - 105R 1S)]
MASTER of Martial Arts: [99R 2S 119C (84R - 92R - 99R 1S)]
MASTER of Martial Arts: [99R 1E 120C (84R - 92R - 99R)]
Champion NUSALA: [85R 1S/E 79C (45R - 54R - 85R)]
If your best general is a VETERAN general, follow this:
From X to Camp 8) 80 Cultists, 120 Dark Priests
ANY general: [117B (117B)]
From B to Camp 8) 86-99 Dark Priests
VETERAN general: [1E 249C (-)]
From B to Camp 8) 100-111 Dark Priests
Open the spoiler below for an optimised setup if you have more than 99 Dark Priests alive:
Otherwise, if your best general is an ANY general, follow this:
From X to Camp 8) 80 Cultists, 120 Dark Priests
ANY general: [138B (138B)]
From B to Camp 8) 65-79 Dark Priests
ANY general: [1E 199C (-)]
From B to Camp 8) 80-91 Dark Priests
Open the spoiler below for an optimised setup if you have more than 79 Dark Priests alive:
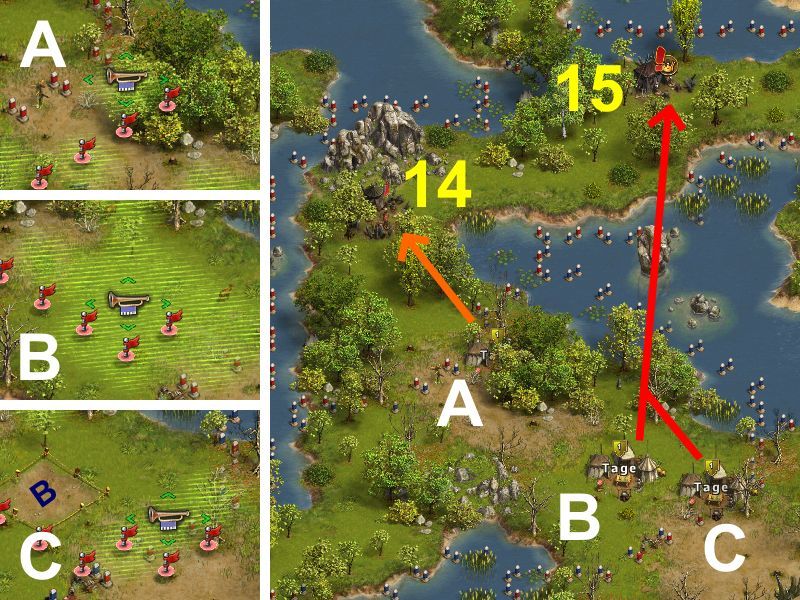
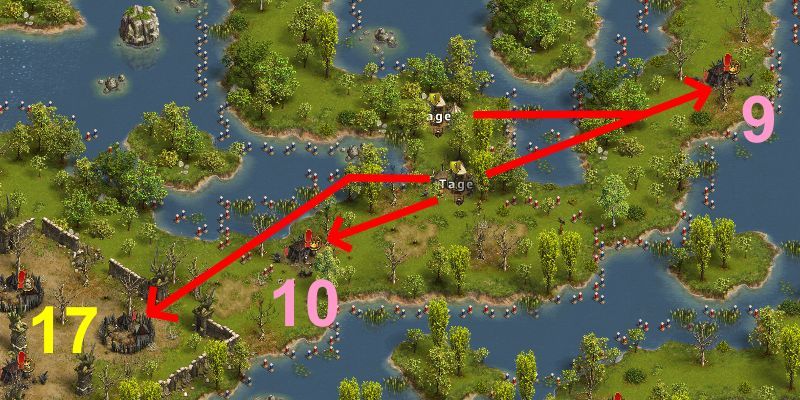
Garrison Position G3 (BLOCK)
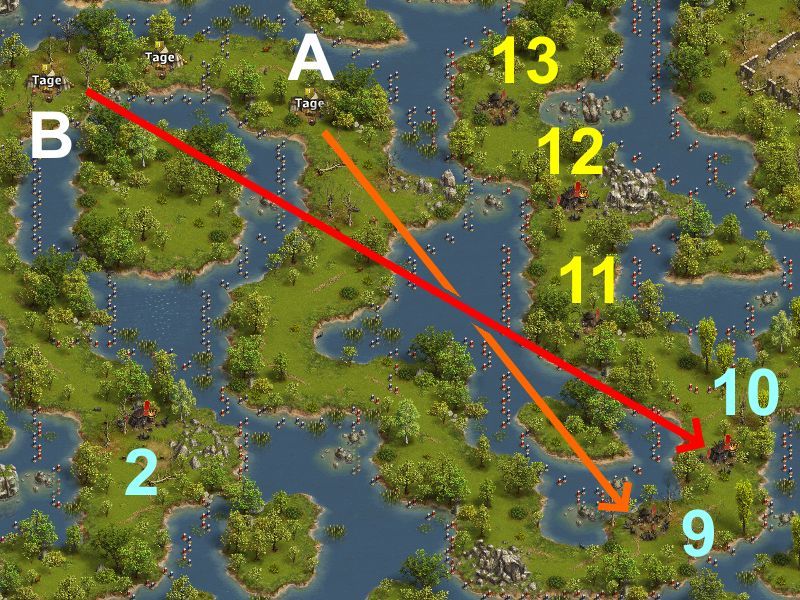
Send both generals after each other:
From A to Camp 9) 100 Cultists, 100 Dark Priests
BLOCKING NORMAL general: [40S 160C (-)] {120 - 220 seconds of fighting}
BLOCKING NORMAL general: [31E 168C (-)] {140 - 220 seconds of fighting, 1% chance of 120 seconds}
BLOCKING NORMAL general: [2S 30E 166C (-)] {140 - 220 seconds of fighting, 1% chance of 120 seconds}
From B to Camp 10) 100 Shadowsneakers, 100 Dark Priests
BATTLE HARDENED general: [120R 80S/E (109R - 115R - 120R)] {40 seconds of fighting}
VETERAN general: [108R 100S/E (105R - 107R - 108R)] {30 seconds of fighting}
VETERAN general: [108R 100S/E 1K (105R - 107R - 108R)] {20 seconds of fighting}
MASTER of Martial Arts: [108R 35S/E (105R - 107R - 108R)] {20 seconds of fighting}
Champion ANSLEM: [98R 52E (98R)] {20 seconds of fighting}
Champion NUSALA: [83R 82E (55R - 59R - 83R)] {20 seconds of fighting}
Champion VARGUS: [65R 1S/E 114C (36R - 44R - 65R)] {20-30 seconds of fighting}
If sent within 5 seconds after general A, the remaining marching time for general B, from the moment general A starts his fight, is about 65 seconds. With the fight for camp 4 lasting a maximum of 40 seconds, a block of 105 seconds would be needed. Thus, you have at least 15 seconds spare time with this block.
Garrison Position G4
Move your best generals to garrison position G4:
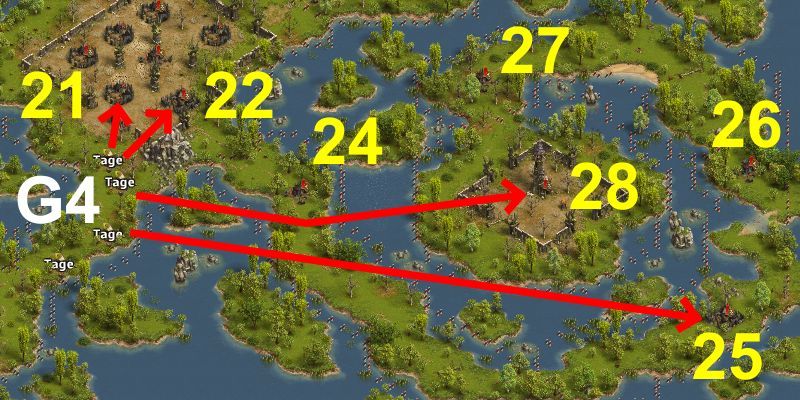
Invite your lootspot buyers now. When they arrive, they will each be able to attack their nearest camp with 1R.
Meanwhile, kill the two southern-most camps in the central cluster:
The cheapest way to kill camp 21 is to use bowmen in a first wave.
However, camp 21 can also be killed in one wave, if you have a MAJOR general or a MASTER of Martial Arts:
Camp 21) 60 Cultists, 140 Dark Priests
MAJOR general: [145R 2S 1E 122C (118R - 133R - 145R 2S)]
MASTER of Martial Arts: [123R 4S 93C (100R - 114R - 123R 3S)]
Champion NUSALA: [94R 1S/E 70C (60R - 67R - 94R)]
If you have a MASTER of Martial Arts, follow this:
Camp 21a) 60 Cultists, 140 Dark Priests
ANY general: [104B (104B)]
Camp 21b) 98-108 Dark Priests
MASTER of Martial Arts: [1E 219C (-)]
Camp 21b) 109-120 Dark Priests
Open the spoiler below for an optimised setup if you have more than 108 Dark Priests alive:
If you have a MAJOR general, follow this:
Camp 21a) 60 Cultists, 140 Dark Priests
ANY general: [106B (106B)]
Camp 21b) 96-106 Dark Priests
MAJOR general: [1E 269C (-)]
Camp 21b) 107-118 Dark Priests
Open the spoiler below for an optimised setup if you have more than 106 Dark Priests alive:
If you have a VETERAN general, follow this:
Camp 21a) 60 Cultists, 140 Dark Priests
ANY general: [113B (113B)]
Camp 21b) 88-99 Dark Priests
VETERAN general: [1E 249C (-)]
Camp 21b) 100-111 Dark Priests
Open the spoiler below for an optimised setup if you have more than 99 Dark Priests alive:
Otherwise, if your best general is an ANY general, follow this:
Camp 21a) 60 Cultists, 140 Dark Priests
ANY general: [133B (133B)]
Camp 21b) 68-79 Dark Priests
ANY general: [1E 199C (-)]
Camp 21b) 80-91 Dark Priests
Open the spoiler below for an optimised setup if you have more than 79 Dark Priests alive:
Camp 22) 50 Cultists, 100 Shadowsneakers, 50 Fire Dancers
ANY general: [135R 65S/E (128R - 132R - 135R)]
ANY general: [135R 1E 64K (128R - 132R - 135R)]
VETERAN general: [102R 148S (84R - 93R - 102R)]
VETERAN general: [98R 152E (82R - 89R - 98R)]
VETERAN general: [84R 1E 165K (77R - 82R - 84R)]
MASTER of Martial Arts: [84R 96S/E (77R - 82R - 84R)]
Champion ANSLEM: [69R 1S/E 80C (66R - 68R - 69R)]
Champion NUSALA: [68R 70E (44R - 50R - 68R)]
Champion VARGUS: [72R 1S/E 107C (62R - 66R - 72R)]
From here, jump to the Final Assault on the Witch Tower.


Originally Posted by BennyTheBeast


 Posting Permissions
 Reply With Quote
 Back to Map