REGULAR general REG1: c15: 160 fox block 1R (1R) or kill with 60R, 55M, 135-155K (60R, 55M)
REGULAR general REG2: c16: 190 wolf block 105ES, 95C
REGULAR general REG3: c15: 160 fox block 1R (1R)
Yes? First 1R block allows passage of the blocker on c16 and the second the passage of the other 2 attackers to leader camp. A bit tricky I admit, but doable. You can use the kill option if you loke, reason I posted it there, recommend it especially if you have lag issues as its the case these days.
Edit:
Modified guide, inserted the kill as main option, risk of block to fail too great to pay off, need those attackers on leader to step really close behind eachother, will have to find closer positions.
Please place the suicidal wave 1 generals BEHIND the positions I recommend (so they don`t get in the way of the blocking generals). There are different options displayed for different generals combos available, pick the best option for you. Check the guide ahead to ensure you don`t suicide a general (MMA especially) and you need it next hit or sector.
Some blocks are highly lag sensitive so please pay attention.
Legend: block REGULAR general VETERAN general MAJOR general MMA general
c0: 100 boar, 50 wolf VETERAN general 95R, 90B, 65K (95R, 90B) MAJOR general 90R, 58B, 122K (90R, 58B) MMA general 123R, 48B, 49K (123R, 47B)
Block section starts here : block c1 with 1R, block c2, block c1 (again) and hit with 2 waves on c3. Keep the following order and general position from the positioning picture. The 1R fight may end too soon so keep alert and retreat all generals if that happens.
Alternative kill c1:
Spoiler
c1: 40 boar, 100 fox VETERAN general 100R, 40M, 110K (100R, 40M) MAJOR general 135R, 4M, 131K (135R, 4M) MMA general 45R, 65M, 110K (45R, 65M)
c2: 50 boar, 50 wolf, 50 fox REGULAR general block: 20M, 20S, 60ES, 40C, 20B, 20LB, 20XB {4-9 rounds, most loss in 5}
c0: 100 bear, 90 fox VETERAN general w1: 250B (250B) or MMA general w1: 220B (220B) VETERAN generalw2: 175M, 75K (175M) MAJOR general w2: 165M, 105K (165M)
c00: 50 boar, 70 wolf VETERAN general 103R, 1ES, 74C, 72K (103R) MAJOR general 93R, 1ES, 127C, 49K (93R) MMA general 90R, 77C, 53K (90R)
c2 60 boar, 140 wolf packleader ANY general w1: 200B (200B) ANY general w2: 200B (200B) MAJOR generalw3: 10R, 260C (3R) VETERAN general w3: 10R, 240C (6R) MMA general w3: 220C (no loss)
You need to sacrifice 40C or 131B to make the block work.
c1: 70 bear, 100 fox ANY general 40C (40C) or 131B (131B)
Block section starts here
Send generals fast one after the other.
c1: 70 bear, 88-90 fox or 62-63 bear, 100 fox REGULAR general block: 200ES {5-9 rounds}
Positions:
1 = regular generals
2, 2bis = w1, w2 generals
For suicidal waves on c00 and c000 use regular or fast generals placed behind the positions for generals 1, 2 and 2bis.
c0: 60 cultist, 50 shadowsneaker, 80 fanatic VETERAN general 112R, 1ES, 137K (112R) MAJOR general 109R, 1ES, 160K (109R) MMA general 102R, 1ES, 117K (102R)
MAJOR generalsingle wave: 18R, 1ES, 10C, 241XB (18R)
Block section starts here. Camp 2 is a good target for some nukes.
If you use Assassin buff on camp 2 and it takes out the 70 cultist, a good option for first wave is MMA generalw1: 152R, 66C (152R, 66C)
If you use Assassin buff on camp 2 and it takes out the 80 firedancers, use single wave: VETERAN general 55R, 18M, 40S, 1ES, 136K (55R, 18M, 36S)
If you use Assassin buff on camp 2 and it takes out the Spawn of Hell, them: MMA general 99R, 1M, 120K or MAJOR general : 114R, 1ES, 155K
c0: 100 shadowsneaker, 70 firedancer VETERAN general 80R, 150ES/K (80R) MMA general 220R (79R)
c00: 100 cultist, 100 dancing dervish VETERAN general 28R, 13S, 1ES, 208XB (28R, 13S) MAJOR general 49R, 1ES, 220XB (49R)
c000: 40 shadowsneaker, 80 fanatic, 80 firedancer VETERAN general 161R, 89ES/K (161R) MMA general 150R, 70K (150R)
or if you have a general to spare: ANY generalw1: 43R (43R) MMA generalw2: 86R, 1ES, 133C (86R)
c1: 80 cultist, 80 firedancer, 1 Dark High Priest VETERAN general 152R, 7S, 1ES, 90XB (152R, 7S) MAJOR general 164R, 1ES, 18C, 87XB (164R)
Sector 7:
Positions:
1 = best general
Behind him place 2 regulars or fast generals for first waves on c3 and c5.
c1: 80 cultist, 40 shadowsneaker, 80 dark priest VETERAN general 153R, 1ES, 96K (153R) MAJOR general 123R, 1ES, 146K (123R) MMA general 111R, 109K (111R)
c2: 100 cultist, 100 firedancer VETERAN general 50R, 100B, 100K (50R, 100B) MAJOR general 110R, 40B, 120K (110R, 40B) MMA general 64R, 71B, 85XB (64R, 71B)
c3: 150 dark priest
MMA general 66R, 1ES, 153C (66R)
ANY generalw1: 49B (49B) VETERAN generalw2: 1ES, 249C (no loss)
ANY generalw1: 44B (44B) MAJOR generalw2: 1ES, 269C (no loss)
c4: 90 shadowsneaker, 80 dancing dervish
send attack to c5 (leader), let c4 intercept and retreat after victory VETERAN general 33B, 200XB (33B) MMA general 34B, 186XB (34B)
Time to call in lootspotters. Have them hit with 1R on camp c0.
c5: 60 cultist, 60 fanatic, 1 Witch, 1 Dark Magician
ANY generalw1: 15R, 80B (15R, 80B) VETERAN generalw2: 127S, 1ES, 122K (127S, 1ES) MAJOR generalw2: 113S, 1ES, 36C, 120K (113S)
To save (me) a lot of scrolling down and looking after proper setups, here`s a short guide for full option lvl50 players (crossbows, cannons, MG and MMA generals available). Most of it is plain copy/paste from Tage guide (posted under Killste`s collected guides).
Adventure Info:
Player Level: 36+
Difficulty: 8/10
Number of Players: 3
Duration: 8 days
Where to get?: Adventure seek with Explorer or Trader (Shop) for 200 map fragments
Troops needed: 865R, 85M, 164S, 169ES, 329C, 148K
Total maximum losses: 745R, 84M, 80S, 65C
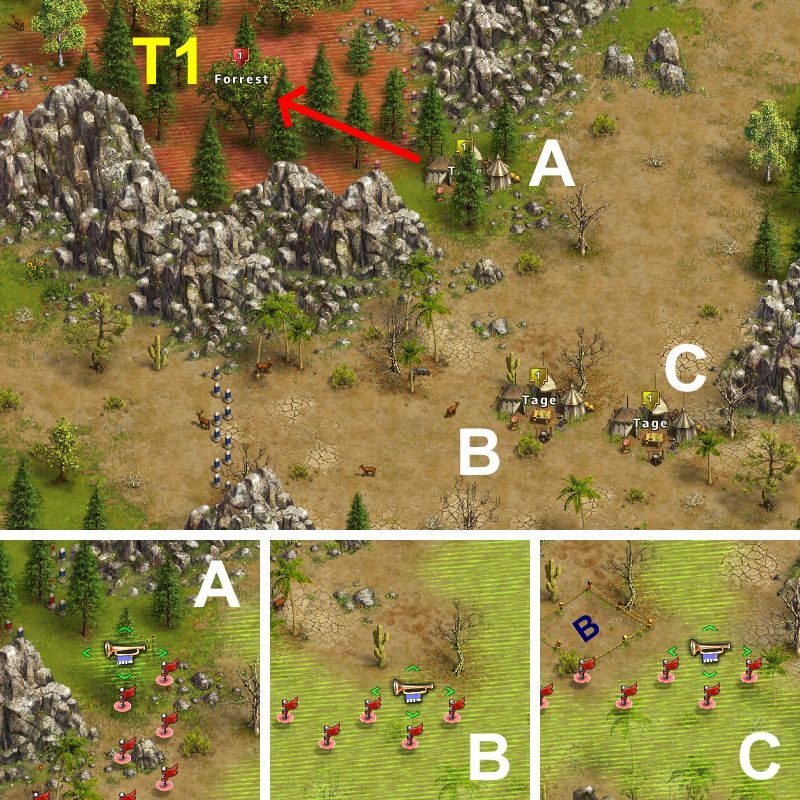
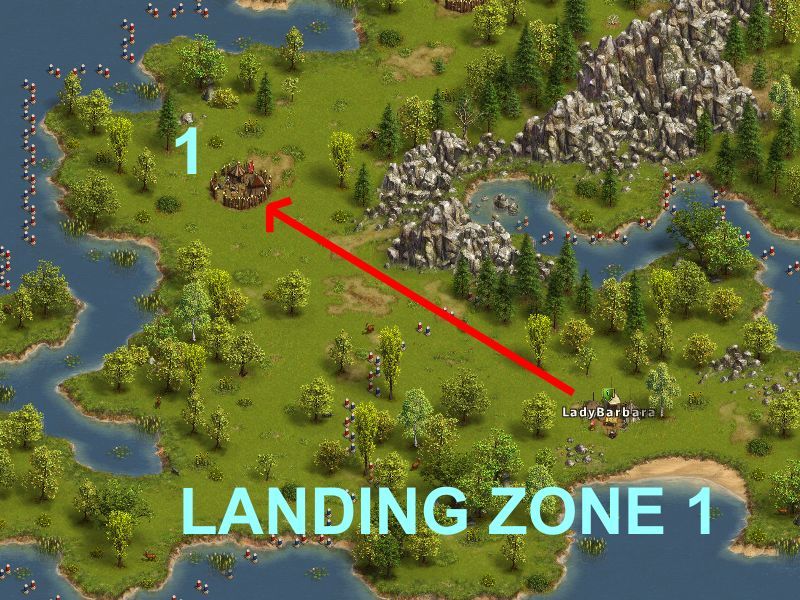
Garrison Position G1
Most of your generals will have arrived in Landing Zone 1 (click the map above to see where it is).
Move two (one if you have cannoneers) fast generals and two normal generals to garrison position G1:
Position A: NORMAL general
Position B: NORMAL general
Position C: BATTLE HARDENED general or ANY general or VETERAN general
Position D: VETERAN general or BATTLE HARDENED general
Legend: block REGULAR general VETERAN general MAJOR general MMA general
Camp 1) 50 Thugs, 50 Guard Dogs, 50 Rangers MASTER of Martial Arts: [75R 85S (54R - 64R - 75R)] MASTER of Martial Arts: [75R 1E 57K (54R - 64R - 75R)] MAJOR general89R, 1ES, 180K (89R)
Camp 2) 50 Roughnecks, 100 Rangers MAJOR general: [34R 1E 225C 10K (23R - 29R - 34R)] MASTER of Martial Arts: [36R 1S 164C 19LB (23R - 29R - 36R)] MASTER of Martial Arts: [35R 1S 174C 10XB (22R - 28R - 35R)] MASTER of Martial Arts: [34R 1E 176C 9K (21R - 28R - 34R)]
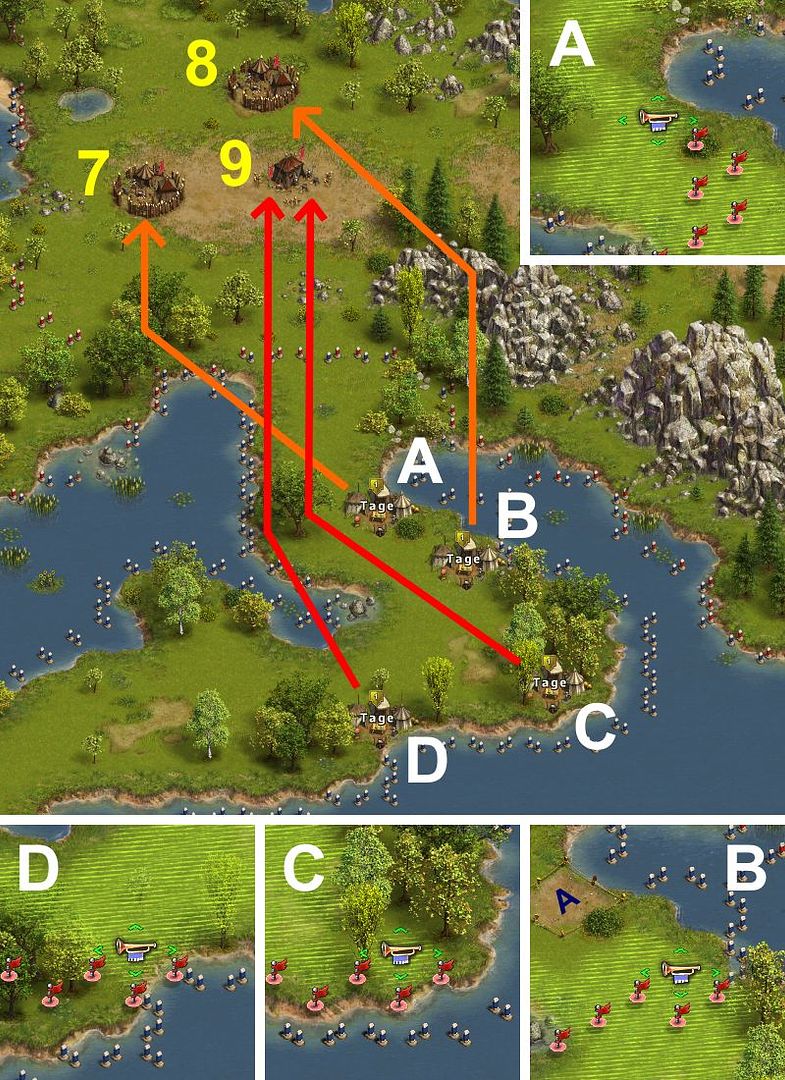
Garrison Position G1 (BLOCK)
This first block is tight with the garrison placements, so make sure no two generals march out at the same time.
Send the first three generals after each other, but wait for the previous one to appear before sending the next one.
No need for general D.
From A to Camp 3) 100 Roughnecks, 50 Guard Dogs BLOCKING NORMAL general: [102E (-)]
Send general B as soon as general A has appeared outside his garrison: From B to Camp 4) 50 Roughnecks, 60 Guard Dogs, 50 Rangers BLOCKING NORMAL general: [6E 193C (-)] {160 - 260 seconds of fighting}
If you have cannoneers, or if you have a master of martial arts, no general D is needed. Camp 5 can be killed in one wave.
From C to Camp 5) 99 Roughnecks, 100 Guard Dogs, 1 One-Eyed Bert MASTER of Martial Arts: [120R 2E 98K (95R - 110R - 120R)] MAJOR general: [120R 2E 148K (88R - 110R - 120R)]
From B to Camp 8) 120 Roughnecks, 50 Guard Dogs BLOCKING NORMAL general: [44S 81E (-)] {180 - 300 seconds of fighting}
you may opt to kill camp 9 in one wave:
From C to Camp 9) 80 Roughnecks, 50 Guard Dogs, 60 Rangers, 1 One-Eyed Bert MASTER of Martial Arts: [126R 1S 1E 92K (97R - 112R - 126R 1S)] {30 seconds of fighting}
or the cheaper version with MMA suicide: From C to Camp 9) 80 Roughnecks, 50 Guard Dogs, 60 Rangers, 1 One-Eyed Bert MASTER of Martial Arts: [1R (1R)] {10 seconds of fighting}
From D to Camp 9) 80 Roughnecks, 35-40 Rangers, 1 One-Eyed Bert VETERAN general: [71R 1S 1E 109C 67XB 1K (52R - 63R - 71R 1S)] {30 seconds of fighting} MAJOR general: [70R 1S 1E 131C 66XB 1K (50R - 61R - 70R 1S)] {30 seconds of fighting}
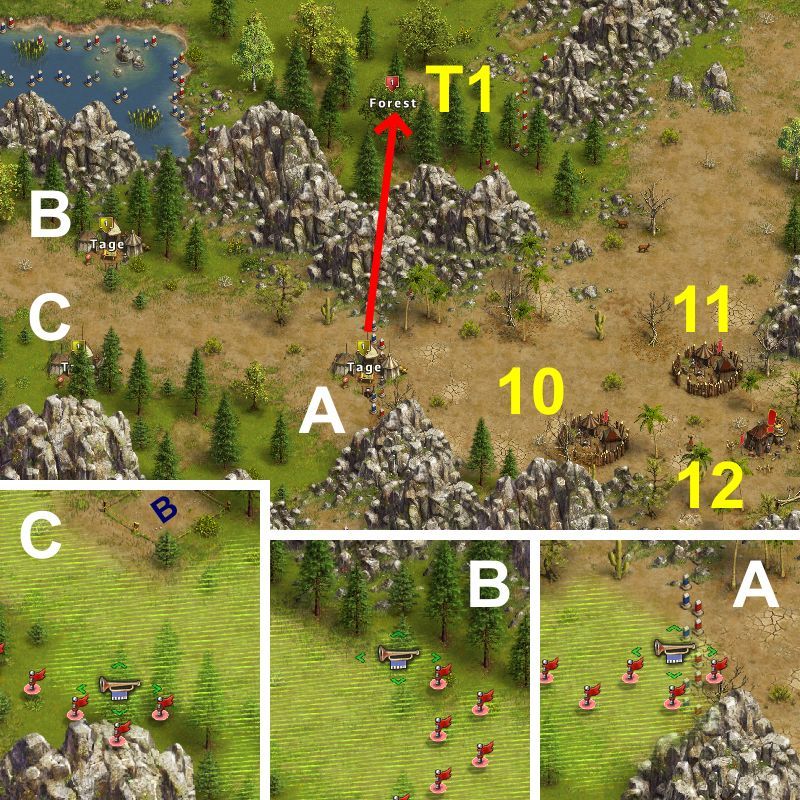
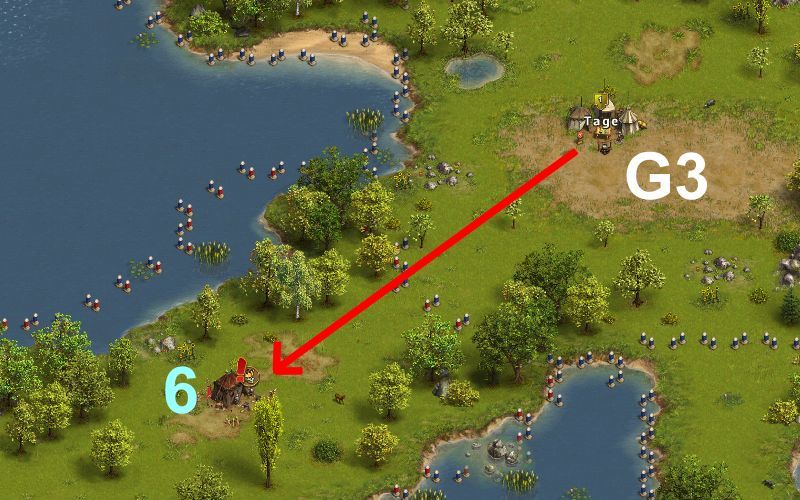
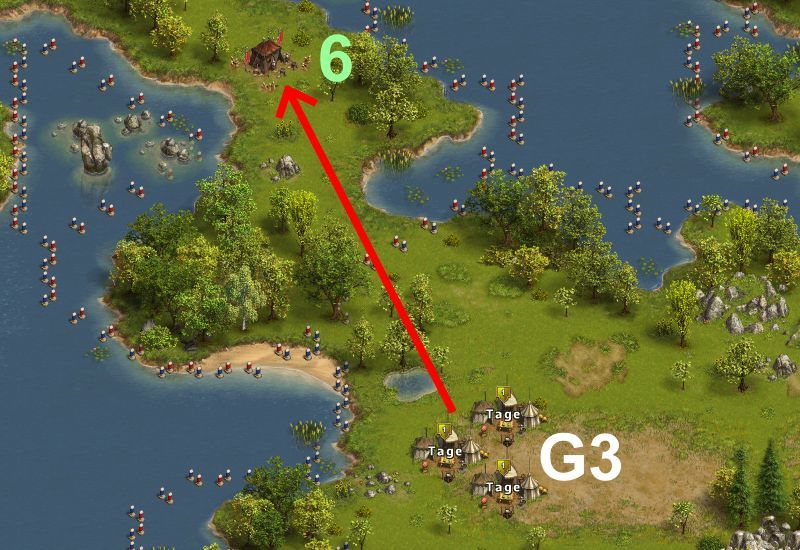
Garrison Position G3
Move at least one general to garrison position G3:
Attack the northern N° 6 leader camp now. Do not attack the southern camp N° 6 yet.
If you're playing alone, save the southern camp 6 till after the lootspot has been sold (see after garrison position G6 below):
From B to Camp 15) 155 Roughnecks, 40 Guard Dogs, 1 Metal Tooth MASTER of Martial Arts: [21R 80S 1E 118K (21R 67S - 21R 73S - 21R 80S)] {30 seconds of fighting}
Garrison Position G4
[/LIST]
Trap T1) 100 Wolves ANY general: [5R 100S (5R)] MASTER of Martial Arts: [5R 55S (5R)]
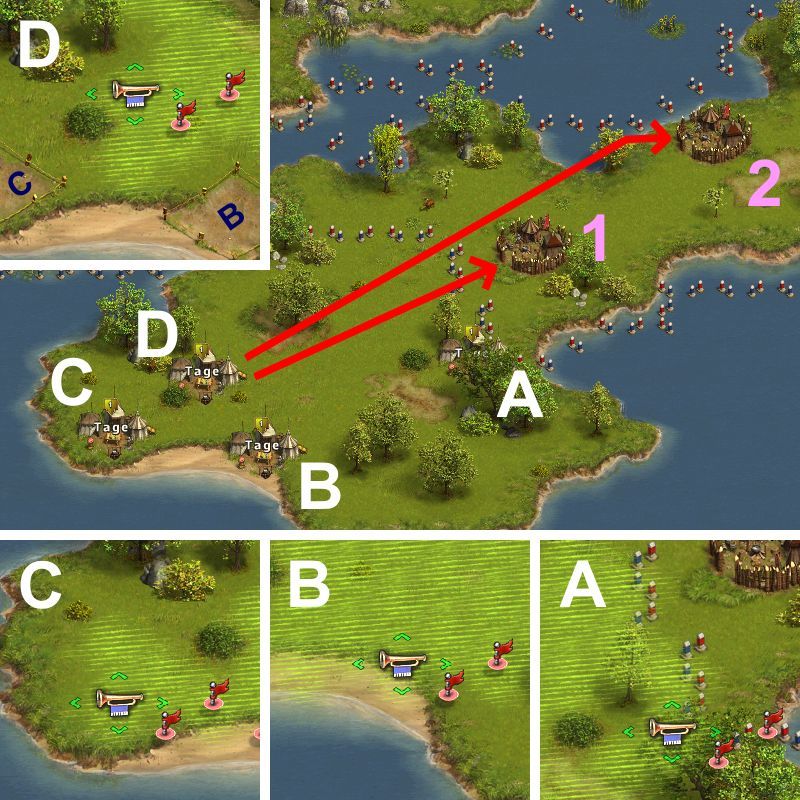
Garrison Position G4 (BLOCK)
send the generals right after each other, general C is not needed:
From B to Camp 15) 155 Roughnecks, 40 Guard Dogs, 1 Metal Tooth MASTER of Martial Arts: [21R 80S 1E 118K (21R 67S - 21R 73S - 21R 80S)] {30 seconds of fighting}
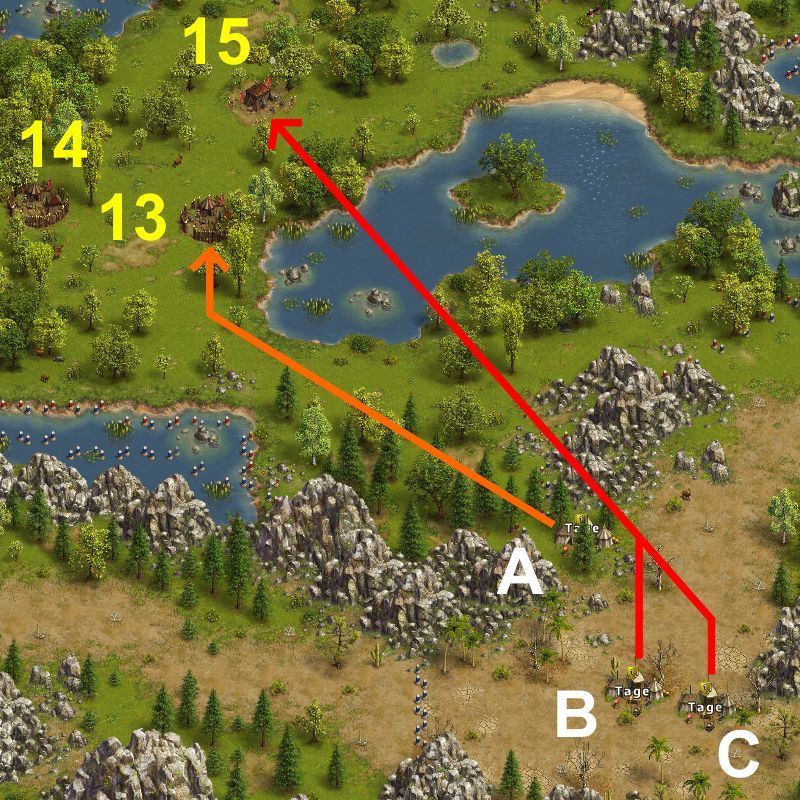
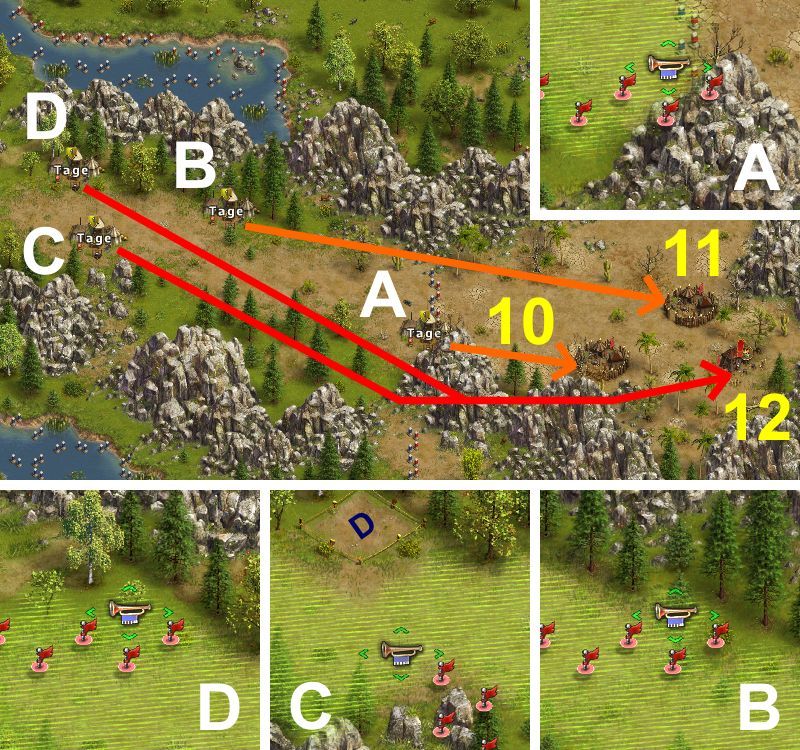
Garrison Position G5 (BLOCK)
Send the generals right after each other, no need for general D:
From B to Camp 11) 100 Roughnecks, 100 Guard Dogs BLOCKING NORMAL general: [117E (-)] {180 - 300 seconds of fighting}
From C to Camp 12) 90 Roughnecks, 100 Guard Dogs, 1 Skunk, 1 One-Eyed Bert VETERAN general: [118R 2E 130K (90R - 105R - 118R)] {30 seconds of fighting} MAJOR general: [117R 2E 151K (89R - 104R - 117R)] {30 seconds of fighting} MASTER of Martial Arts: [118R 2E 100K (88R - 105R - 118R)] {30 seconds of fighting}
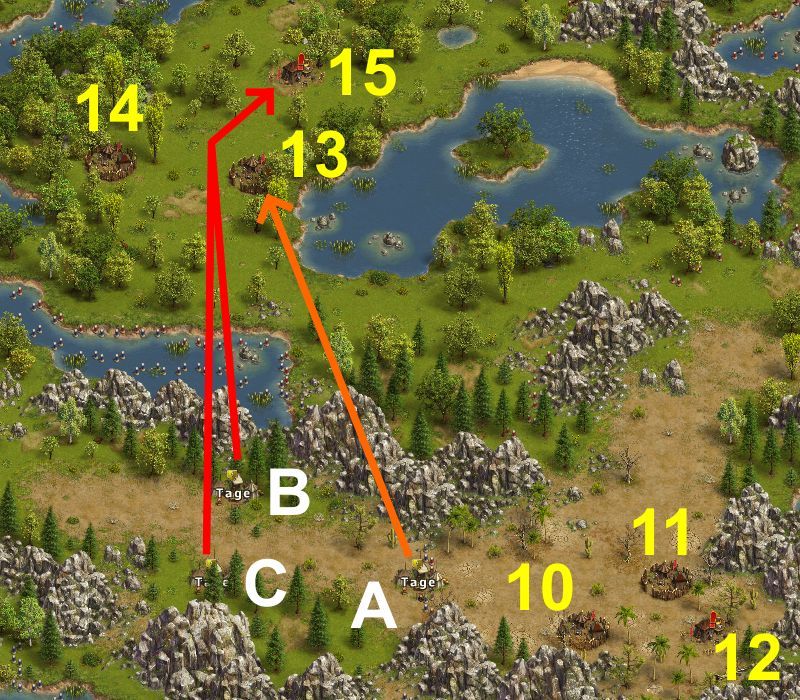
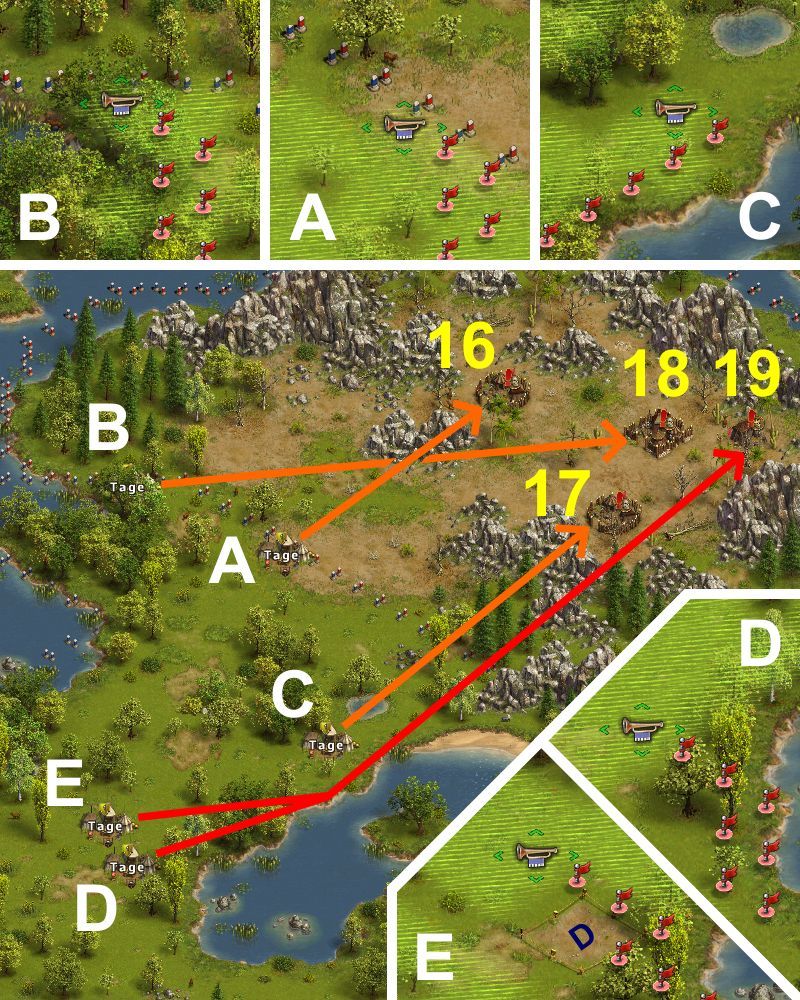
Garrison Position G6 (BLOCK )
Thanks to the 1R block on camp 16, the block on camp 18 can be sent without being intercepted by camp 17. Thus the veterans going for camp 19 can be sent to arrive at the red area of influence of camp 17 just after that block has started to fight.
Do not place any general north of the little lake at general C position.
Send the generals right after each other:
From A to Camp 16) 40 Guard Dogs, 80 Roughnecks, 80 Rangers BLOCKING NORMAL general: [1R (1R)] {20 seconds of fighting}
From C to Camp 17) 80 Guard Dogs, 80 Roughnecks, 40 Rangers BLOCKING NORMAL general: [39S 19E 137C (-)]
From D to Camp 19) 100 Scavengers, 50 Rangers, 1 Wild Mary, 2 Skunks w1:MASTER of Martial Arts: [125R 65C (125R 65C)] {30-40 seconds of fighting}
From E to Camp 19) 10-40 Scavengers, 1 Wild Mary, 2 Skunks w2:VETERAN general: [67M 20S 1E 39C 123K (51M - 67M 2S - 67M 20S)] {60 seconds of fighting} w2:MAJOR general: [84M 2E 62C 122K (51M - 69M - 84M)] {60 seconds of fighting}
Lootspot and back to Garrison Position G3
All blocks are now behind us, and if you've played this alone, now is the time to invite two friends (lootspot buyers).
If invited at this stage, your lootspot buyers will each need to bring 1C (one cavalry) to kill one guard dog.
Provided you still haven't killed camp 6, your friends will have a short march to kill one guard dog:
For your final kill, move at least one general back to garrison position G3:
Attack the southern N° 6 leader camp after you have verified that both lootspot buyers have killed at least one guard dog:
Ubisoft uses cookies to ensure that you get the best experience on our websites. By continuing to use this site you agree to accept these cookies. More info on our privacy.


 Reply With Quote


 Sector 1:


 [ SIZE="3"]Garrison Position G5[/SIZE]