Sons of the Little Tailor


 required:
 1925R, 1053B, 71LB, 175M, 306C, 60XB , 154S, 326ES, 216K
max losses: 1874R, 1052B, 71LB, 133M, 27S
Minimal General Requirements
4 Normal General
1 Fast General, Bhg, Grim, etc...
2 Veteran General
Recommend General Requirements
Minimal General Requirements and...
+1 Normal General/Fast General. Normal General can used in sector 6, C0 First wave.
No blocking required.
+1 Fast General. Your first fast general attack at sector 5, C4 First wave. Second time you need fast general is at sector 8, C3 First wave. If you are fast enough, your first fast general is still unconscious from first attack and you may wait some time.
Blocking required.
This is a 99% mix of
Nighteye`s and
Athlan`s guides. All credits go to them. If for whatever reason you find yourself in a rough spot, use them for ideas with confidence.
During this adventure try saving your slow generals (use for wave 1 sacrifice fast generals as much as possible), enough triple or quad blocks to need the slow generals.
In the interess of having clear pictures, for most of them I gave up on drawing the lines, instead I used color codes: camp 1 blue hits on camp 1 red, camp 2 blue on camp 2 red and so on.
Camps 0 and 00 are to be destroyed before any blocks.
Sector 7 block is the most... problematic and it is to be considered risky. Use with caution.
Important Tip.
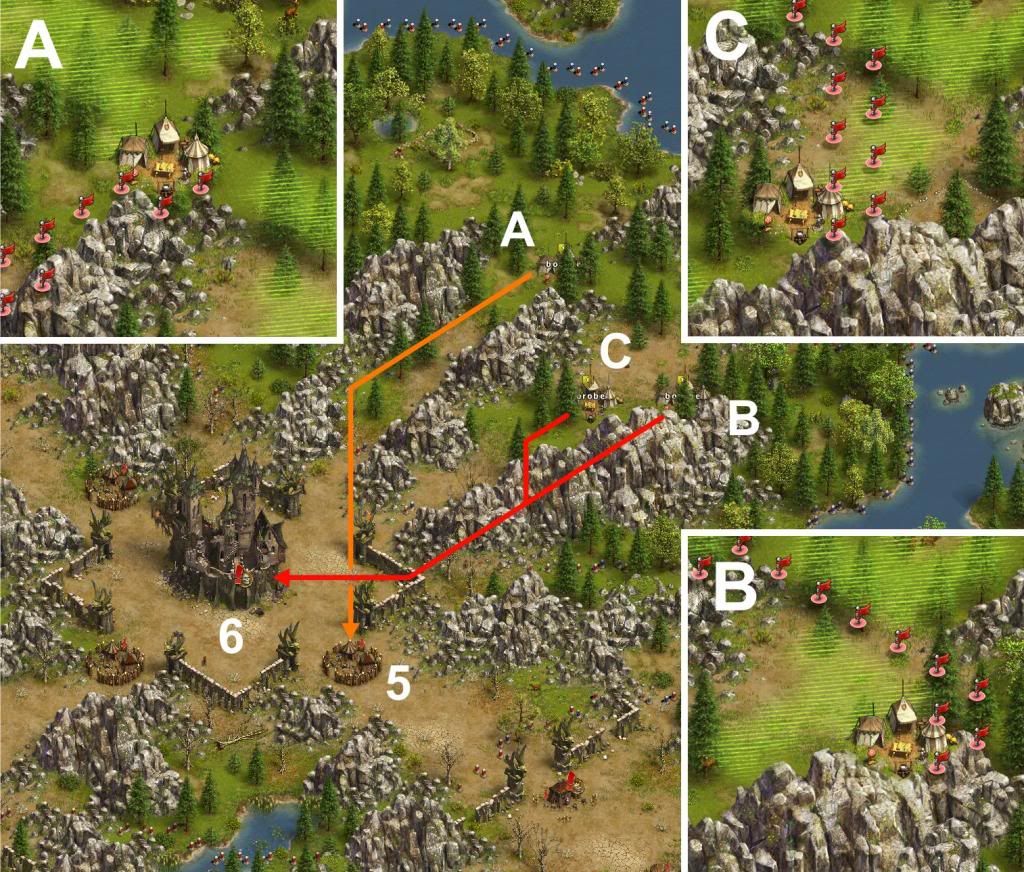
You don't need to play as guide ordered. After sector 1 you can take 3 different path. You can attack sector 2, Sector 5 or Sector 7. Just scroll down to right Sector. Also if you want attack different Sectors same time (lets say 3), put 3 different tabs to your browers. First tab shows Sector 2, second tab shows Sector 5 and third Sector 7. Well ofcourse this is only possible if you have enough generals and troops. You also can use this in other Adventures. My favorite is Outlaws, where I usually attack 2 different route at the same time  Sector 1:

General Placement.
1. Normal.Block. 39M, 120ES, 40C
2. Normal.Block. 96S, 98C
3. Normal.Block. 1M, 34ES, 165C
4. Normal.Block. 103ES, 3C
5. Veteran. 140R, 1ES, 109K (140R loss) OR 84M, 1ES, 165K (84M loss)
 c1:
c1: 180 rough, 20 ranger
block: 39M, 120ES, 40C {7-15 rounds}
Send general 2, after general 1 has arrived as following image shows
 c2:
c2: 130 rough, 70 ranger
block: 96S, 98C {7-12 rounds}
c3: 90 rough, 110 ranger
block: 1M, 34ES, 165C {7-11 rounds}
c4: 120 dogs, 80 roughneck
block: 103ES, 3C {8-13 rounds}
c5 leader: 80 dogs, 119 rough, 1 OneEyed Bert
140R, 1ES, 109K (140R) 2 rounds
or
84M, 1ES, 165K (84M) 2 rounds
Sector 2:

General Placement.
1. Normal. Block. 96S, 98C
2. Normal. Block. 132ES, 68C
3. Veteran. 190B, 60XB (loss 190B)

hits in order to corresponding camps
c1: 50 bear, 40 wolfpack leaders
block: 96S, 98C
c2: 110 bear
block: 132ES, 68C
c3 leader: 60 bear, 40 fox, 30 giant
veteran: 190B, 60XB (190B)
Sector 3:

General Placement.
1. Normal.Block. 98ES, 98C
2. Veteran. 175B, 30LB, 45XB (loss 175B, 30LB)
 c1:
c1: 20 boar, 80 bear
block via attacking c2: 98ES, 98C
c2 leader: 70 bear, 40 fox, 20 giant
175B, 30LB, 45XB (175B, 30LB)
Sector 4:

General Placement.
1. Normal.Block. 98ES, 98C
2. Veteran. 114M, 1ES, 135K (114M)
Remember to first kill camp 0, before attempting to block
 c0:
c0: 40 bear, 70 wolfpack leaders
106R, 33C, 111K (106R)
c1: 90 wolf, 60 wolfpack leaders
block: 98ES, 102C
c2 leader: 90 fox, 20 giant, 1 giant bear
114M, 1ES, 135K (114M)
Sector 5:

General Placement.
1. Normal.Block. 198ES
2. Normal.Block. 1M, 79ES, 120C
3. Normal.Block. 1R, 154S, 45C
4. Fast General. 158B (loss 158B)
5. Veteran. 129R, 1ES, 120K (loss 129R)
Remember to first kill camp 0, before attempting to block
 c0:
c0: 110 boar, 40 wolf
115R, 75B, 60K (115R, 75B)
c1 = trap : 90 bear, 60 fox, 1 lying goat
block: 198ES
c2: 70 bear, 40 fox
block: 1M, 79ES, 120C
Block camp 3 indirectly by attacking c4 and getting intercepted:
c3: 140 boar
block via c4: 1R, 154S, 45C
c4: 70 bear, 50 fox, 20 giant
w1: 158B (158B)--- use fast gen
w2: 129R, 1ES, 120K (129R)
Recommend. Attack Sector 7 first, before attacking Sector 6, if you have only 2 Veteran Generals.
Sector 6:

General Placement.
1. Normal.Block. 146ES, 54C
2. Normal.Block. 4S, 179ES, 17K OR 16S, 164ES, 18K
3. Veteran. General. 209B, 41LB (loss 209B, 41LB)
4. Veteran General. 85R, 1S, 1ES, 163K (loss 85R)
Remember to first kill camp 0 and 00 before attempting to block
 c0:
c0: 120 boar, 70 wolf
w1: 160B (160B)
w2: 142R, 1ES, 107K (142R)
c00: 90 boar, 40 bear
146R, 1ES, 103K (146R)
c1: 90 bear, 50 wolf
block: 146ES, 54C {8-14 rounds, most~9}
c2: 190 boar
block: 4S, 179ES, 17K {4-7 rounds, most~5}
or
block: 16S, 164ES, 18K {5-7 rounds}
c3 leader: 70 bear, 90 wolfpack leaders, 1 Giant Gogor (Giant Leader II)
w1: 209B, 41LB (209B, 41LB) --- 2 rounds, veteran rests
w2: 85R, 1S, 1ES, 163K (85R) --- 4 rounds
Sector 7:

General Placement.
1. Normal.Block. 1R, 114ES, 85C
2. Normal.Block. 20ES, 180C
3. Veteran General. 100R, 85B, 65K (loss 100R, 85B)
4. Normal.Block. 120S, 57ES
5. Veteran General. 98R, 1ES, 151K (loss 98R)
Important. Block 1 is extremely dangerous and can fail. Send generals immediately one after another. Still I recommend to kill that camp than try to block it.

Block can be extremely tight on camp 1, it started countdown before veteran entering leader, but he managed to finish just 1 line ahead, so take your heart pill before doing it

ALL c1-c5 hits leave one after the other. During this set of hits camp c3 will go down (intended). This is done so that c4 has a clear path to his target without being intercepted by camp 3.
Take in consideration Athlan`s way of clearing this sector (numbered in his guide as s5):
http://settlers.athlan.net/sons/s5.png
c1: 80 bear, 50 wolf
block: 1R, 114ES, 85C
or to kill it 127R, 70B, 53K (loss )
c2: 70 wolfpack, 30 fox
block: 20ES, 180C
c3: 110 boar, 40 wolfpack
100R, 85B, 65K (100R, 85B)
c4: 40 boar, 60 fox, 50 giant
block: 120S, 57ES
c5 leader: 100 dogs, 100 roughneck
98R, 1ES, 151K (98R)
Sector 8:

General Placement.
1. Normal.Block. 1R, 107ES, 85C
2. Normal.Block. 1M, 98ES, 95C
3. Fast General. 200R (200R) (loss 200R)
4. Veteran General. 107R, 1ES, 48C, 94K (loss 107R)
Remember to first kill camp 0 and 00 before attempting to block
 c0:
c0: 150 roughneck, 50 ranger
155R, 10S, 35C, 50K (155R)
c00: 20 dog, 180 roughneck
152R, 17S, 1ES, 80K (152R)
c1: 70 dogs, 130 roughneck
block: 1R, 107ES, 85C {8-14 rounds, most~9)
c2: 80 dogs, 120 roughneck
block: 1M, 98ES, 95C {7-13 rounds, most~9}
c3 leader: 30 dogs, 180 roughneck, 40 ranger
w1: 200R (200R) -- use fast gen, 2 rounds
w2: 107R, 1ES, 48C, 94K (107R) --- 2 rounds
Sector 9:

General Placement.
1. Normal.Block. 68ES, 132C
2. Normal.Block. 2M, 160ES, 35C
3. Veteran General. 110R, 19M, 1ES, 120K (loss 110R)
Remember to first kill camp 0 before attempting to block
 Invite lootspotters to send 1C to this camp:
c0:
Invite lootspotters to send 1C to this camp:
c0: 120 dogs, 80 ranger
250R (89R) --- use minimum 90R and rest of 160 can be M, S, ES or K in any combo you like (in case you`re short on R)
Time to wrap it up:
c1: 120 roughneck, 80 ranger
block: 68ES, 132C
c2: 200 roughneck
block: 2M, 160ES, 35C
c3 leader: 80 dogs, 119 roughneck, 1 Cudgel Claus (Thug Leader)
110R, 19M, 1ES, 120K (110R)


 Reply With Quote